Table of Contents
Expenses
Expenses made by reporting persons, which have not been paid by the company, are reflected in the expenses documents.
Expenses are located Finance→ DOCUMENTS → Expenses
1. Expenses buttons
1.1. Unconfirmed expense header buttons
- Close - closes the document, after checking if the document has unsaved changes
- New - opens new blank document. Checks in advance if the previous document contains unsaved changes.
- Copy - makes a copy of the document. It means new document is created, where most fields are filled in as in the source document (range of copying depends on the
System setting - Document copy selection) - Confirm - confirms document if save button is pressed after confirm button. As a result, a transaction related to the purchase invoice is automatically created
- Save - saves the document
- Delete - deletes unconfirmed document
- Mail - sends a printout of the expense by e-mail. By right-clicking you can choose between existing printouts
- Print - prints a printout. After pressing Print, a document preview is displayed briefly and the printer selection window opens. By right-clicking you can choose between existing printouts.
- Paperclip - allows to link attachments to document
- Forum - you can read and write about Directo, also can start own forums within company
- Expense due - creates a payment document filled with the data entered for the expense. The expense document number and comment are added as a comment on the payment
- Event - creates an event related to the expense. The number of related events is shown in the upper right corner of the document and can be opened from a link.
- Paste recipe - possible to place a previously created financial recipe
- Bulk insert - allows you to fill/place rows based on a table (mostly excel). In the bulk insert window there is a description of the columns order in Help section.
1.2. Confirmed expense buttons
2. Expense fields
2.1. Header fields
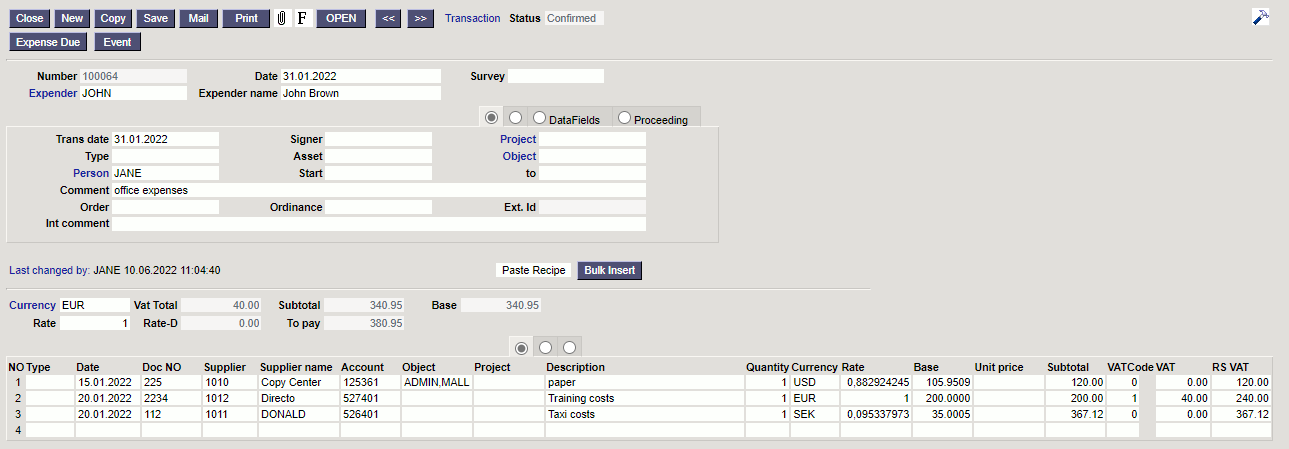
- Number - document number. When making new document range code is shown there. By double-clicking or with Ctrl+Enter the right range can be selected
- Date - document date
- Survey - at the moment for the customers working with optics. Can be selected by double-clicking or using Ctrl+Enter.
- Expender - expender`s user code. If a expender's account is entered on the personal card of the user indicated here, this account will be used as the credit account in transaction. If the account is not filled in on the expender's personal card, the account will be taken from
System settings > Expender's account. - Expender name - expender`s name, placed automatically by placing the user code in the expender field. Can be changed if necessary.
- Trans date - transaction is generated with this time after confirming the expense. Date entered in the date field is then automatically set.
- Signer - user code. It is possible to filter by signer in the expender report
- Project - project code. Used if you want to link to a specific project. When a project is entered, the document is reflected in the project reports.
- Type - appropriate type can be selected from
Finance settings > Expense typesby double-clicking or using Ctrl+Enter. - Asset - asset code (fixed asset or low value asset)
- Object - Object(s) or financial dimension(s) related to the expense.
- Person - user code of the user who created the expense document. Automatically filled in when creating a document. Possible to change.
- Start - date field. Calendar opens by right-click
- To - date field. Calendar opens by right-click
- Comment - free text field for comments
- Order - it is possible to link the expense to the order. If the expense is initiated from the order document, the order number is placed automatically, if the expense is created in another way, the order number can be written here. If the order number is saved to the expense, the related order can be opened directly from the expense document by clicking on the word Order.
- Ordinance -
- Ext. ID - free text field for external ID
- Int comment - free text field for internal comment
- Start mileage - number field
- End mileage - number field
- Total quantity - total quantities indicated on the expense lines
- Mileage total - total mileage
- Customer - can be selected by double-clicking or using Ctrl+Enter
- Customer name - placing a customer, displays the customer's name
- Status - option from
System settings > Expense statuses

System settings > Status of the expense to which the payment has been made is completed, the status of the expenditure is automatically changed to the status written in the setting after saving the payment created from the expenditure. It is a good idea to use this option later, for example, to exclude expenses paid out in the report of the spender.
- Country - location of the assignment
- City - city of assignment. Ctrl+Enter or a double click open texts with a “city” filter, from which can select previously saved cities. Texts can be entered in General settings > Texts
- Datafields - expense data types
- Proceeder - procedure or approval round means costs approval by a person.
- Role - signer role is determined.
- Comment - proceeder comment about the expenditure.
2.2. Row fields
- Type - appropriate type can be selected from
Finance settings > Expense typesby double-clicking or using Ctrl+Enter. - Date - row date
- Doc no - document number
- Supplier - it is possible to link the expense line to the supplier. Supplier is placed in the financial transaction row by confirming the expense. Possible to place by double click or with Ctrl+Enter.
- Supplier name - supplier name is automatically placed from the supplier card when placing the supplier
- Account - expense line debit account
- Object - objekt(id) or financial dimension(s) related to the expense
- Project - project identifier. Used if you want to link to a specific project. When entering a project, the document is reflected in the project reports
- Description - row explanation. When placing an account, the name of the account is placed here, can be overwritten. If you want to enter the account later or you need to change the account, but you don't want the explanation to be overwritten with the account name, “System settings > When placing a purchase invoice and expense account, the description is always taken from the account” should be set to No.
- Quantity - if only the subtotal is filled in the line, filling in the quantity is not important. If the unit price is entered, the quantity should also be entered. The quantity is placed on the financial entry.
- Currency - row currency
- Rate - row currency rate
- Base - unit price in base currency
- Unit price - unit price without VAT
- Subtotal - row subtotal without VAT
- VAT code - VAT code of the row
- VAT - VAT amount of the row
- RS Vat - row sum with Vat
- Customer - can be placed by double click or with Ctrl+Enter.
- Customer name - when placing a customer, displays the customer's name
- Route - by double click or with Ctrl+Enter can place route to the expense
- Mileage - total mileage
- Reason - text field
- Item - item code
- Resource - resource code
- Start - start date
- End - end date
- Sum-T - the sum paid by the expender, which is payable
- Rate-D - shows the difference between the sum paid by the expender and the payable sum according to the exchange rate of the expenditure header.
Example:
The employee purchased office supplies in the total amount of 100 USD on 01.04.2022. The line displays the exchange rate with the date the expense was entered. The sum actually paid by the expender is entered to the field Sum-T i.e. how much the employee paid at the exchange rate at the time of the expense.
- Asset - only at confirmed expense, the code of the new fixed asset or low value asset created from the expense. Fills in after the card created by using NEW FA or NEW LVA button is saved.
- NEW FA - only at confirmed expense, it is possible to start a new fixed asset card.
- NEW LVA - only at confirmed expense, it is possible to start a new low value asset card.
- Asset - only at confirmed expense. Can be placed with a double click, if you want to add an additional sum to fixed assets or low value assets through expense.
- ADD FA - only at confirmed expense, the button is active only if the asset code is filled in the previous field, to add fixed assets additional sum.
- ADD LVA - only at confirmed expense, the button is active only if the asset code is filled in the previous field, to add low value assets additional sum.
3. Linking to purchase invoice
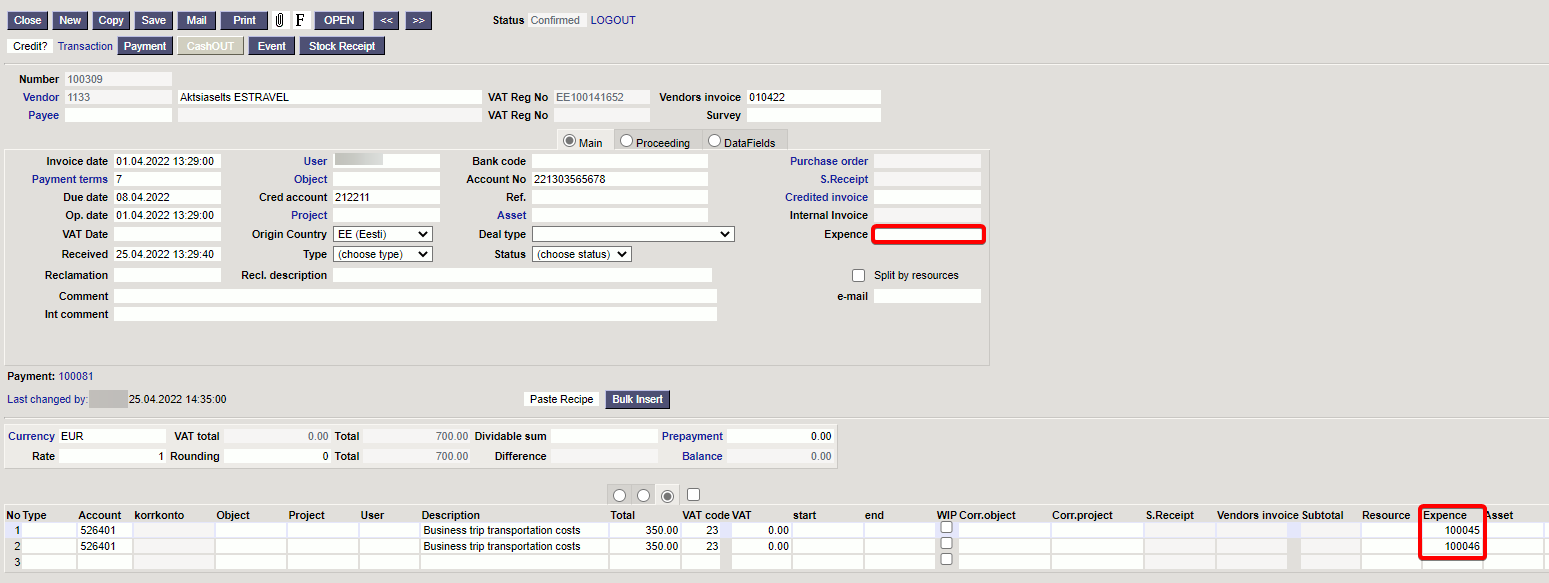
It is possible to link expenses and purchase invoices together (or one purchase invoice with several different expenses). For example, airline tickets purchased with one purchase invoice can be linked to several different persons business reports. Linking to purchase invoice is done in the header or rows of the purchase invoice (if you only want to link a specific row to some expense). Double-clicking on the Expense field of the purchase invoice (in the header or on the rows) opens the Expenses option and the option to place the expense on the document with which you want to link the purchase invoice. The expenses indicated on the rows are always preferred to those indicated in the header.
The result is reflected in the Expender's report if you check the box With purchase invoices.
4. Expense periodization
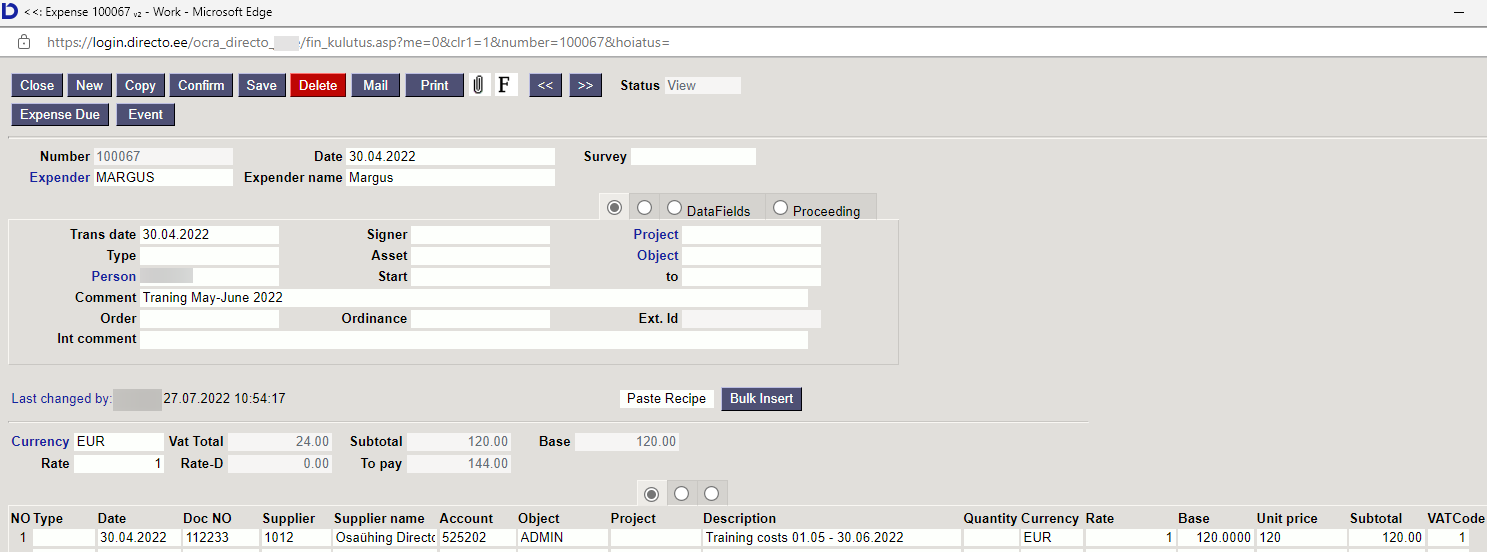
Expenses can be periodized in the same way as purchase and sales invoices, by writing the start and end date in the row to be periodized.
Necessary system settings:
Finance settings → Automatic Periodization → Expense
Finance settings → Periodized transaction description in the beginning of row and head description
Periodized, Periodiz. etc (text field)
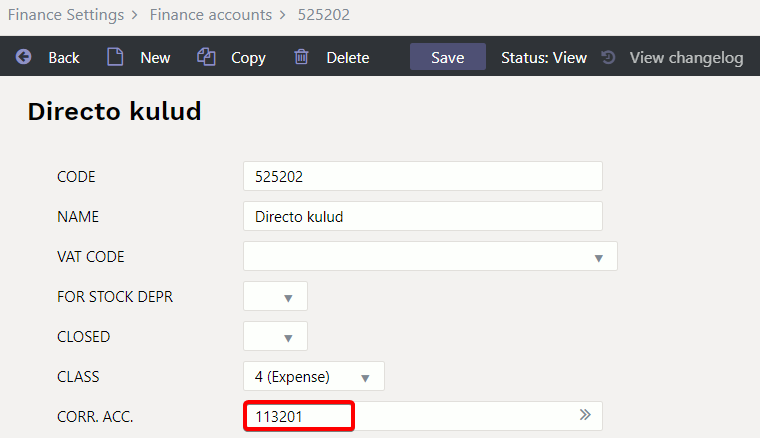
Finance settings → Finance account → CORR. ACC. → (balance account number)
Periodization
The start and end date of the expense to be periodized is marked on the expense row.
Finance transaction after confirmation
Periodization with an additional option - including VAT
If is used periodization with additional option VAT too, VAT code is added to each financial transaction row. It is not mandatory in Estonia and when using it should ensure that the VAT declaration is correctly set up.
And VAT too +
And VAT too -
5. Expense bulk import
It is possible to bulk import all the expense fields except the base - this field is only visible on the document.
If fields are not imported applies the following rules
- User - if not filled in, bulk import user code is imported by default
- Date - if not filled in, bulk import current date is imported
- Trans date - if not filled in is imported according to the following rules
- Date - when importing the date field, the same date is placed in the Trans date field
- Date - if the date field is not imported, bulk import current date is placed in the Trans date field
- Currency - EUR is imported by default
- Rate - 1 is imported by default
- Description - Account name is placed, if the field is not filled in.


