Table of Contents
VAT and VAT declaration
1. Introduction
Definitions, terms, abbreviations
- VAT- Value-Added Tax
- VAT report - Directo VAT report with the rows of the VAT declaration
- VAT declaration - national VAT declaration form (KMD in Estonia)
- VAT code - VAT identification number (VAT ID)
- VAT Act - Value-Added Tax Act (KMS in Estonia)
- Tax Board - Estonian Tax and Customs Board
2. VAT related settings
2.1. VAT codes
- determine the VAT amount and calculation on sales and purchase transactions
- affect the posting of VAT in the financial transactions of subsystems
- differentiate transactions for the preparation of the VAT declaration using codes
VAT codes can be configured here Settings > Finance settings > VAT codes:

2.2. System settings
System Settings, that are related to VAT:
Settings → System settings → Finance settings
- Automatic Periodization - options „Invoice, Purchase invoice, Expence, and VAT too“. Allows you to determine periodization by document type. „and VAT too“ adds a VAT code to the rows of the periodized transaction.
- VAT Code Distinctness - comma separated list. The codes listed here can be selected separately on the VAT code card. This is used when the transactions marked with this VAT code must be reported as special arrangements in state reports.
- VAT Code Extra Info - comma separated list. In Estonian conditions, there must definitely be a special arrangement here, because it may be needed for the correct generation of VAT return INF1. The choice of special arrangement is definitely marked if the given VAT code indicates operations performed on the basis of the special arrangement specified in the VAT Act. For example, 20% turnover on the basis of the special procedure provided in § 41 and 42 of the VAT Act in Estonia.
- VAT sum splitted in sales - this setting affects whether and based on what criteria the VAT amount is distributed on the transaction (sales side). Options:
- no
- by object+project
- by rows
- by object.
- VAT sum splitted in purchases - this setting affects whether and based on what criteria the VAT amount is distributed on the transaction (purchase side). Options:
- no
- by object+project
- by rows
- by object.
- Sale VAT object - the object listed here is used as the object of the sales invoice VAT row if
Settings > System settings > Finance settings > VAT sum splitted in salesis selected as “object+project” or “project” and the VAT code does not have an object. - Purchase VAT object - the object listed here is used as the object of the VAT row when entering the expenditure and purchase invoice, if
Settings > System settings > Finance settings > VAT sum splitted in purchasesis selected as “object+project” or “project” and the VAT code does not have an object.
Settings → System settings → Sale settings
- Invoice VAT is always total-sum -
- POS invoice shows sum w.o. VAT -
- Row sum with VAT rounding, how many places -
- Sale VAT - sales VAT account. It is used when creating a transaction if the corresponding account cannot be found in the field SALES VAT ACCOUNT for the VAT code.
- Fine VAT Code - VAT code, that goes to the fine row when making fine invoice.
Settings → System settings → Receipt settings
- Prepayment Receipt requires VAT code -
- no - confirms the prepayment row of the receipt document even without a VAT code
- yes - confirms the receipt document only if the VAT code is entered in the prepayment row
Settings → System settings → Purchase settings
- Purchase VAT - input VAT account. It is used when creating a transaction if the corresponding account cannot be found in the field PURCHASE VAT ACCOUNT for the VAT code.
- Purchase invoice VAT has a different date - periodized VAT account. Enables VAT to be calculated on the purchase invoice in a different time period than the purchase invoice.
2.3. Customer and supplier settings
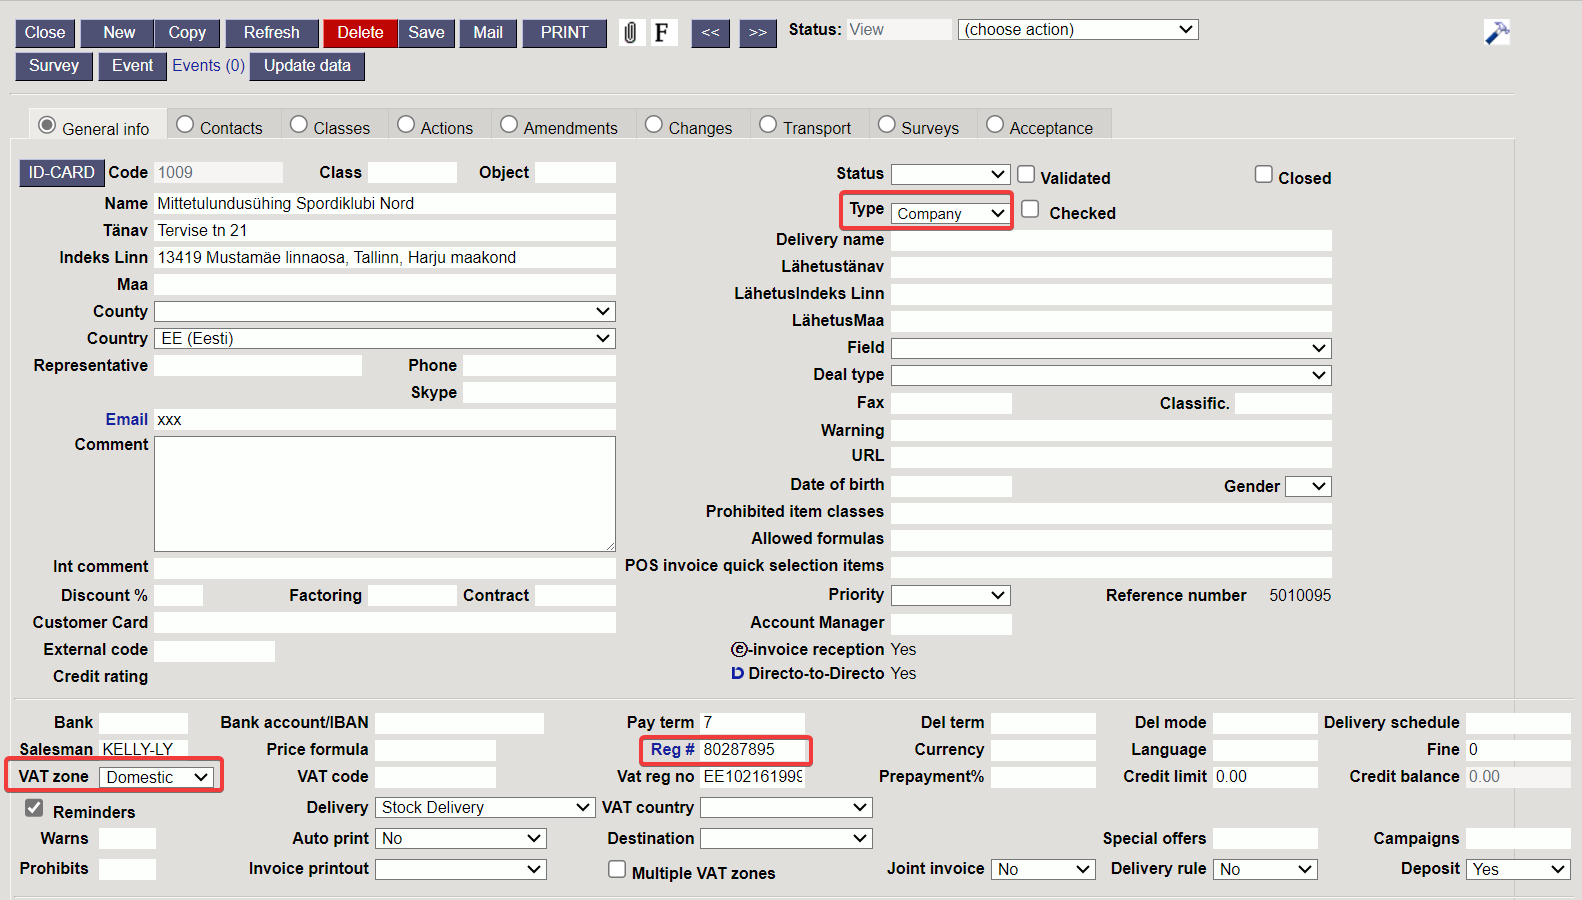
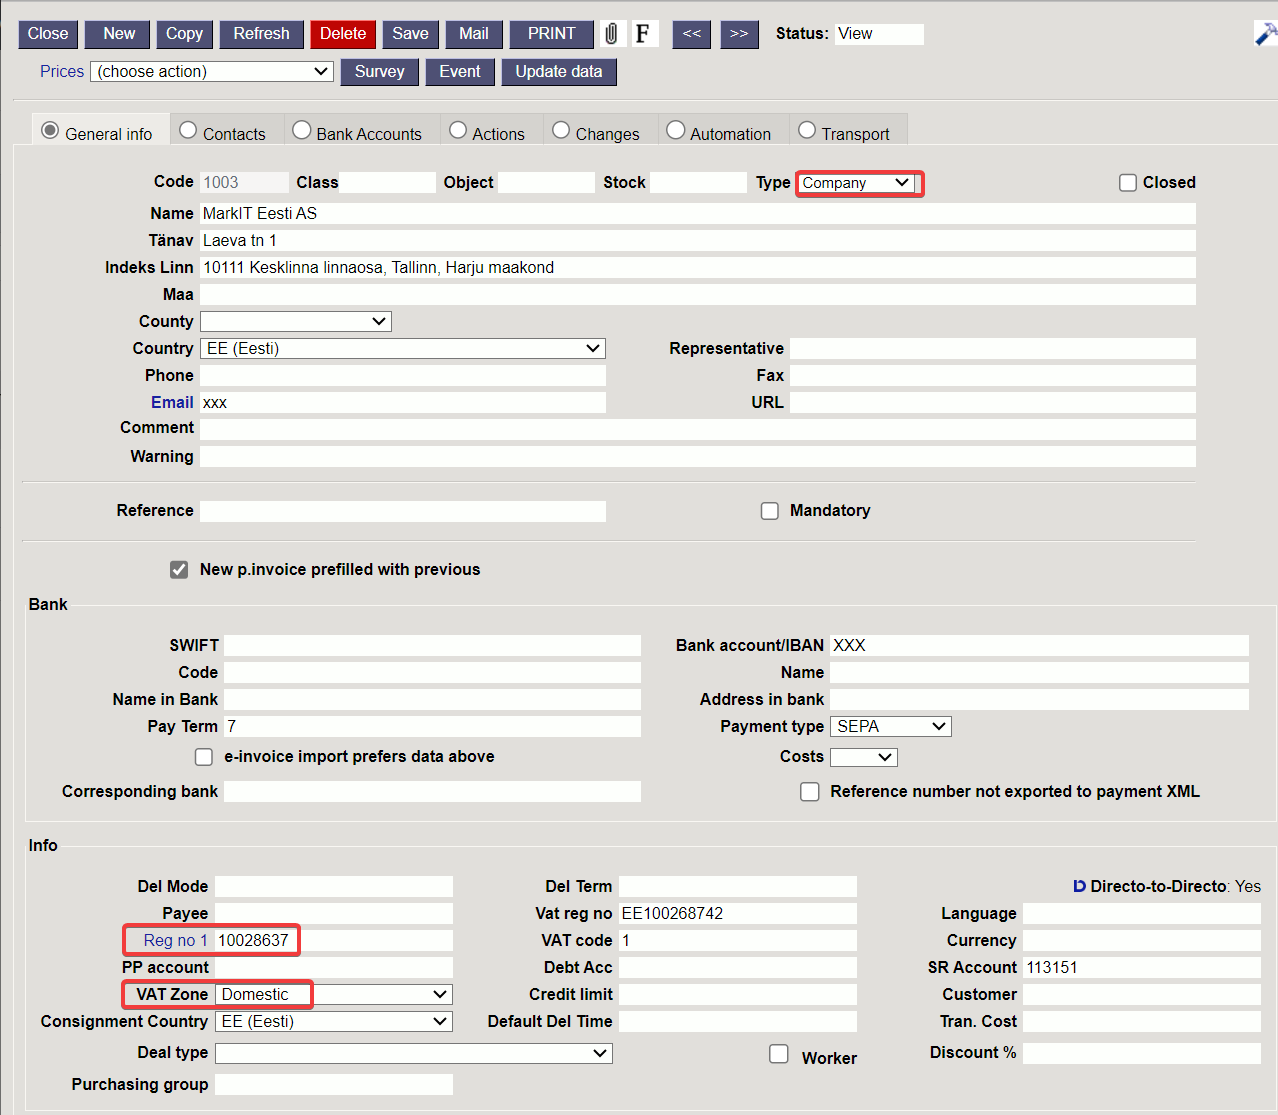
It is important to correctly fill in the following fields on the customer and supplier card for convenient VAT calculation (in addition to the usual fields such as company name, etc.):
- VAT zone - options: Domestic/Inside EU/Inside EU 2/Inside EU 3/Export/Concern. Determines the customer's or supplier's VAT zone and thereby the VAT code from the automatic selection article or article class. This is an important convenience setting, but also avoids mistakes when choosing a VAT code.
- Type - options: Company/Private/State institution. Required primarily for the correct preparation of the VAT return INF1 declaration to be sent to the Tax Board.


- Reg no - registration number or personal identification number. It is necessary to fill in correctly, especially for customers whose Type is “Company” and for suppliers with whom input VAT has been calculated. Required to submit VAT return INF1.
2.4. Setting up reverse charge settings
To set up reverse charge:
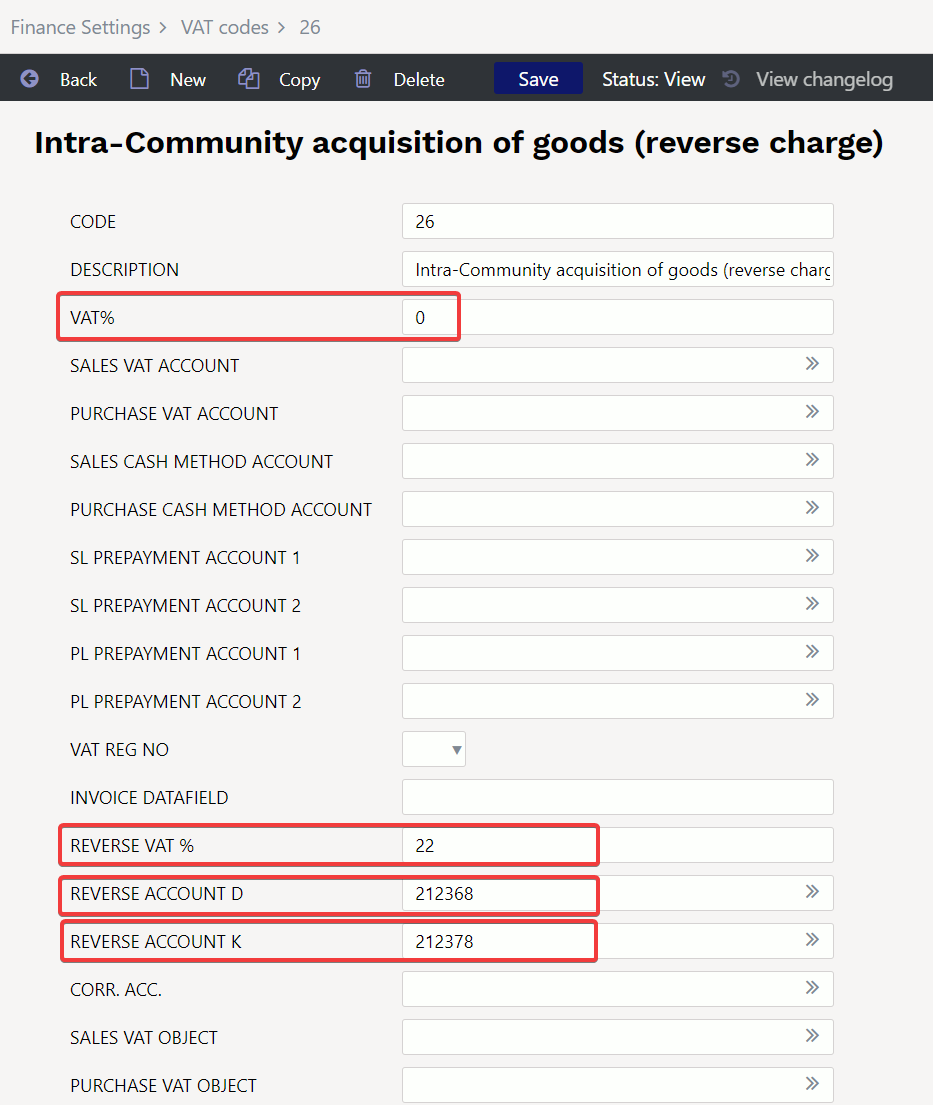
- create a new VAT code:
Settings → Finance settings → VAT codes. The created VAT code must be set as follows:
- VAT% - 0 The VAT rate is zero (no VAT is added to the transaction)
- REVERSE VAT% - for example 22 (in Estonia). The VAT percentage used to calculate the reverse charge (rate of the reverse charge) is written,
- REVERSE ACCOUNT D - account to which the calculated amount of reverse charge is calculated/transferred. This account should be included in the input VAT row of the VAT declaration.
- REVERSE ACCOUNT K - account to which the debit row amount of the reverse charge is balanced. It can be adjusted to the same account as REVERSE ACCOUNT D, because the VAT declaration cannot separate debit and credit. The total of the balance sheet does not artificially increase as a result of the interaction of REVERSE ACCOUNT D and REVERSE ACCOUNT K.
- The created reverse VAT code must be used in the rows of reverse VAT transactions of Purchase invoices. It does not increase the amount of the invoice to be paid, but the VAT adds additional rows to the purchase invoice transaction.
- In the VAT declaration, the range of expense and asset accounts, which may contain reverse VAT transactions, must also be adjusted to include the transactions taxed at 22%, and the selection must be limited to the created VAT code. In addition, the account shown in the REVERSE ACCOUNT D setup must be added to the input VAT row.
3. VAT report (VAT declaration)
3.1. Configuration of the VAT report (VAT declaration)
Configurations of the VAT report can be created and corrected: Settings → Finance settings → VAT declaration.
Clicking on a VAT declaration option opens a list of available report configurations:
3.2. Configuration of the main part of the VAT report
The configuration of a specific report opens when you click on its code.
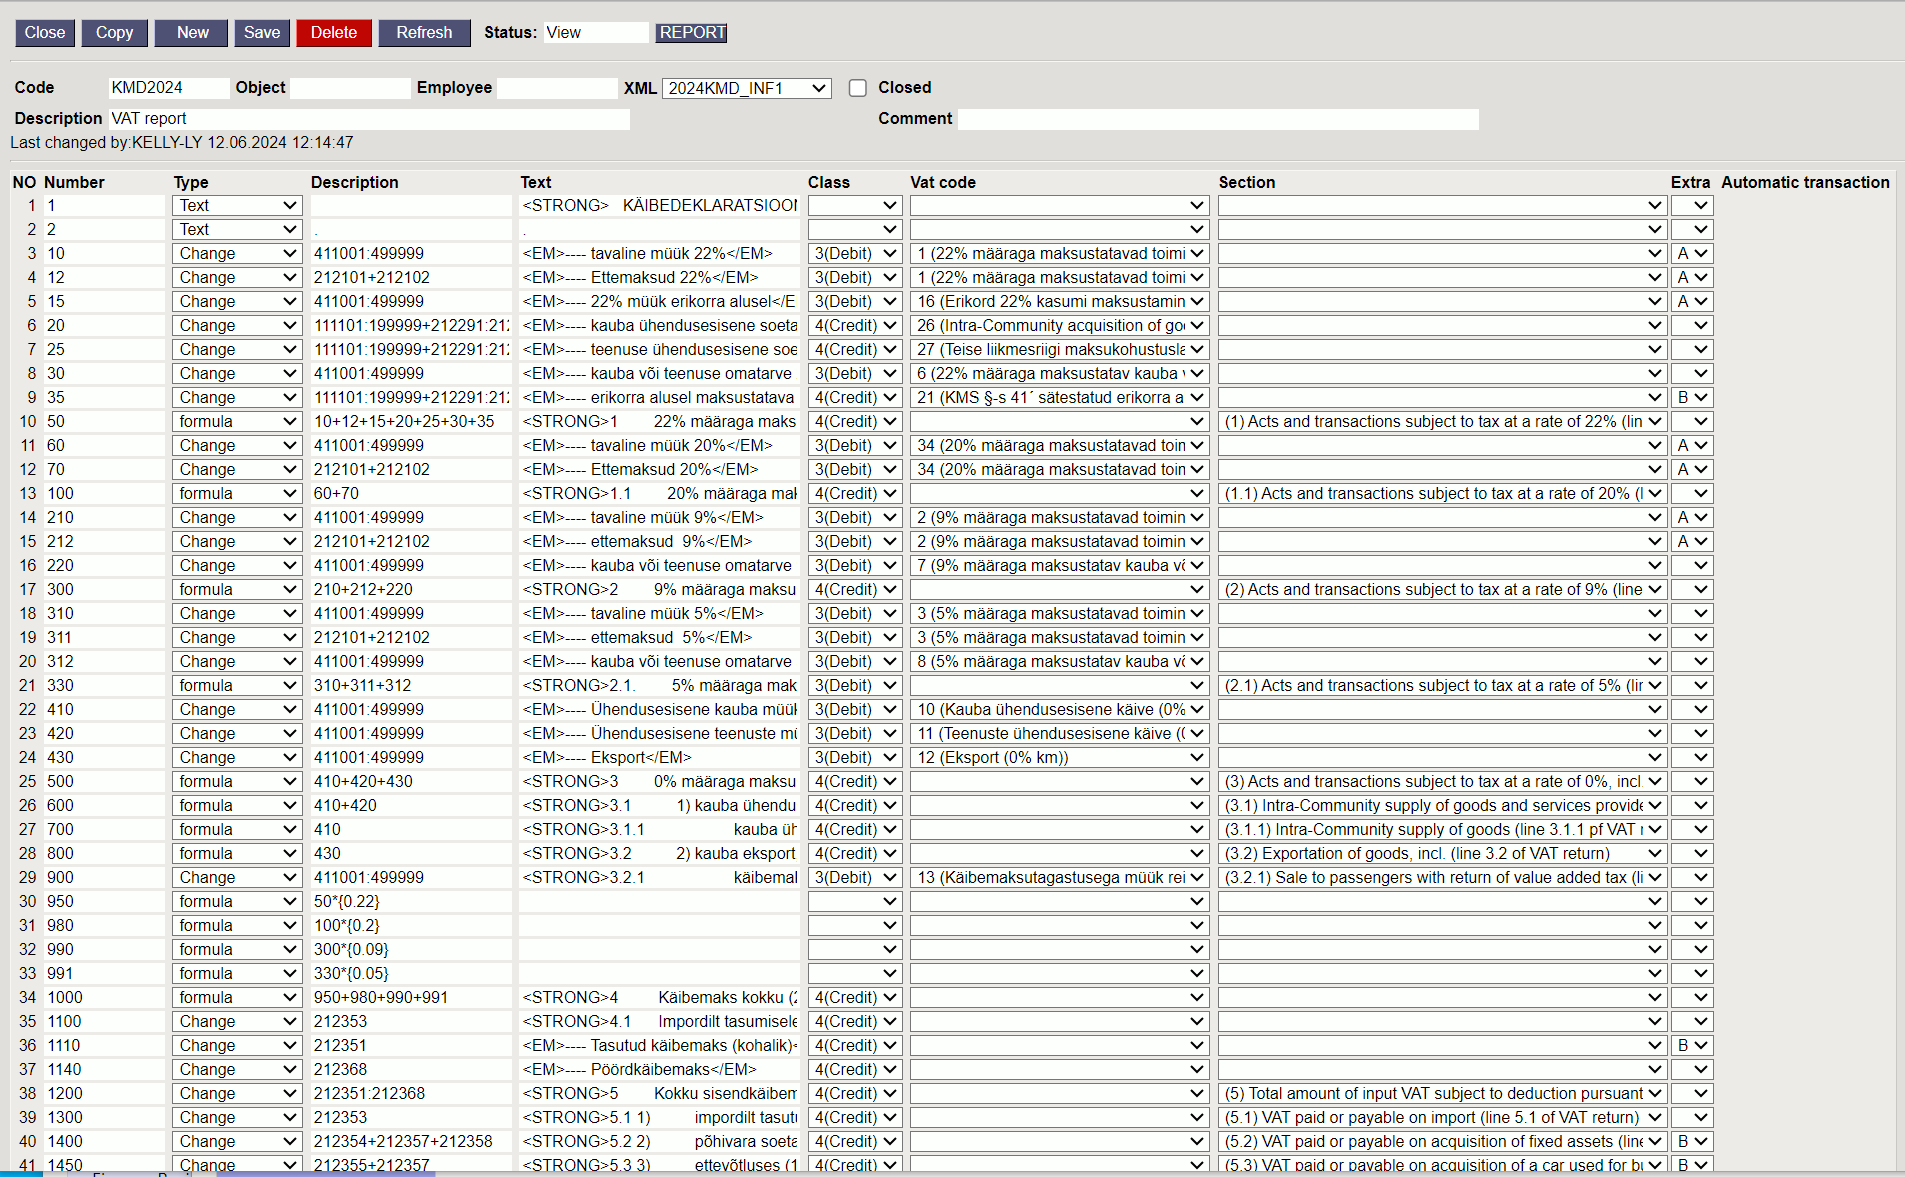
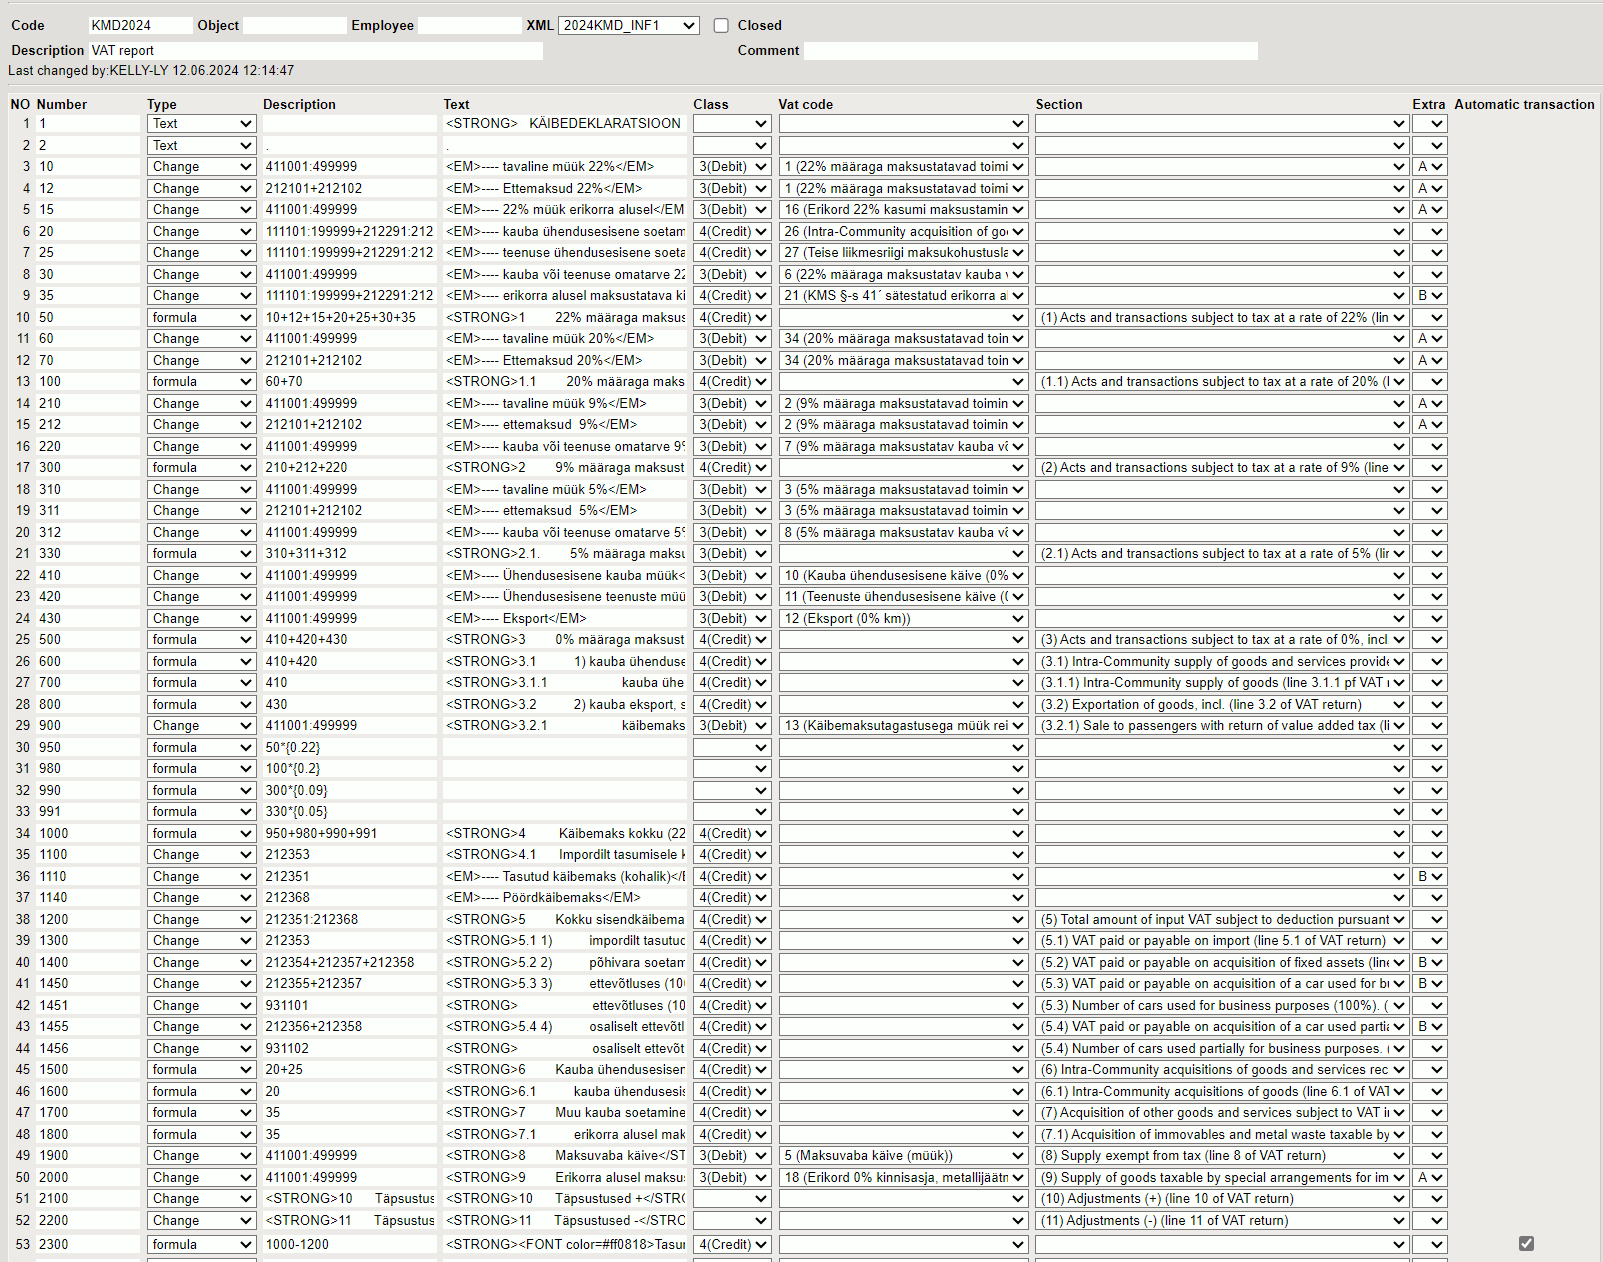
VAT report configuration window:
3.2.1. VAT report header fields
- Code - report code
- Description - explanation of the report given by the user.
- Object - to create object-specific usage restrictions. Used when several VAT declarations are prepared in one base.
- Employee - Used to create named usage restrictions.
- XML - Format selection for the VAT report file to be sent to the Tax Board (currently valid in Estonia as of 2024KMD_INF1).
- Closed - closed declaration, cannot be selected.
- Comment - text field
3.2.2. Fields in the VAT report rows
- NO - system-generated row number. Cannot be modified by the user.
- Number - Row number given by the user. Used to perform operations on row values in calculations. Rows are sorted by field value from smallest to largest. Leave spaces for row numbers: 10, 20, 30…. or 100, 200, 300…., to allow creating rows in between, if necessary, without having to renumber the existing rows and change the row numbers in the process.
- Type - the row type. Defines how to operate on the contents of the Description field
- Description - the functional content of the row is entered according to the row type. See Type.
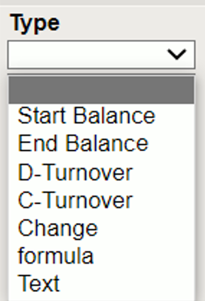
With the option Start Balance; End Balance; D-turnover; C-turnover; Change - the field Description can be used to create a list (not a mathematical operation) of accounts whose corresponding values are summed. To create the list, the following symbols can be used : (colon) to describe a range and + (plus) to add an individual account or an entire range to the previous one. For example: 10901:10908+10911:10918+10921+10931:10938.
Start Balance - uses the account's beginning balance for the report period.
End Balance - uses the account's closing balance for the report period.
D-turnover - uses the account's debit turnover for the report period.
C-turnover - uses the account's credit turnover for the report period..
Change - uses the account's turnover change (debit turnover minus credit turnover) similarly to an income statement.
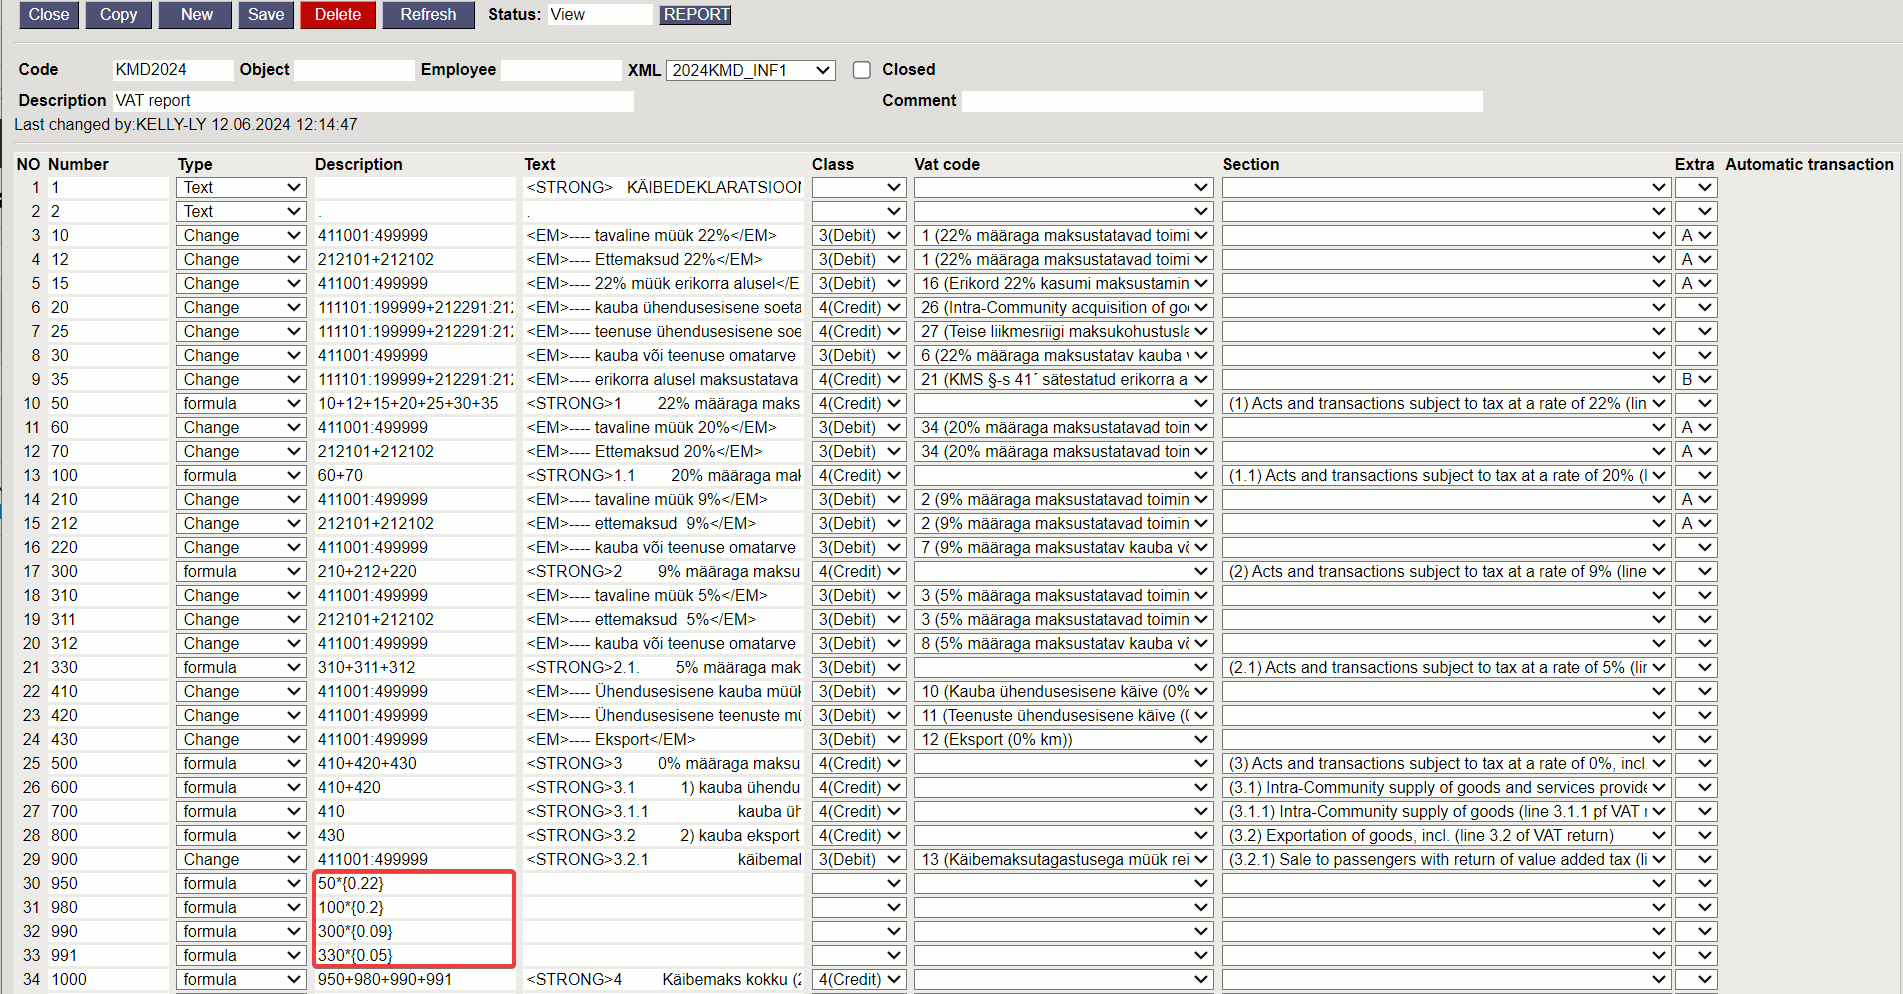
Formula - row allows you to configure the mathematical operation of the field Description with the values of the previous rows. Addition, subtraction, multiplication and division can be used. The factors of the operation are the numbers or constants of the previous rows. Row numbers are entered as normal numbers. A constant, i.e. a definite numerical value given by the user, is entered between braces { }. All operations are performed in order from left to right regardless of operation type. For example, in the case of the configuration 100+200/500*{0.21}, the results of rows no.100 and no.200 are first added, then the obtained result is divided by the result of row no.500, and the result of this operation is multiplied by the number 0.21. Brackets etc. cannot be used. If in an operation it is necessary to use the result of another operation, in which case we would use brackets in normal mathematics, then it makes sense to describe the operation in so-called brackets on the previous rows and use the number of that row, or the result, in the final operation.
If you want to calculate the totals of different VATs, you have to report them on different rows. For example, on one row (row 950) operation 50*{0.22}, on the next row (row 980) operation 100*{0.2}.

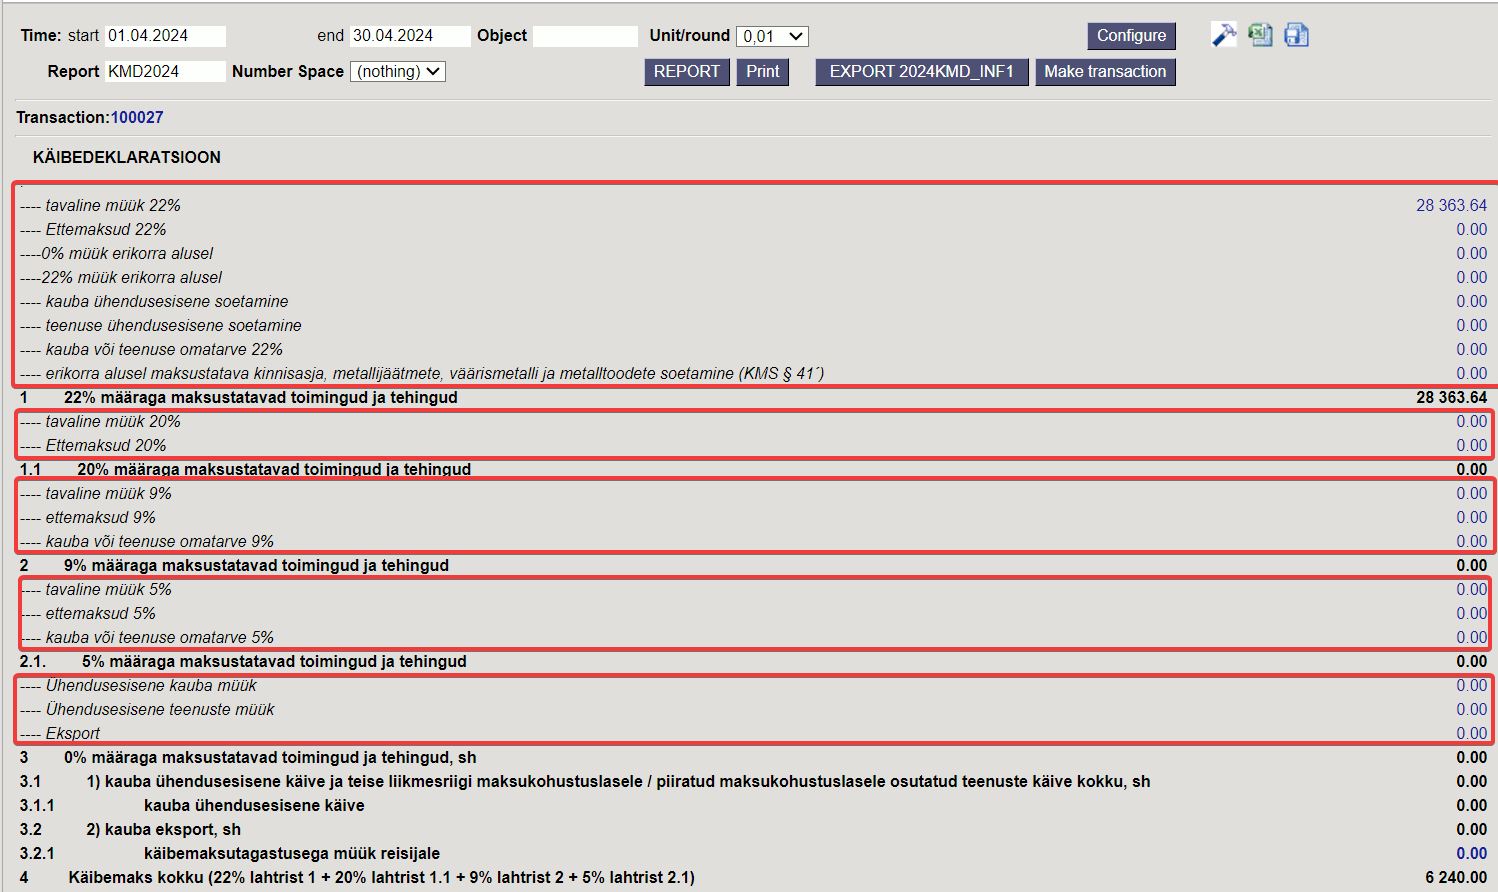
- Text - an explanation of the row that is presented in the result of the report generation (For example, titles, empty rows, etc.). If you leave this field blank in a row, this row will not be displayed in the report result. In this way, it is possible to make so-called calculation rows, the result of which does not need to be displayed in the report result, but needs to be used as part of another calculation.
- Class - allows you to reverse the sign (+ or -) of the row result. Possible options:
- empty - changes the sign of the result i.e. multiplies the result by -1.
- Debit - changes the sign of the result, i.e. multiplies the result by -1.
- Credit does not change the sign of the result, but leaves it as it is as a result of the accounts or calculation.
Rules:
The closing credit balance of the account is a negative number. To find the change in the account, the debit turnover is subtracted from the credit turnover. If the credit turnover is greater than the debit turnover, the result is a negative change. In the example, sales revenue is recorded as a credit turnover of sales accounts, and the change in the account is a negative number. In order to get a positive result for the row of the VAT report, the Class value of this row must be selected as either empty or debit.
The sign can only be rotated to display the result of a specific row within the same row. If the result of this row is used as part of an operation, the operation still uses the result with the unchanged sign. For example, so that the result of the row reflecting the sales turnover can be presented as positive, we set its class to empty or debit (they change the sign), because the sales turnover increases on the credit side of the account, and the result of positive sales turnover on the account is a negative number by default. However, if we use the result of this row in an addition operation where we cannot change the sign of the result, we must instead subtract the previously mentioned row because its actual value is negative.
- Vat code - allows the result on report rows that use account lists (Start Balance-; End Balance-; D-Turnover-; K-Turnover-; Change-type), to be restricted to a specific VAT code (VAT type). You can select from the VAT codes you have configured. See Vat codes.
For such row of the VAT report:
The turnover amounts of accounts 40000 to 49999, where the VAT code is “1”, are summed from the financial transactions.
The general principle of configuring the report:
- To determine and declare taxable turnover, VAT codes must be used. VAT codes allow different types of transactions to be marked within the same accounts.
- When declaring taxable turnover, the base amount for tax calculation is calculated, not the tax amount. In the Estonian VAT declaration, the tax amount is calculated mathematically from the base amount. The calculated VAT amount should also be reflected in the corresponding financial account, but it is not requested in VAT return.
- In order to find and declare the input VAT, you must use the financial accounts to which we have currently entered the input VAT amounts. In the case of input VAT, the amounts that are deemed correct to be deducted during the current calculation are declared, not the basis of taxation (as in the case of sales). In the VAT report, it is therefore not necessary to additionally limit the rows of the input VAT amounts with the VAT code, since the accounts reflected in the row only have the necessary amounts.
3.2.3. Recommendations
- In the electronic file of the VAT return, only the rows of the declaration indicated in the Section column are transferred to the Tax Board, the help rows are not transferred.
- Each VAT return Section row can be used only once. If necessary, merge different rows together and add a selection to this row.
- The help rows you need must be described and made visible in the report. For example, taxable turnover consists of very different types of operations, some of which come from sales and some from purchases. Help rows help to check the data and, if necessary, find errors.
3.3. Configuration of the VAT report to be sent to the Estonian Tax and Customs Board (2024KMD_INF1 jms.)
In order for the VAT declaration to be sent to the Tax Board, you must select the
- XML: form (currently valid in Estonia: 2024KMD_INF1). By choosing the XML format, it is possible to submit the electronic VAT return (both as a file and automatically).
When selecting and saving the form, columns appear in the configuration of the declaration rows
- Section - VAT return main report rows
- Appendix - VAT return INF1 appendices A and B.
3.3.1. Setup
- Under the System settings, a limit must be set, which must be equal to or greater than the amount of transactions with the transaction partner during the period, in order for the invoice data to appear on part A and/or B of VAT return INF1:
- Customer and supplier data. VAT return INF1 is prepared with the data of those customers and suppliers whose card has the Type field „Company“ and “State institution” and the field Reg no is filled with the correct registration number.
- VAT codes. It is important to create a sufficient number of VAT codes for marking and posting for different types of operations. It is also important to correctly fill out the EXTRA INFO and DISTINCTNESS fields for VAT codes.
By selecting option 2024KMD_INF1 of the XML Tax Board file, additional fields appear in the report description:
- Section - this field is used to determine which row of the VAT report configuration corresponds to the corresponding row of the official VAT declaration. Since the possibility of electronic declaration of the VAT return INF1 form was also accompanied by the possibility of electronic submission of the main part of the VAT return, it is necessary for the program to determine where the correct values are found for the rows of the submitted VAT return. The configuration of the report can contain all kinds of help and calculation rows and information that is necessary for the user, but redundant for the official presentation format. Therefore, it is necessary to define from which rows the numerical values for the official declaration are taken. You can make selections for the Section field from the drop-down menu, which contains the options provided by Directo. These options correspond to the VAT return structure:
Section column options:
 Choose the “Section” only for summary rows that are transferred to the Estonian Tax Board VAT declaration.

- Extra - determines which invoices, purchase invoices and expenses corresponding to the characteristics are included to find the content of appendices A and B of VAT return INF1 in Estonia. The value of the Extra field can be selected from the drop-down menu, and the options are A and B.
Option A is used to determine which invoices containing specific VAT codes are included in the content of appendix A of the VAT return INF1. In other words, option A must be selected for that row of the VAT report, which adds the corresponding invoice amounts to the main part of the report via the VAT code on the row. The VAT code determines the operation of one or another type of VAT. However, several different VAT types or cases are declared as a common amount on the same row in the official VAT return. But not all of these cases are subject to declaration in appendix A. For example, operations and transactions taxed at a rate of 20% include normal sales turnover and at the same time transactions taxed with reverse charge, etc. In appendix A, only those invoices that, among other things, include the usual 20% of turnover in Estonia and taxable turnover based on the special arrangement set forth in VAT act § 41 and 42 are subject to declaration. ince each type of such transaction has a separate VAT code and a distinct row in the VAT report, you need to mark option A in the Extra field for those that, in your VAT code system, signify the types of sales transactions that must be declared.
 You may wonder why all this needs to be set up via the VAT report and not the VAT code? Would it be easier? This is so for two reasons. First of all, appendices A and B must be based on the main part of the VAT return, and the corresponding version of the VAT report together with the option of the additional report form one entity valid for a certain period of time. Secondly, if the Tax Board changes the rules of the VAT return or its appendices in the future, a new VAT report can be easily created with the corresponding settings, and at the same time the previous versions will remain, and the past data can be reproduced very easily in the form that they were valid at the time.
Option B is used to determine which purchase invoices and expenses with a transaction containing financial accounts will be included in VAT return INF1 appendix B. Since it is more convenient to calculate input VAT through financial accounts, the starting point here is the existence of the corresponding account on the purchase invoice or expense transaction. We emphasize that the basis is the account on the transaction, not the original document, because the amount reaches the main part of the VAT report through the account on the financial transaction, not through the document account. It also eliminates errors that can occur if an account has been changed on a purchase invoice or expense transaction without changing the original document.

3.3.2. Report generation
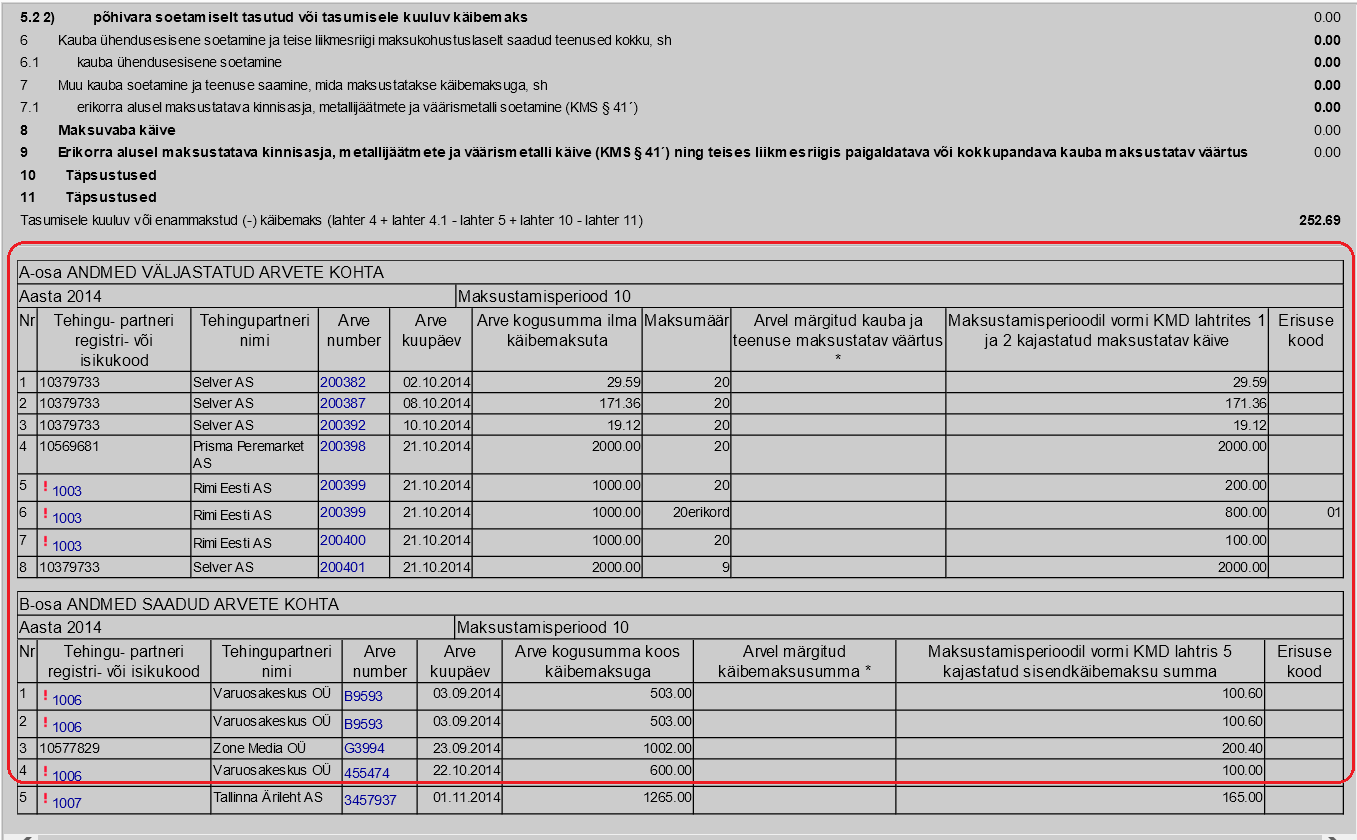
The additional Estonian VAT return INF1 report is automatically generated together with the main form of the VAT report if the corresponding form is selected in the XML field in its settings:
Part A is generated from sales invoices that meet the following conditions:
- The operation date of the invoice falls within the period of the VAT report;
- The Type of customer on the invoice is “Company” or “State institution”;
- The rows of the invoice have some of the VAT codes that are marked in the VAT report settings in the Extra field with option A.
The total amount of invoices that meet the aforementioned conditions is summed based on the customer code (NB! not on the basis of the reg. code). Invoices with positive and negative totals are added separately. If any such amount exceeds the limit shown in the System settings, all invoices of the respective customer are presented on Part A.
Part B is generated from purchase invoices and expenses that meet the following conditions:
- The operation date of the purchase invoice or expense falls within the period of the VAT report;
- When entering the purchase invoice, the expense, the input VAT accounts are used, which are marked in the VAT report settings in the Extra field with option B.
The total amount of purchases that meet the aforementioned conditions is summed based on the supplier code (NB! not on the basis of the reg. code) Invoices with positive and negative totals are added separately. If any such amount exceeds the limit shown in the System settings, all invoices of the respective supplier will be presented on Part B.
NB! The date of the sales invoice, purchase invoice, financial transaction of the expense must not be changed without changing the operation date of the original document! Otherwise, part A and/or part B may not correspond to the main part of the Estonian VAT return.
If the transaction partner's (customer or supplier) reg.code is not filled in on the card, the customer/supplier code is displayed in the corresponding field of the report, with a red exclamation mark in front of it. The card can be opened from the code and the reg.code field can be filled in correctly. When generating the report again, the added reg.code is entered in the correct field. The same is the case with the invoice number of the supplier's purchase invoice or the original document number of the expense. If it is missing, the report will show  Unfilled. By clicking on it, the purchase invoice/expense opens and you can fill in the field with the correct information.
3.4. Submitting the VAT Declaration
If the XML option is filled in the VAT report setting, the declaration can be submitted electronically either by sending it directly to Estonian Tax Board or by manually uploading the file.
3.4.1. Automatic Submission of the VAT Declaration to e-MTA
If desired, the system behavior can be configured to automatically send the file as submitted. This is determined by the system setting VAT declaration KMD INF1 is sent to e-MTA as submitted - YES.

Sending occurs in real-time, but the data is processed asynchronously and may take some time to arrive. Feedback of the sent item is also retrieved asynchronously (every 15 minutes). Therefore, there may be situations where the submission has already been successfully received, but the feedback has not yet reached Directo
Prerequisites for a successful submission:
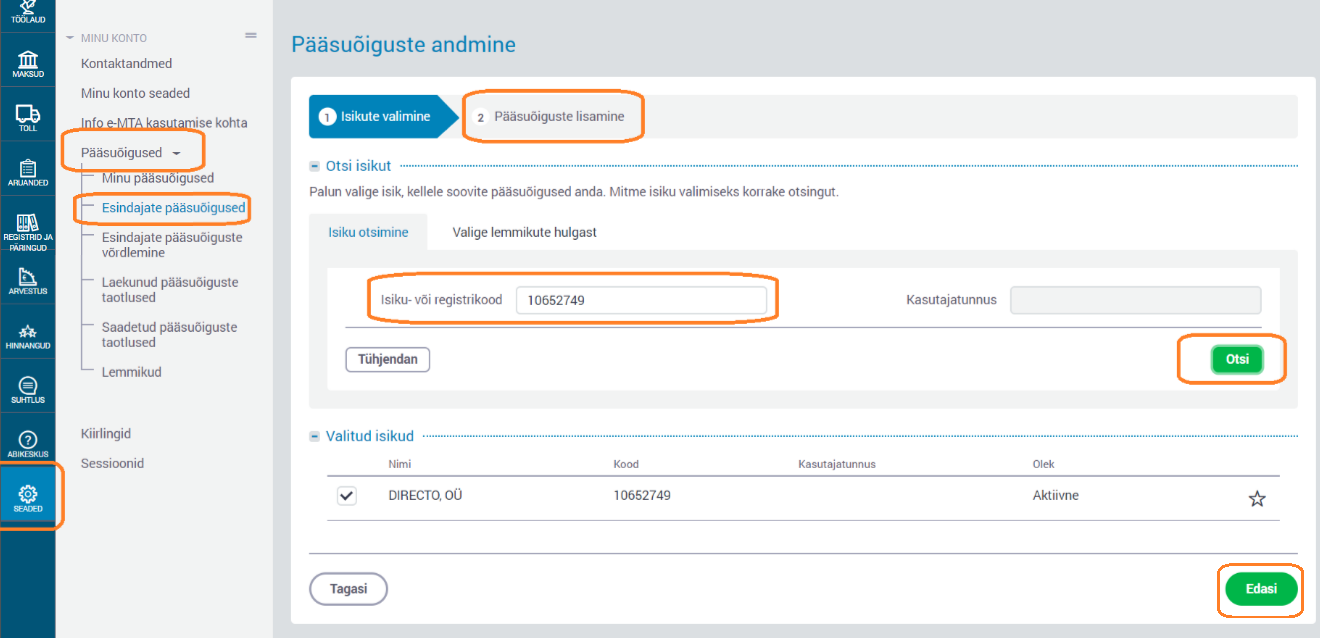
- in e-MTA:

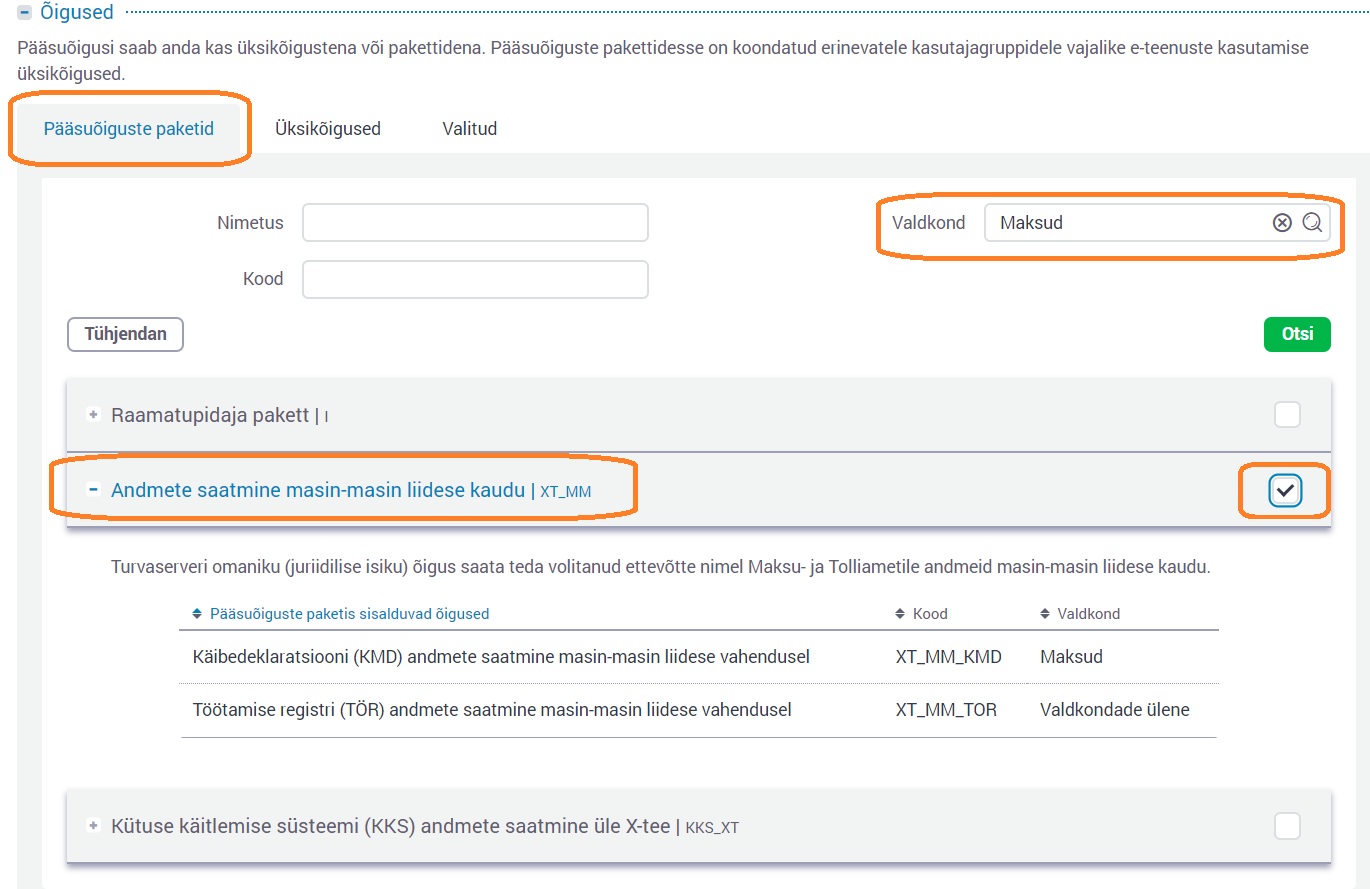
 We recommend that the authorizations of Directo OÜ board members be terminated, even if they are not terminated, they will not have any access to the data.


- in Directo:
- The user must log into Directo using an ID card, Mobile-ID, or Smart-ID. This is necessary because the personal identification code of the sender is transmitted to the e-MTA, which verifies whether the user has the right to submit the report.
- System setting VAT declaration KMD INF1 is sent to e-MTA as submitted - yes sends the declaration submitted to e-MTA. If you prefer to manually confirm and submit the declaration in the e-MTA, choose no. This setting only affects the VAT declaration; for TSD, there is no setting, and it is always sent in an unsubmitted form.
- The user must have e-MTA channel rights assigned in Directo. These rights can be configured under the Other tab in the user/group permissions settings.
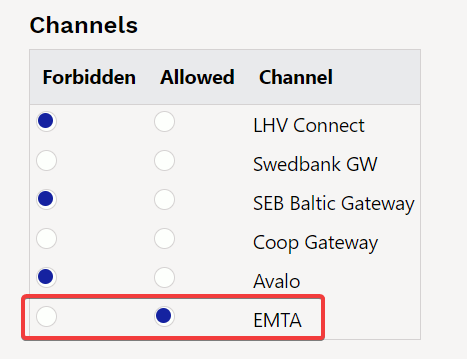
A button appears , which is pressed to send the document. With the link Saatmise ajalugu (sending history) it is possible to display the latest sendings.
Each sending leaves a record in the Document Transport register. The record is closed (marked as strikethrough) when feedback has been received and the action was successful, so these records can be simply ignored.  When sending VAT return, the following Document transport fields are used:
- Number - Register number, clicking here opens the entire sending in XML format
- Inbound doc. no - If the report was sent as submitted, 1 will be displayed here
- Doc.date - the month here determines the month for which the VAT return was sent
- Came in - the time of sending
- Processed - the time of feedback processing
- Status - the result of sending. If successful, then Sent and submitted, if error, then error message
- Doc no - The unique identifier for the sending. Clicking here in the column opens the XML with the sending result; in case of errors, you can get an idea of what might be wrong
3.4.2. Manually uploading the VAT return INF1 file of the VAT declaration
To manually upload the VAT declaration file:
System setting VAT declaration KMD INF1 is sent to e-MTA as submitted - no.
The file is sent to e-MTA in such a way that the user must also enter e-MTA in order to submit the declaration there.
- Calculate the VAT report
- Save the report file to your computer.
- Enter the e-MTA
- Create a VAT return for the period of taxation in e-MTA
- upload the file online
- Save, check and confirm
NB! By manually uploading the file to the e-MTA, the report is not submitted, but the necessary fields on the Tax Board's form are pre-filled. After uploading, it is possible to supplement, change, delete and finally submit the report in e-MTA.
4. "Make transaction" button on the VAT declaration
Enables the VAT declaration to automatically generate a financial transaction - the transfer of the VAT payable according to the declaration to the advance payment account of the Tax Board.
4.1. Seadistamine
4.1.1. System settings - Finance settings
- VAT declaration automatic transaction date next month … date - enter here the date of tax liability (in Estonia, the 20th of the following month)
- VAT declaration automatic transaction - options
- no (does not create an automatic transaction)
- yes (creates an automatic transaction)
- VAT declaration automatic transaction Debit Account - financial transaction debit account (account for VAT payable)
- VAT declaration automatic transaction Credit Account - financial transaction credit account (The Tax Board's prepayment account or consolidated account)
4.1.2. Configuring the VAT declaration
In the configuration of the VAT declaration, the column Automatic transaction appears at the end. Select the row that contains the amount due in the VAT declaration and put a check mark on that row. After activating the row, all other options disappear from the column.
If you need to change a row:
- Deactivate the row (uncheck it)
- Click save on the report configuration
- After saving, all row options in the column will reappear.
- Select a new row (check it)
- Click save on the report configuration
4.2. Usage
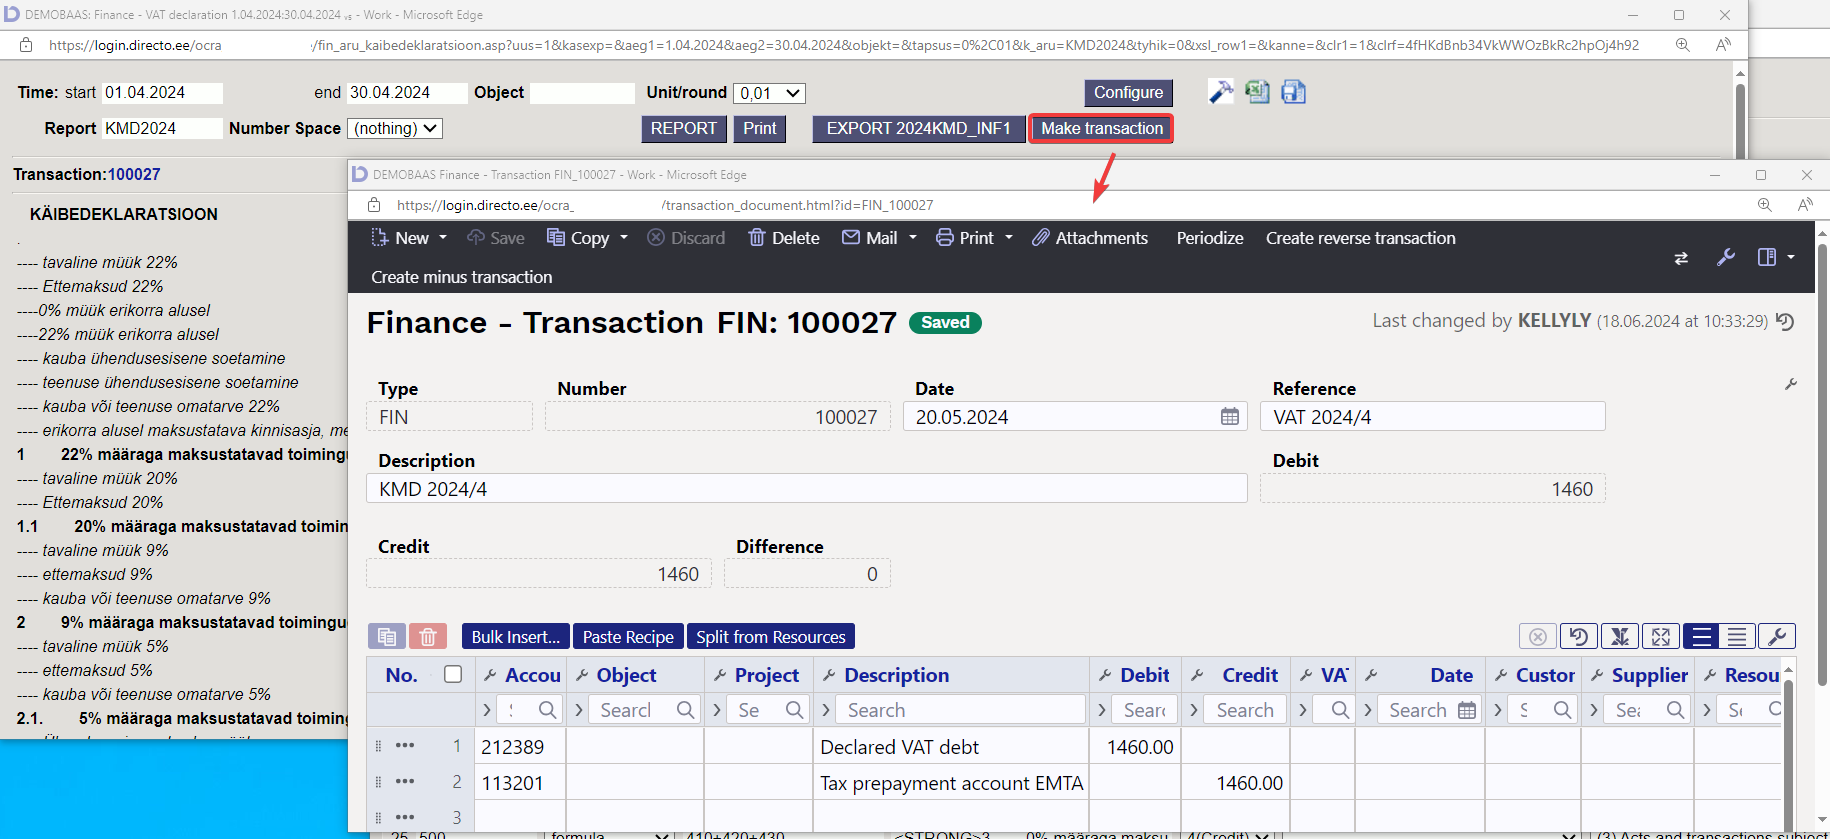
Once the VAT return has been calculated and checked, the month-end transaction can be made directly from the declaration. By clicking the  button on the VAT declaration, a financial transaction is created.
- If you need to correct the VAT return, you can always overwrite the transaction. This means that you click the Make transaction button again and the entry is generated again.
- If the VAT return is calculated according to the object(s), the financial entry is prepared with the same object(s).
- Setup must be done before creating a transaction.
4.3. An example
The financial transaction for the April 2024 declaration will be prepared as of the 20th of the following month (according to what is written in the setting).
5. VAT group VAT return
- “VAT group representative reg. no” must be added to the databases of companies belonging to the VAT group in the system setting
- a file must be downloaded from each group member's Directo base and the VAT return must be uploaded to the e-MTA on the parent's register number, i.e. the parent's Tax Board's database.
- Information is uploaded to the group's VAT return at the Tax Board


6. Sample configuration of the VAT report
7. Instructions for VAT transactions
7.1. Accounts
7.2. Monthly transactions
During the month, transactions are recorded in various VAT (purchase and sale) balance sheet accounts.
A VAT declaration is made on the 20th of each month (declaration deadline).
Finance → Reports → VAT declar.:
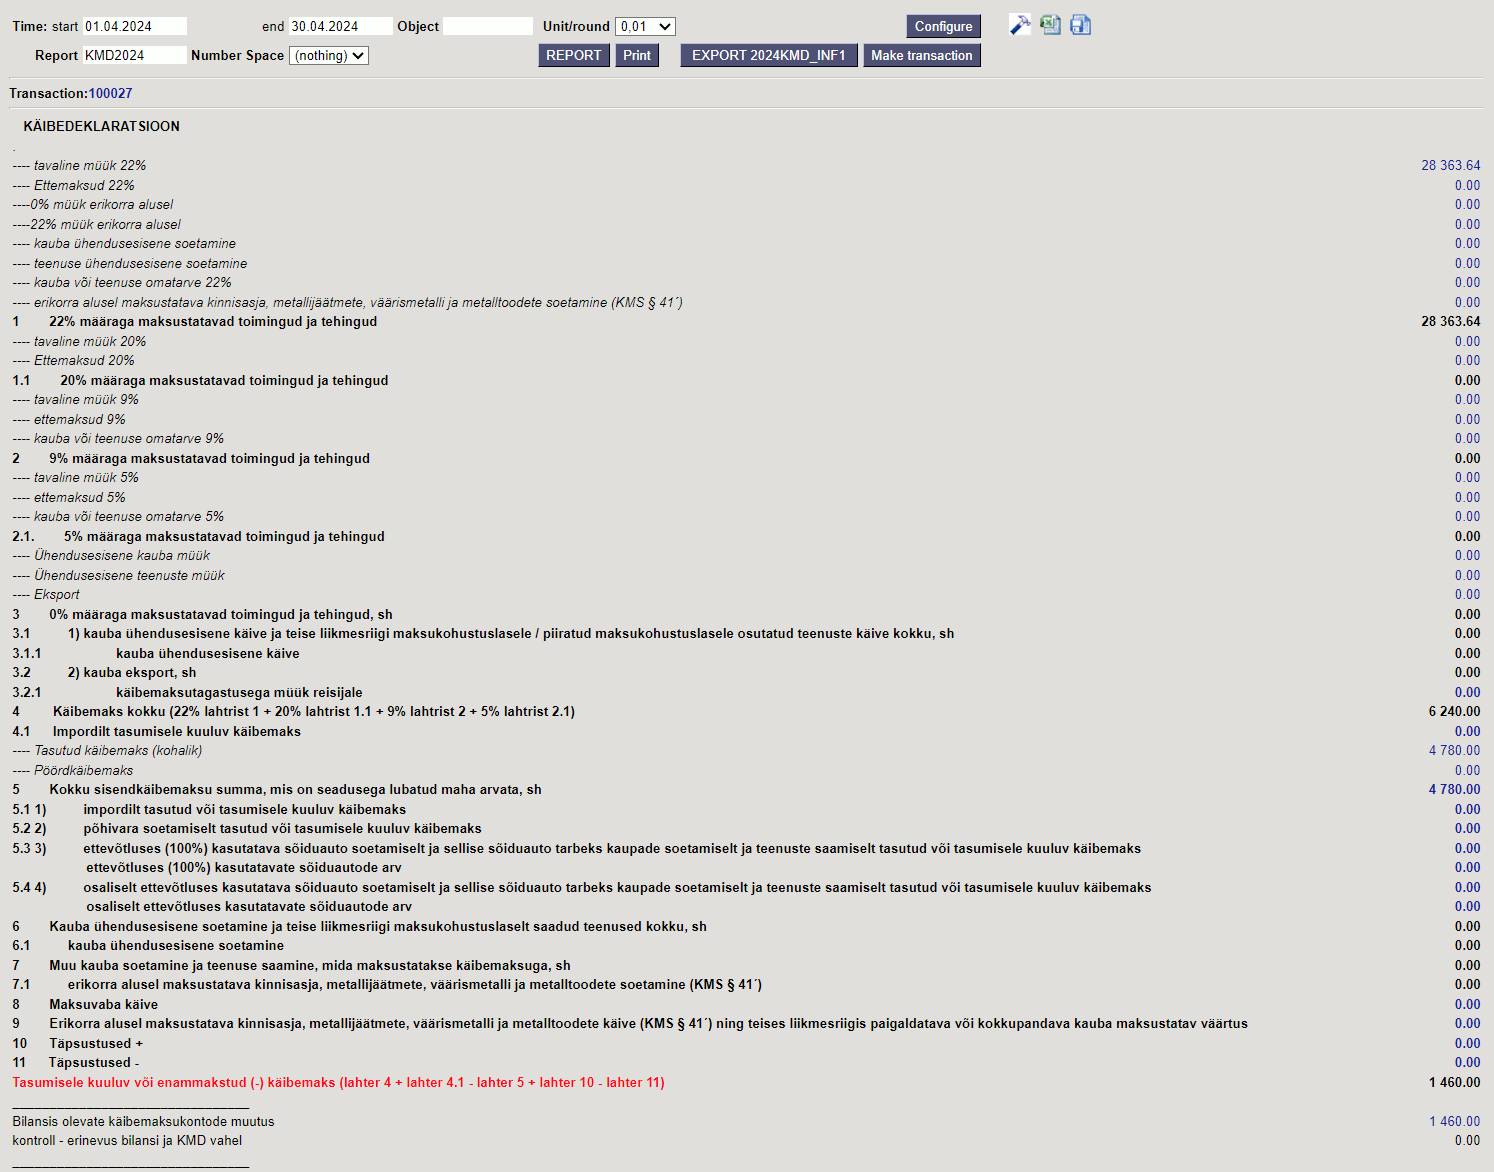
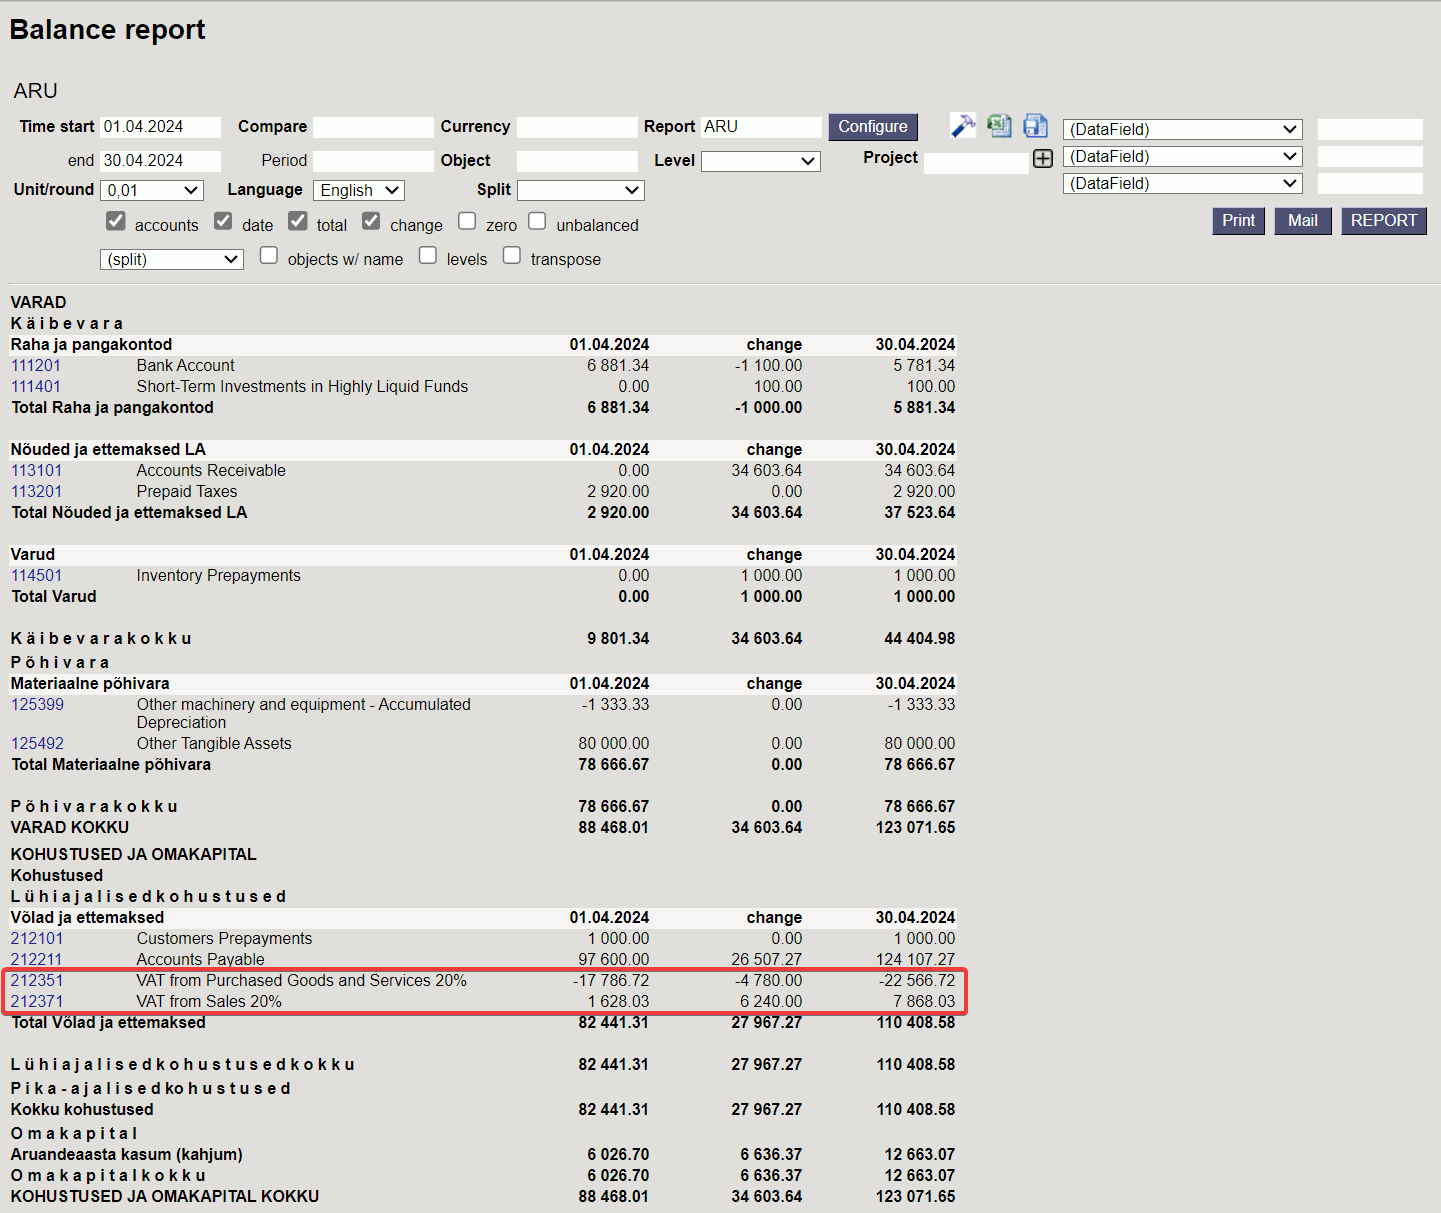
The amounts in the declaration match the amounts in the balance sheet:
- 22% VAT from sales invoices totaling 6240 euros.
- Input VAT from purchase invoices totaling 4780 euros.
- Total VAT payable of 1460 euros.
The „Make transaction“ button in the report automatically generates a transaction:

- If there is VAT payable (as in the example), then the transaction is:
- If there is an overpaid VAT, the transaction should be:
Read the instructions for setting up the “Make transaction” button https://wiki.directo.ee/et/kaibemaks#kaeibedeklaratsiooni_nupp_tee_kanne:
When transferring money to the Tax Board, the transaction should be:

In the next month's balance sheet, under the change, you can clearly see the reduction of the declared VAT debt and the new month's sales and purchase VAT amounts:
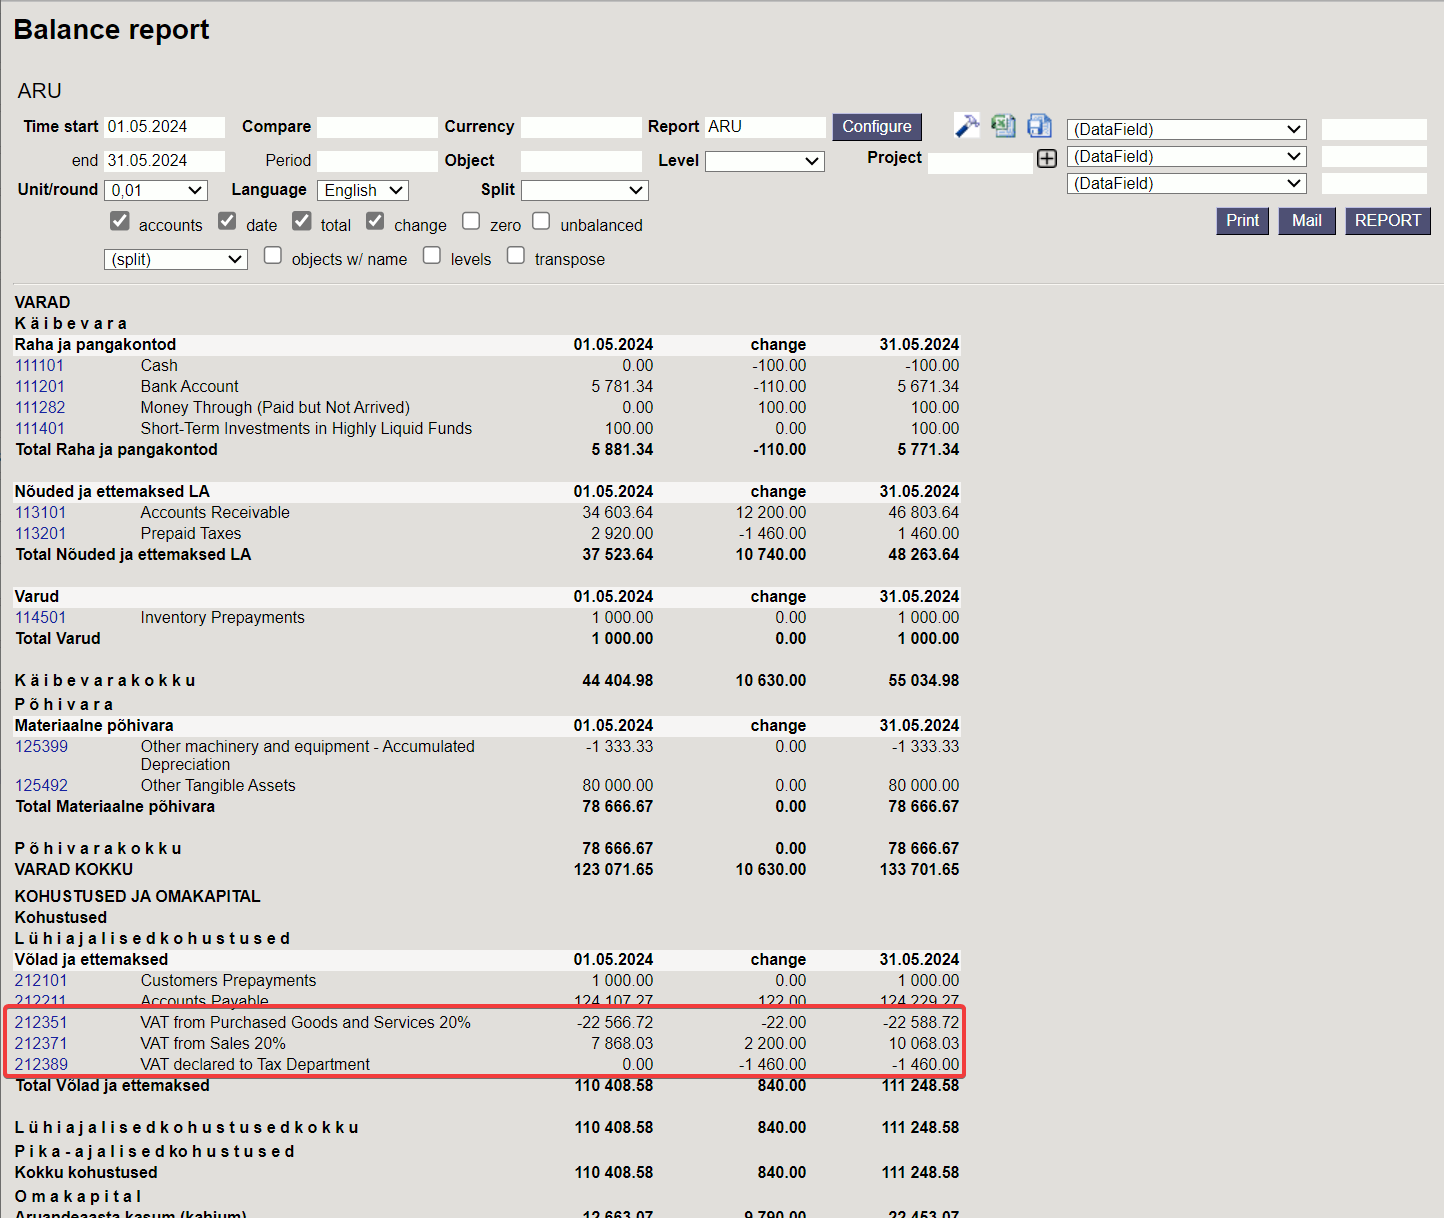
The May declaration is made on the 20th of the following month, i.e. June 20. The same process as previously described with April takes place.
7.3. Year-end procedures
At the end of the year, VAT accounts should be closed or reset. If desired, it can also be done every month.
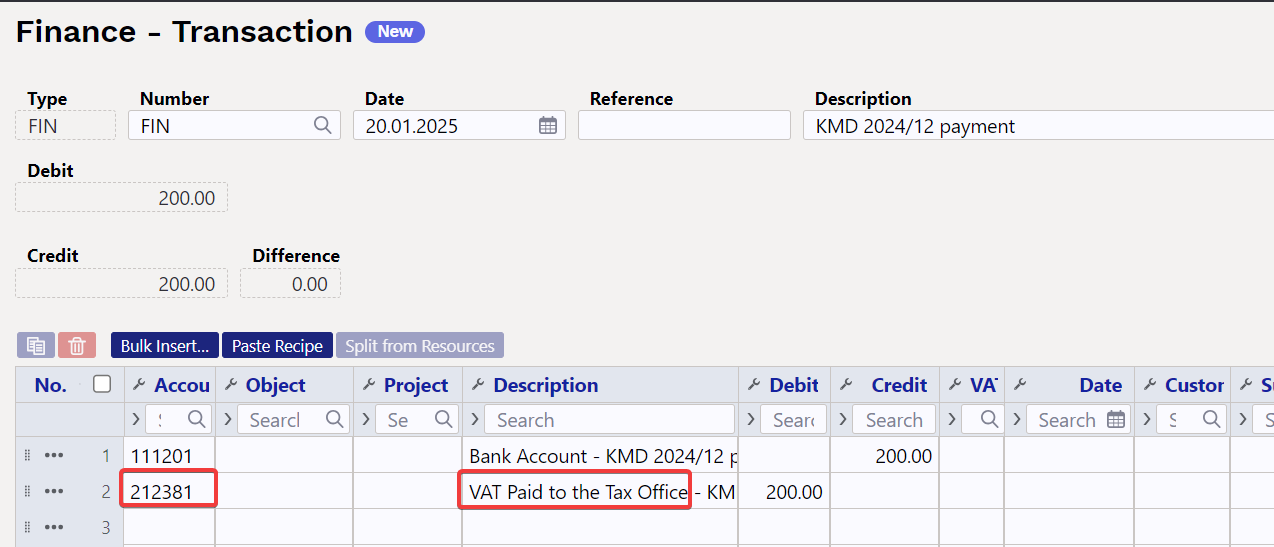
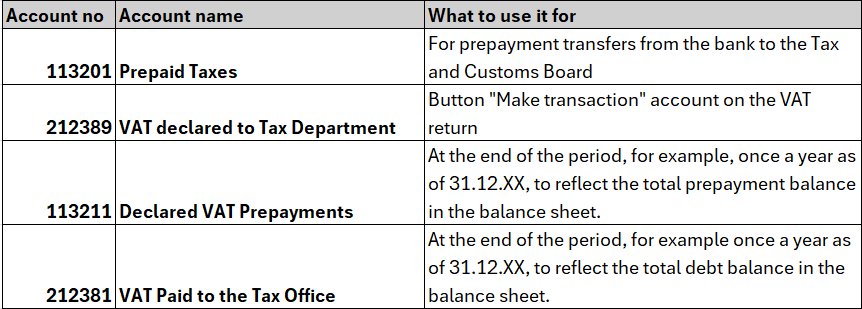
With the Middle Transaction (Finance → Documents → Middle Transactions) all VAT account balances are reset, except the amount that remains to be paid to the Tax Board for December 20.01.XX and which is entered on 20.01.XX. As of 31.12.XX, leave the amount in account 212381 “VAT Paid to the Tax Office”. If there is a prepayment of VAT at year-end, use account 113211 “Declared VAT Prepayments” .
- If there is a VAT debt balance as of 31.12.20XX, use a middle transaction to reset all the VAT accounts and add the total debt balance to account Credit 212381 “VAT Paid to the Tax Office”.
- If there is a prepayment balance as of 31.12.20XX, use a middle transaction to reset all VAT accounts and add the total advance payment balance to account Debit 113211 “Declared VAT Prepayments”.
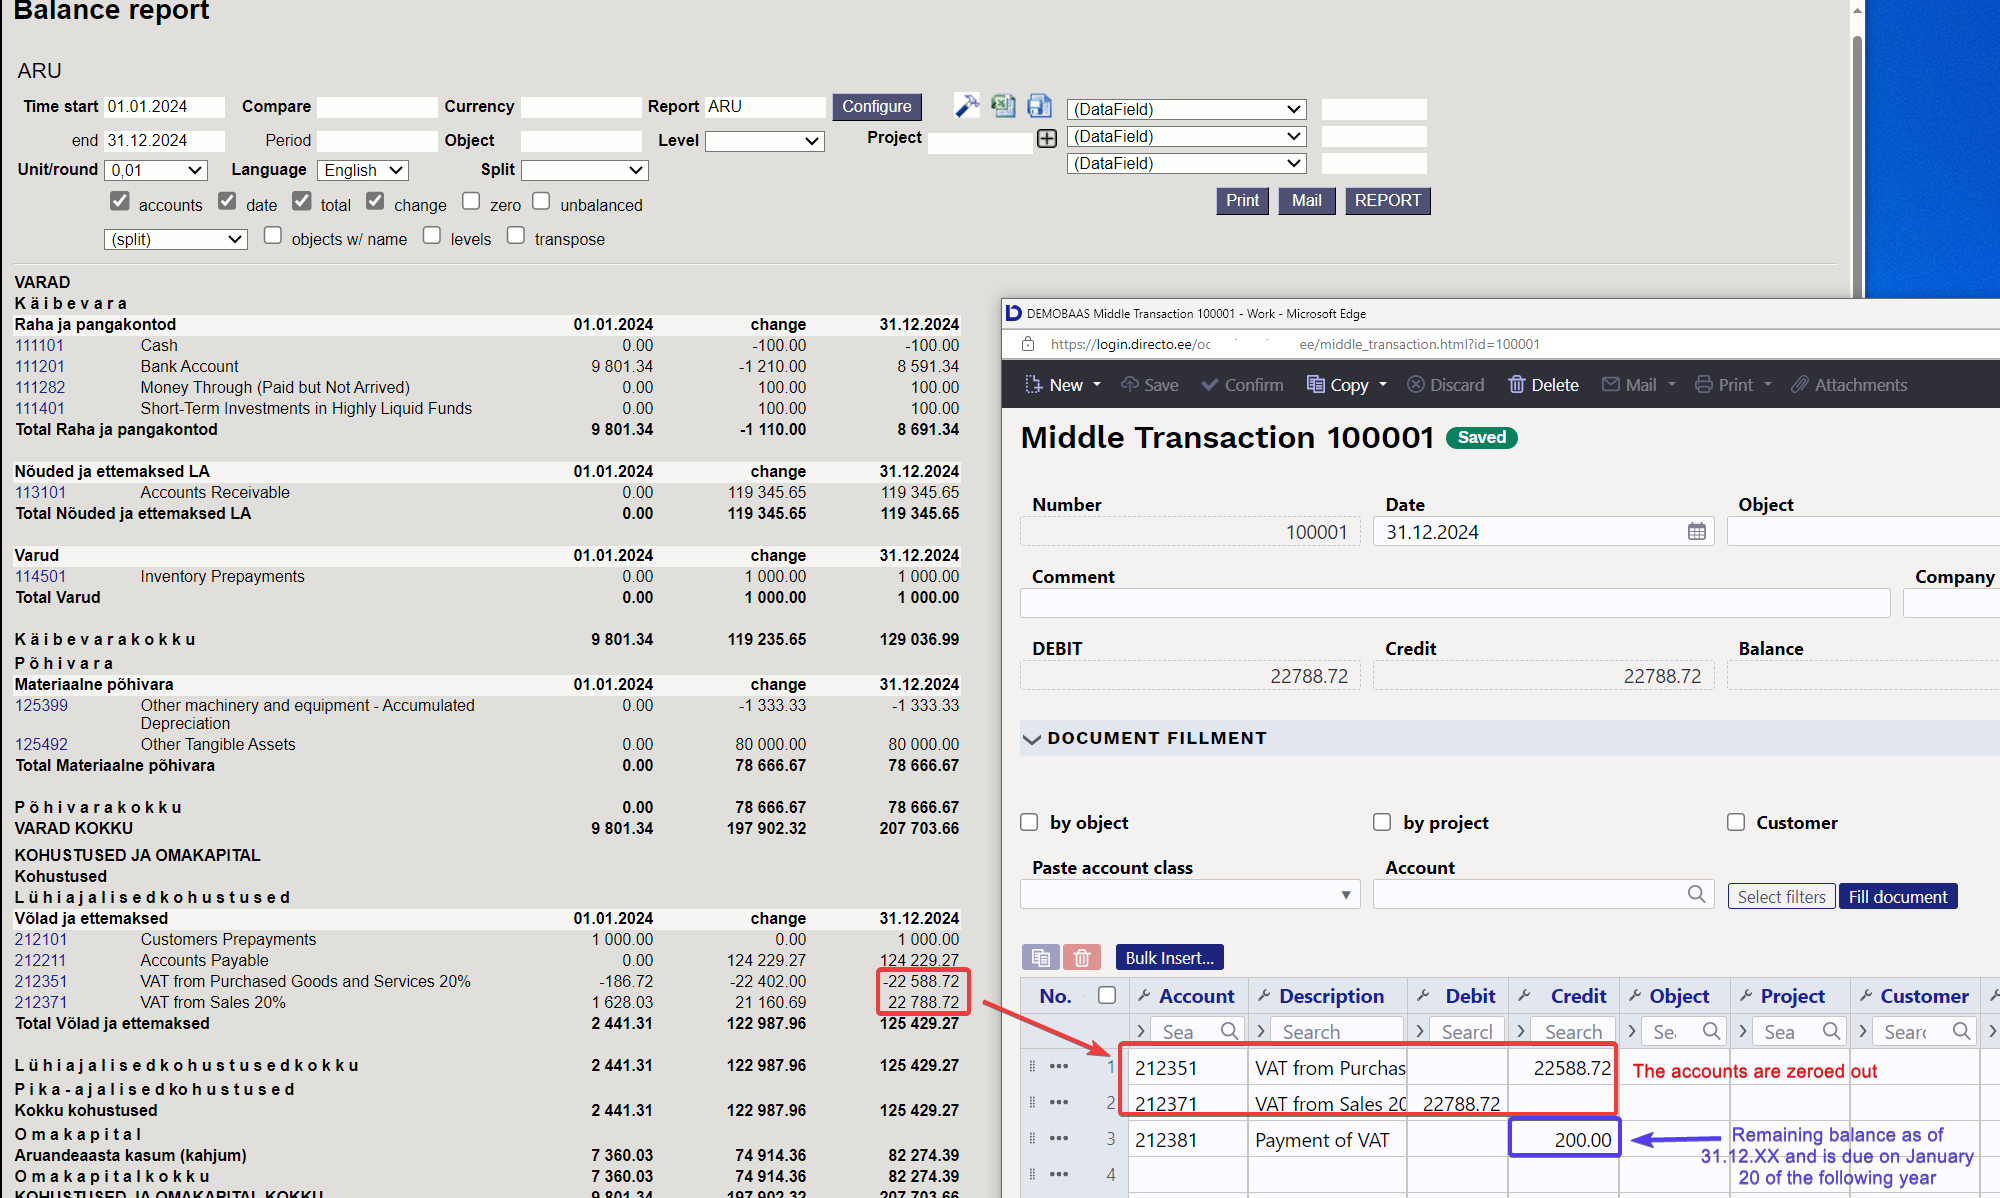
An example of making a middle transaction where, on 31.12.XX, there remains a VAT debt in the amount of 200 euros (sales VAT 22788.72 - purchase VAT 22588.72). The remaining amount can also be seen on the VAT declaration.
Balance sheet on 31.12.XX before making the middle transaction and preparation of the middle transaction:
January balance sheet after the middle transaction > the opening balances of the purchase and sales VAT accounts for the next period have been reset:
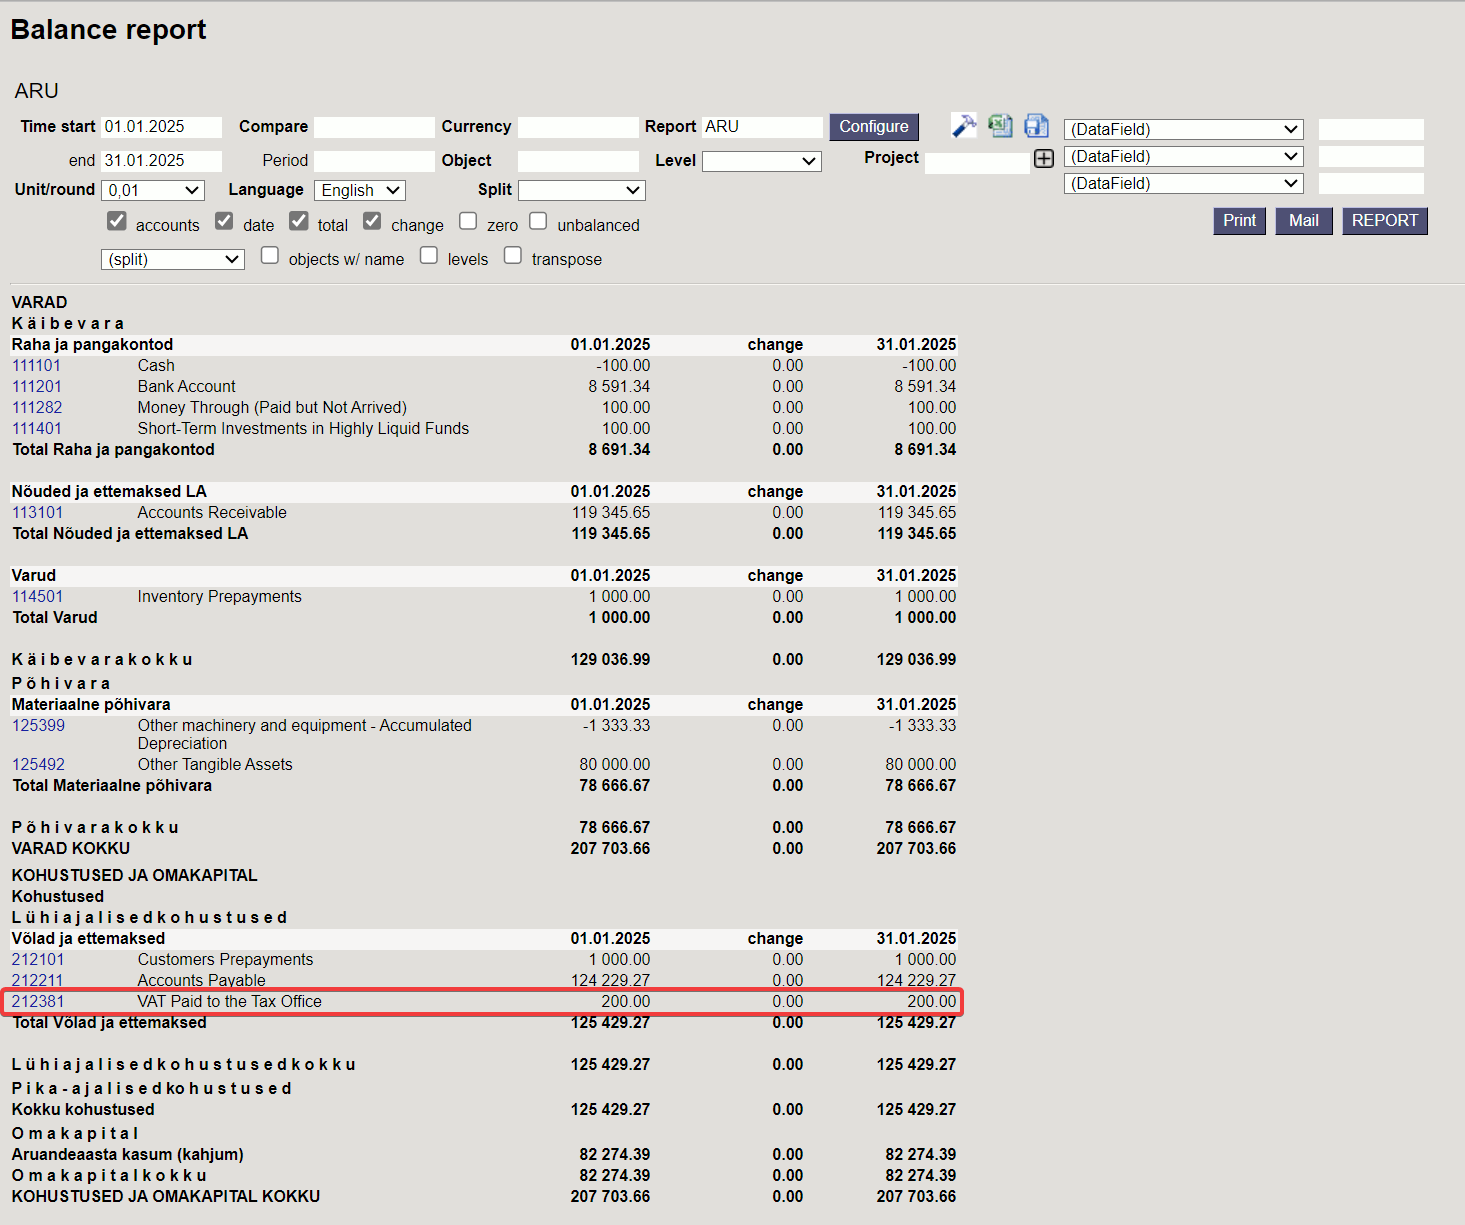
When paying VAT for December in January, account 212381 “VAT Paid to the Tax Office” must be used for payment. In this way, the account resets, and the usual process continues until the end of the year.
