Table of Contents
Document views of the new system
The following tutorial provides an overview of the major changes in Directo's new document system. The goal for the future is to move all documents to the new document view system.
 New system is only available with Edge and Chrome browsers.
Drafts
All documents with the new system now have a new status: draft. When creating a new document or editing a saved document, the document is no longer edited directly, but is drafted and changes are made to the draft. Draft can be modified without the fear of affecting the original document.
Draft activities
There are four buttons on the toolbar that are associated with the draft:

- Save - applies all changes made to the draft to the original document;
- Copy - creates a copy of either the draft or the original document, overwrites the new documents draft;
- Discard - discards any changes made to the draft, deletes the draft, and the original document reappears;
- Delete - deletes the original document and the associated draft permanently;
Document status
The current status of the document is shown in the upper left corner after the document name, the statuses are:

- New - a new document is created and the draft of the new document is modified;
- Draft - draft document is modified;
- Saved - document is saved, a draft is automatically created when the document fields are changed;
Creating a new document

When creating a new document, a new document is not created immediately, but a draft of the new document is. Each user has one draft for new document, it means that when creating a new document is stopped (hasn't been discarded, saved or deleted) and a new documents is created later, the previous draft will open. As with a saved document, “Discard” will delete the changes and the draft will become the new saved document after pressing “Save”. It is not possible to delete a new document with the “delete” button, as only the draft exists. Creating a copy of another document uses the same draft and may overwrite changes made previously.
Taking over drafts

There can currently be only one draft of a document at a time. If a user is currently modifying a document and has created a draft, others will not be able to edit the document at the same time. However, draft can be taken over from another user, if needed. If a document that already has a draft from another user is opened, a notification with a “Take draft over” button opens at the top right of the document to take over the draft. Once a draft has been taken over, the original owner of the draft cannot change it.
Automatically saved changes
Any changes to the draft are automatically saved in the database, after changing the fields, the window can be closed and reopened later, and the changes made to the draft are still there, without using the “Save” button. “Save” button is used only to apply the changes made to the draft to the original document.
Customising views
Document views with the new system are based on the principle that the end user should be able to customise the view to their best convenience and liking. All customisations in a specific document view are automatically saved to the database and are user-specific.
Customising document header

- The order of the fields in the document can be changed by dragging them. Dragging can be done by clicking and holding the title of the field.
- Clicking the wrench
 button on the right side of the header opens the menu from which fields can be selected to be visible in the menu. Fields can be hidden and shown at will.
 - The same drop-down menu also has a “ Reset default settings ” button, which restores the default order and visibility of the columns.
- Header fields can be divided into rows with separator. A new row can be added by clicking “+ Add separator” and by dragging it above the first field of the new desired row.
Example : Header without separator
 Example : Header with changed order of the fields and separators

Customising the document row table
The columns in the table can be customized by clicking wrench icon button in the column header. This will bring up a customisation menu with the following options:
- Freeze left/right - freezes the column to the left/right edge of the screen, when the table is scrolled horizontally, the frozen column is always visible;
- Unfreeze - removes the freeze from the column;
- Filter type: Text search/Select element - turns the filter under the column header into a search or selection box;
- Shortcut - creates a shortcut to the column, which, when clicked, scrolls the view to that column. Useful for many columns. A list of shortcuts appears above the table.

- The width of the columns can be changed by grabbing the border between the columns and then dragging.
- The density of the rows can be changed by clicking the density buttons
 in the upper right corner of the table.
 - The columns can be hidden/shown by clicking on the button with the wrench icon in the upper right corner of the table.
- Reseting the table can be done in the same place by clicking the “Reset default settings” button in the drop-down menu.

Other significant changes
- Rows can be sorted by the desired column by clicking on the column name. By default, the table is sorted by row number.
- Search/Replace is now column-based and is located below the header of each column. Individual columns do not yet allow searching/replacing.

- Right-clicking on a row number opens the row context menu . The following activities are possible here:


- Add row above - adds one blank row above the selected row;
- Add row below - adds one blank row below the selected row;
- Copy row - copies the row to the copy buffer;
- Delete row - deletes selected row from the table;
- When a row in a table is copied, two new activities are added to the menu:
- Paste row/rows above - pastes the rows in the copy buffer above the selected row;
- Paste row/rows below - pastes the rows in the copy buffer below the selected row;
- The rows in the table can be selected by clicking the row number. When holding down the SHIFT key after selecting a row and clicking on another row, the range between the two rows is selected. There is a checkbox above the row number column where all rows in the table can be selected / deselected .
- When selecting rows, the “Copy selection” and “Delete selection” buttons are activated, by clicking them the selected rows are either copied to the copy buffer or deleted. Copied rows can be pasted from the row context menu with the “paste lines” option.
- In the upper right corner of each table is the Export Data button for the table. Clicking it opens two options:
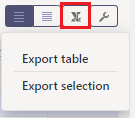
- Export table - exports all rows in the table as .xlsx file;
- Export selection - exports only the selected rows in the table as .xlsx file;
- Bulk insert the number/order of columns is now the same as the number/order of columns in the table.
