Table of Contents
Payments
Payment is a document where payments to suppliers are indicated. Prepayments, purchase invoice payments and nettings can be created using payment document. New payment document can be also added from purchase invoice or using report “Payment forecast”. Payment reduces debt for supplier.
1. How to use
1. From the payments register create new payment by pressing “F2-Add new” button. Fill in necessary fields. To keep the document, press “Save” button. Payment should be confirmed by pressing “Confirm” and “Save” after the data is verified.
2. Payment can also be created from the report “Payment forecast”. For that it's necessary to fill in the filtering fields of the report and select “Report”. After the report is created, button “Create payment” will appear. By pressing this button, new payment document will be created with prefilled fields. It's recommended to save the document. After checking all the data payment should be confirmed.
New design

Old view

1.1. Differences between the new Payment document and the old Payment document
- Opportunity to change, remove and add fields in the header and rows. Read more here.
2. Payment buttons
2.1. Header buttons

- New- Opens new empty payment document. Checks if previous document has any unsaved changes
- Save – saves the document
- Confirm– pressing “Save” after pressing “Confirm” confirms the document
- Copy- creates a copy of existing document. Opens new document that has most fields filled as on previous document. Date of creating the copy is by default marked as the new document date. Document number range is by default selected from the user settings that created the copy.
- Discard - interrupts document filling without saving, same does F5.
- Delete - deletes the document
- Open - allows to open the document (if the user has rights).
- Attachments- possibility to add attachments
- Mail – sends printout with e-mail. In case there is more than one printout designed pressing “Mail” with right mouse button will open the selection.
- Print- creates printout. After pressing “Print” printout preview will be shown for a moment and after that print dialog will be opened. For separate printout preview hold “Shift” button on keyboard and press “Print” on the document. In this case print dialog will not be shown automatically. After pressing “Ctrl” + “P” on keyboard print dialog will be opened. If there is more than one printout designed pressing “Print” with right mouse button will open the selection.
- Open purchase ledger - opens an empty purchase ledger report.
- SEPA EST - allows payments to be exported to the Internet bank.
2.2. Row buttons

- Copy selection - copies the selected rows to the copy buffer. To select rows, press on the row number. The button is not active if no rows are selected. Copied rows can be pasted from the row context menu (opens when you right-click on the line number) with „paste rows“.
- Delete selection -deletes the selected rows. To select rows, press on the row number. The button is not active if no rows are selected.
- Bulk insert - allows to fill/place rows based on a spreadsheet (mostly excel). The order in which the columns should be is listed in the HELP under the Bulk insert button.
 - these buttons affect the height of the rows.
 - for exporting table or selected rows to Excel.
 - from this button row fields can be selected and unselected. Only selected fields are displayed on the document.


3. Payment fields
3.1. Header fields
New design
 Old view

- Status - shows document status. Possible statuses:
- “New” - document is created but not saved;
- “View” - document is unconfirmed and open and there is no unsaved changes;
- “Changed” - there are unsaved changes;
- “Confirming” - confirming document is started (by clicking “Confirm”) but “Save” button is not yet pressed. This process can be cancelled by clicking “Confirm” again.
- “Confirmed” - document is confirmed and not changeable
- Number- document's number is created automatically when the document is saved for the first time. If necessary document number range can be changed with double-click or pressing “Ctrl” + “Enter” on the keyboard.
- Date- payment date. When opening new payment the document creation date will be shown in this field. Date can be changed if necessary.
- Reference - reference number can be used when adding invoice on the payment. Reference number in the payment header will be added to transaction reference field.
- Purchase invoices - total sum of purchase invoices on the payment rows. In case of currency invoices the sum is calculated according to the invoice date currency rate.
- Paid - total sum of payment rows. When using base currency and purchase invoices are paid in full, fields Purchase invoices and Paid values are equal. If currency invoice is paid in base currency then purchase invoices to be paid sum in base currency is shown in field “Purchase invoices”.
- Paid in currency - shows the sum paid in foreign currency. The sum paid and the sum paid in currency are the same in the base currency.
- Pay mode - payment mode, shows which method of payment is used for paying to supplier. With double-click or “Ctrl” + “Enter” it's possible to select, change or add new payment mode. Payment mode settings can be found
Settings > Finance settings > Payment mode. On prepayment payment mode type “Equal” should be used to avoid mistakes. Type “Equal” checks that using prepayment gives total sum 0. Currency sums are also calculated when used. - Comment - informative field. If payment is created from the purchase invoice, then comment field is automatically filled: Invoice nr xxxxx.
- Object - object used in accounting calculation. Using objects is not mandatory, except when objects are already in use and there is a need to add particular object to the sum of money. Selection of objects can be opened with double click or “Ctrl” + “Enter” combination.
- Project - project code. This is used in case where payment needs to be connected with certain project. When project is used on payment, this document will be shown in project reports. Selection of projects can be opened with double click or “Ctrl” + “Enter” combination.
- User- creator of this document
- Difference - if purchase invoice in foreign currency is paid in base currency and there is loss/profit due to currency rate changes (due to purchase invoice date and payment date currency rate changes) or commercial rate profit/loss, the difference is shown in that field.
3.2. Row fields
- NO – number of the row
- Invoice no. – to help adding right purchase invoice number to the payment, partially or fully unpaid purchase invoices list can be opened with double click or “Ctrl” + “Enter” combination. Invoice number can be also added manually.
- Supplier– to open suppliers list for adding supplier code to payment use double click or “Ctrl” + “Enter” combination
- Name in bank - supplier's name will be added here if supplier or purchase invoice is pasted on the document, informative field
- Supplier invoice - purchase invoice number issued by the supplier
- Object - purchase invoice header object
- Project - purchase invoice header project
- Bank cur – if the payment is in foreign currency, then by double-clicking or pressing Ctrl+Enter opens currency list, where can choose an appropriate currency to a payment. If the purchase invoice already has currency assigned, then when placing the invoice, the currency is also placed automatically from there.
- Bank sum– shows the sum to be paid
- PreID - Directo generates a prepayment ID or value for each payment row with a positive prepayment sum.
- Bank rate– shows the central bank rate of the selected currency on the payment date.
- Cust. total – shows supplier's total sum, if one supplier is on several rows, supplier's total sum will be shown on the first row.
- Cust. total EUR – supplier's total sum in EUR
- Bank account/IBAN– bank account from the supplier's card will be pasted here. Adding supplier to purchase invoice will also fill the bank account field there.
- Inv. balance – shows purchase invoice balance, this field is not changeable
- Description - text field, if it is filled in, then when importing to the bank, the “Comment field” of the payment order will be filled only with this information. If not filled in, the suppliers invoice number will be placed.
- Paid– shows paid sum
- Cur. Paid - purchase invoice currency
- Rate service - commercial currency
- Rate paid - purchase invoice currency rate
- Ref. - purchase invoice reference number. If several purchase invoices with a different reference number are filled in and paid to the supplier, these invoices will not be joined into one payment.
- Sum paid - purchase invoice sum at the time of purchase
- Paid EUR - the payment of the row is calculated in the base currency at the rate of the payment day
- Fine – fine sum
- Fee - field for bank fees. This field should be filled manually after payment transaction in bank is done. Fee can be filled in each payment row or as a sum to one row or can be also added to payment transaction manually after payment is confirmed.
- VC - VAT code
- Fee cur. - service fee in currency
- Date - payments created on several different days can be added to one payment document.
- Reg NO/ID Number - text field
- Document - displays operation name and generates Select prepayment option, when adding a payment to a supplier without selecting a purchase invoice.
- Costs - allows to share the payment service fee costs. Choice of SEPA, shared, us, theirs.
- Invoice cur – shows purchase invoice currency. This field is not changeable, use Cur. Paid for indicating payment currency if necessary.
- Payment No - payment order number
- Money receiver - allows to add a payee other than the supplier to the purchase invoice.
- Supplier warning - displays an alert, when the supplier has a debt balance
- Payment type - options SEPA, Normal, Urgent, Extra Urgent. Choose Normal, Urgent or Extra Urgent to send Luminor payments to the bank. The selection assigned to the supplier is added to the payment line.
4. Fine-tuning

- SETTING - System, Personal
- Supplier name goes to comment - if selected, the supplier names on the payment lines will go to the payment header comment field (list separated with commas).
- Export payment comment from p. invoice (when present) - the purchase invoice header comment goes to the payment comment cell when exporting the bank payment order. If purchase invoices are joined, appears a comment list separated with commas. If not selected, the supplier number of the purchase invoice or a numbers list with commas will be entered in the comment cell.
- Export does NOT join same supplier payments - all the purchase invoices are paid with separate payment orders. If not selected and purchase invoices do not have different reference numbers, then all the purchase invoices paid to the supplier are usually joined to one payment order.
- Due date is pasted from Purchase Invoice - allows to create a payment for purchase invoices to be paid in whole week. Payment terms that are on the rows are imported into the bank and the payment from bank are made according to the payment term on the rows.
- Attachment preview - possible to see the pdf-documents attached to the payment
5. Payment types
- Usual payment - unpaid purchase invoice payment to supplier, on payment rows corresponding purchase invoice is chosen.
- Prepayment - In case of prepayment to supplier, supplier code is added to the first row of payment, “Sum Paid” is filled with prepayment sum. Using prepayment is similar but sum is indicated with “-”. NB! In case of prepayment invoice number is not used. If paid sum is bigger than purchase invoice sum, then overpaid sum will be indicated as prepayment. In this case payment with two rows needs to be created. On the first row purchase invoice number, supplier and “sum paid” is added. On the second row supplier and overpaid sum on “sum paid” field are indicated.
- Netting payment - if existing prepayment needs to be used for paying purchase invoice. In this case payment with two rows needs to be created. On the first row of the payment purchase invoice number, supplier and sum is indicated. On the second row there is only supplier code and sum with symbol “-”.
6. Payment transactions
| What | D/C |
|---|---|
| Usual payment | |
| Money | credit |
| Debt to supplier | debit |
| Prepayment to supplier | |
| Money | credit |
| Prepayment to supplier | debit |
| Using prepayment with “Equal” payment type | |
| Prepayment to supplier | credit |
| Debt to supplier | debit |
Finance account for money is taken from the payment type - whether bank, netting, prepayment etc.
Finance account for Debt to supplier and prepayment are taken from the System settings > Purchase settings > Supplier prepayments, Supplier unpaid invoices
7. Export to the bank
Program offers the possibility to export payments to internet bank. For that there is a button “SEPA EST” on the payment document. For this button to appear “Export type” needs to be defined on the payment mode. In addition “Bank account” and “Bank” fields are also necessary for exporting payments to internet bank.

After clicking “SEPA EST” a window opens where payment files can be downloaded. Next step will be logging into internet bank and selecting “Import of payments”. After that upload the file into bank. After confirming the payments in the bank the operation is complete. For successful payments export into bank, supplier's bank account and if necessary reference number, need to be filled in on payment rows.
 Each click on “SEPA EST” button generates new values in “Payment No.” field. Later for relating bank statement and payment it's important to make sure that the newest export file is uploaded into bank.
Data order in Export file (SEPA EST) description:
- Purchase invoice has Vendors invoice field filled and “Description” column is empty on the payment - Information in the file will be in form: “Nr.xxx” (xxx=vendors invoice number from the purchase invoice“)
- Description field is filled on the payment document- data from the description field will be indicated in the export file.
- On the purchase invoice reference number is filled and description field is filled on the payment document - Reference number will be indicated in the export file
When working with different companies and their payments it's recommended to use System setting > Company short code - in window title to distinguish different companies payment files more easily. Payment file name format is following: Payment_number_company_short_code_payment_moce_code.
8. Sending payments to bank
LHV and Swedbank offer the possibility to send payments directly to bank.
8.1. Settings in Swedbank
- Company's legal representative has to add and sign digitally the service Payments import to internetbank

Keep in mind to remember (copy) the number of the contract


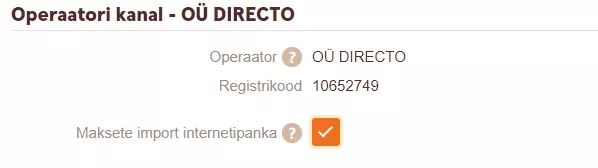
8.2. Settings and using in Directo
- Export channel needs to be defined on payment mode card. LHV Connect or Swedbank GW
- If using Swedbank, contract number needs to be added to the payment mode card field EXPORT CHANNEL CONTRACT
- In user or user group rights section Other corresponding Channel rights need to be granted. Accordingly: LHV Connect or Swedbank GW
- Instead of SEPA EST button Send to bank button is now shown
- Clicking the button will send the payment to bank. A note about the transaction will be indicated accordingly:

- This process can take up to 15 minutes. (If the payment is sent, the date of the sending time will be shown in bold)
- Payments can be sent again if necessary. User has to delete previous payment manually from the bank.

9. Purchase invoice payment in currency
9.1. Full purchase invoice payment in currency
If the purchase invoice is not in the base currency, then there will be an exchange rate difference in payment. It is necessary to follow the next rules in order for the exchange rate transactions to be correct. The following system settings accounts are used in the examples:

9.1.1. Currency purchase invoice payment in the same currency
- USD invoice is received from the supplier, paid also in USD.

Needs to be indicated on payment:
- Payment date and pay mode
- The purchase invoice is placed on the row
- Confirm the payment
Payment document: New design

Old view

The finance transaction is created after payment confirmation:

9.1.2. The purchase invoice payment in the base currency (EUR) with exact daily central bank rate
- USD invoice is received from the supplier, paid in EUR exactly at the central bank rate on the date of payment.

Needs to be indicated on payment:
- Payment date and pay mode
- The purchase invoice is placed on the row
- EUR is entered or selected to the Bank Cur field.
- Confirm the payment
- Sum is converted into EUR automatically in the Bank Sum field, nothing needs to be changed.
Payment document: New design

Old view

The finance transaction is created after confirming the payment document:

9.1.3. Currency purchase invoices payment in base currency (EUR) not at the central bank rate
- USD invoice is received from the supplier, paid in EUR at the rate agreed with the supplier.

Needs to be indicated on payment: (NB! Given order is important):
- Payment date and pay mode
- The purchase invoice is placed on the row
- Select or write the currency code, in which the payment is made to the Bank Cur field: EUR
- Enter the sum to be paid from bank to the Bank Sum field: 935.00
- Double click on the Rate Service field
- Confirm the payment
Payment document: New design

Old view

The finance transaction is created after confirming the payment document:

9.1.4. Currency purchase invoices payment in another currency (not in the base currency) with exact daily central bank rate
- USD invoice is received from the supplier, paid in SEK exactly at the central bank rate on the date of payment.

- Needs to be indicated on payment:
- Payment date and pay mode
- The purchase invoice is placed on the row
- SEK is entered or selected to the Bank Cur field.
- Confirm the payment
- The sum is converted into SEK automatically in the Bank Sum field, nothing needs to be changed.
- Exchange rate differences are calculated automatically in the Financial transaction.
Payment document: New design

Old view

The finance transaction is created after confirming the payment document:

9.1.5. Currency purchase invoices payment in another currency (not in the base currency) not at the central bank rate
- USD invoice is received from the supplier, paid in SEK at the rate agreed with the supplier.

Needs to be indicated on payment: (NB! Given order is important):
- Payment date and pay mode
- The purchase invoice is placed on the row
- Select or write the currency code, in which the payment is made to the Bank Cur field: SEK
- Enter the sum to be paid from bank to the Bank Sum field: 9850.00
- Double click on the Rate Service field
- Confirm the payment
Payment document: New design: After entering 9850 SEK, a warning is displayed
After double-clicking on RateService and confirming

Old view

The finance transaction is created after confirming the payment document:

9.1.6. Prepayment to supplier in currency
Needs to be indicated on payment:
- Payment date and pay mode
- Supplier code is entered to the Supplier field
- Select or write the currency code, in which the supplier wants the prepayment to the Bank Cur field: for example USD
- Enter the prepayment sum in currency to the field Bank Sum
- Confirm the payment
Payment document: New design

Old view

The finance transaction is created after confirming the payment document:

9.1.7. Prepayment to supplier in currency with commercial rate
Works only on the new design payment document.
Needs to be indicated on payment: (NB! Given order is important):
- Payment date and pay mode
- Supplier code is entered to the Supplier field
- Select or write the currency code in which the payment was made to the Bank Cur field
- Enter the amount that was paid in the bank to the Bank Sum field
- Select or write the currency code in which the the supplier received the prepayment to the Cur.Paid field
- Enter the sum in which the payment was made to the supplier to the Sum Paid field
- Double click on the Commercial rate field for the commercial rate to be calculated or enter the rate manually
Example: 1000USD is payed as a prepayment to the supplier from EUR account. EUR account was deducted in the amount of 935 EUR with the commercial rate (0,935). Central bank rate on the date of payment is 0.894054537.

The finance transaction is created after confirming the payment document:

9.2. Partial payment of purchase invoice in currency
9.2.1. Partial payment of the purchase invoice in the same currency
- USD invoice is received from the supplier, paid also in USD, for example 50%.

Needs to be indicated on payment:
- Payment date and pay mode
- The purchase invoice is placed on the row
- Enter the sum to be paid from bank to the Bank Sum field: for example 500 USD
- Confirm the payment
Payment document: New design

Old view

The finance transaction is created after confirming the payment document:

9.2.2. Partial payment of the purchase invoice in the base currency (EUR)
Works only on the new design payment document.
- USD invoice is received from the supplier, paid partially in EUR at the rate agreed with the supplier.
- For example, a purchase invoice of 1000 USD, 50% of the purchase invoice is paid, i.e. 500 USD, from bank is paid 470 EUR.

Needs to be indicated on payment: (NB! Given order is important):
- Payment date and pay mode
- The purchase invoice is placed on the row
- Select or write the currency code, in which the payment is made to the Bank Cur field: EUR
- Enter the sum to be paid from bank to the Bank Sum field: 470.00
- Enter the value of purchase invoice in currency to the Sum Paid field 500
- Press to the formula fx in the Sum Paid field
- Confirm the payment
Payment document:

The finance transaction is created after confirming the payment document:

10. Practical examples
10.1. On payment - the sum to be paid by the supplier is red with a minus sign / NEW yellow
If the supplier has issued invoices and credit invoices and the sum to be paid is negative, it will be marked with red. Red field is informative.
Old view

New design : Customer Total is negative and yellow

10.2. Placing several purchase invoices in a row
Double click on the purchase invoice number cell, opens the list of purchase invoices. Activate the Multiple record paster (the window does not close) under “Settings”

10.3. Directo purchase invoice number on the finance transaction row
New design

Old view

10.4. SEPA error message

This error message occurs when you want to send purchase invoices to a bank, but some purchase invoices have a different supplier name. In this case, purchase invoices with a different suppliers name will not be summarized.
New design

Old view

It is allowed to send credit invoices to bank with purchase invoices. One supplier purchase invoices are summed up, if the supplier name is written in the same way. Purchase invoices with reference number will not be summarized.
10.5. Error message when importing payment to the bank - comment too long
If too many purchase invoices are paid together, the purchase invoice numbers will not fit in the comment field. Also, the payee does not know which purchase invoices have been paid.
Xml fail adds all one supplier purchase invoices rows together and purchase invoice numbers are written to the comment field when importing one supplier purchase invoices to the bank.
Bank issues a warning that comment is too long, if too many purchase invoices are paid together and reference numbers are not in use.
Possible solutions:
- use fine-tuning Export does not join same suppliers payments
- create multiple different payments with less purchase invoices
- use reference numbers
- send payment report to the supplier Purchases - Reports - Payments
10.6. Purchase invoice number added to the transaction row
To simplify verification, the Directo purchase invoice number is added to the Payment finance transaction.
- Works with system setting
Finance transactions from ledgers in rows - asset part too


- Works with system setting
Finance transactions from ledgers in rows - debt part


10.7. The payment exchange rate transaction is created separately for each purchase invoice
Every purchase invoice exchange rate transaction is on a separate line and the purchase invoice number and header object are added to the transaction line to track exchange rate gains/losses.

10.8. Why the payment cannot be confirmed, although the object is marked on the row?
If the account object level is required and the payment row has object level object verify if in system settings are marked
- Finance settings - Payment uses Purchase Invoice object on rows - YES
- Payment settings - Payment uses header object for the Asset Accounts - NO

10.9. Payments - own right does not work
User group own right does not work when making payment. If it is necessary to give the user the rights to see only limited payments and the right to see only certain bank accounts, it is possible to
- Use the user group extended right
- Use the limited right
- Make a separate payment modes for each bank account.
- Rights can be limited in visibility rights.
- Add the right to see limited payment rights under the user or user group rights.

If the cell is empty, everything is allowed. Comma separated list. If at least one code is filled in, only that code is allowed.
10.10 Payment extended right
- The user sees only payments where an object, indicated on personnel card, is marked in the header
- User group rights have document = payment marked extended right
If the user group has the Payment Extended right, the user can only see payments with the object on the personnel card.
If the right is extended, but the object is not marked on the user's personnel card, then it behaves like an “All” right and sees all payments. If you add an object to the user, only payments with this object in the header will be visible.
11. Examples of system settings
11.1. System setting - Finance transactions from ledgers in rows
- Finance transactions from ledgers in rows - affects receipt, payment and expense due entry lines. Options:
no - rows with one account are summed to one row in the related finance transaction (if the document rows do not have different objects or projects).
debt part - money flow is with one transaction row, the receipts/payments of customers/suppliers are in a separate row, as on the receipt/payment document, i.e. there is no rows consolidation on the debt side. Objects and projects are considered.
asset part too - money flow and customers/suppliers receipts/payments are in a separate rows as on financial transaction.
like payment file - the flow of money is the aggregate by customer/supplier, and on the ledger side, the invoice is reflected line by line, the invoice number is at each row beginning.
Payment document

11.1.1. Finance transaction with options NO - Finance transactions from ledgers in rows
The debit and credit sides are a cumulative total

11.1.2. Option DEBT PART - Finance transactions from ledgers in rows
The money flow is in the cumulative total and the debt side of the ledger is by purchase invoice rows, at the beginning of each row is the number of the purchase invoice.

11.1.3. Option ASSET PART TOO - Finance transactions from ledgers in rows
Money flow and Accounts Payable are on separate rows in transaction, at the beginning of each row is the purchase invoice number.

11.1.4. Options like PAYMENT FILE - Finance transactions from ledgers in rows
Money flow is cumulative total by supplier and the debit side is on separate invoice rows, at the beginning of each row is the purchase invoice number.

12. Prepayments via PreID (NEW PAYMENT DOCUMENT)
These payment rows, which do not refer to any specific purchase invoice, affect the prepayment balance in the purchase ledger and the customers prepayment balance in the balance sheet. Directo generates a unique prepayment ID or PreID value for each payment row with a positive prepayment sum, which can later be used to link the purchase invoice to a specific prepayment row. In the prepayment row can use the account to which the prepayment can be entered in the balance sheet - if the account is left empty, it will be taken either from the supplier's card in the payment row or if no account has been specified in the PP account field on the supplier's card, then from the system setting Supplier prepayments. Prepayment row object and project are used to create the transaction.
12.1. PreID on payment document
An example of a payment where two prepayments of different sums and purposes have been paid to the same supplier :
New payment document

Transaction

12.2. PreID prepayment use on the purchase invoice
The payment rows identified via PreID can be linked to the purchase invoice. To make a choice, must click on the Prepayment link in the purchase invoice header, which opens a section on the purchase invoice, where can see the PreID of the given supplier with an usable balance.
A double-click inside any of the Selected column fields will attempt to match that specific prepayment with purchase invoice prepayment uncovered sum.

PreIDs manual selection is not mandatory! If no manual selection is made or the selected sums do not fully cover the purchase invoice prepayment sum, selects Directo automatically the necessary IDs using the FIFO method.
After confirming the purchase invoice is created following transaction:

The prepayment row uses the account, object and project resulting from the payment row associated with the selected PreID.
If the object was not filled in the payment row to which the PreID refer to, is used purchase invoice object for corresponding transaction row.
If the system setting Prepayment takes object from Customer/Supplier is something other than No, the object found via EtteID is not used.
12.3 Using PreID on payment
Example :

To reduce the prepayment balance on the payment document, must select a PreID with a sufficient balance to the payment row with a negative sum to be paid.
- Write manually or double-click on the corresponding payment row PreID field, which opens the PreID placer. Objects and projects are placed from PreID.

- Write the supplier's code and the sum with a minus sign, PreID is selected using the FIFO method, when saving. By placing it in this way, prepayment objects and projects will not be included.

12.4. Examples of currency prepayments


The prepayment is used for payment at the same exchange rate as the original prepayment.
12.4.1. Prepayment use on purchase invoice in currency
- Prepayments can only be used in the same currency as the purchase invoice. If the prepayment is created in EUR and the purchase invoice is in USD, the prepayment cannot be used on the purchase invoice.
Using prepayment in currency on the purchase invoice at the rate of the prepayment date
 Transaction

12.4.2 Prepayment netting on the payment document in currency
Example : Prepayment
 Transaction

To use prepayment
- Use payment type, which TYPE=EQUAL
- Place PreID
- Place purchase invoice
- Enter manually the same exchange rate to the purchase invoice as on the prepayment in the BankRate field

The exchange rate profit/loss is calculated on the transaction

- If several prepayments are used for one purchase invoice netting, the purchase invoice must be placed on several rows and the payment sums and exchange rates must be manually overwritten with the currency rate in Prepayment.
Purchase invoice
 Transaction

12.4.3 Before PreID, netting the currency prepayment with the purchase invoice in the same currency on the payment document, if the prepayment sum is smaller than the purchase invoice
- if the prepayment is in currency, e.g. USD, then it should also be used in the same currency
- if the purchase invoice is smaller than the prepayment, then mark to the Paid field on the payment the sum that can be settled with the prepayment.

Necessary steps
- place purchase invoice
- place supplier code and choose prepayment
- if the prepayment was created before 25.11.22, use the old design document and select the prepayment from the list

Change the purchase invoice fields

After changing the fields, confirm the purchase invoice

12.4.4. Netting - prepayment and purchase invoice are in different currencies
If the prepayment is in a different currency, it is possible to settle it with a purchase invoice in another currency. The currency in which the prepayment is made must be marked on the purchase invoice for payment.
- when using prepayment mark the prepayment with the same exchange rate as payment Bank rate
- the purchase invoice is paid in the same currency as the prepayment Bank cur
- when making purchase invoice payment mark the same exchange rate in which the prepayment was made Bank rate.
- use the netting payment as payment mode, which type is = equal

The exchange rates are calculated on the financial transaction 
Payment mode type must be equal

12.4.5. Netting - prepayment and purchase invoice are in the same currencies
If the prepayment is in the same currency as purchase invoice
- when using prepayment mark the prepayment with the same exchange rate as payment Bank rate
- the purchase invoice is paid in the same currency as the prepayment Bank cur
- when making purchase invoice payment mark the same exchange rate in which the prepayment was made Bank rate.
- use the netting payment as payment mode, which type is = equal
- exchange rates are calculated on the financial transaction
12.5. Previous prepayments
All the earlier suppliers prepayments are without a prepayment number and will be used without a prepayment number. The PreID functionality only works on a new Payment document.
12.5.1 How to see correctly the prepayments in the Supplier prepayments report
- If there are few prepayments, open previous prepayments, press save (e.g. add a dot to the comment field to create a save button) and confirm again. Start by over confirming the original prepayments, then move to the used prepayment documents.
- If there are lots of prepayments, use the OLD Payment document to link the old prepayments.