Turinys
Purchase invoice
1. Purchase invoice buttons
1.1. Unconfirmed purchase invoice header buttons
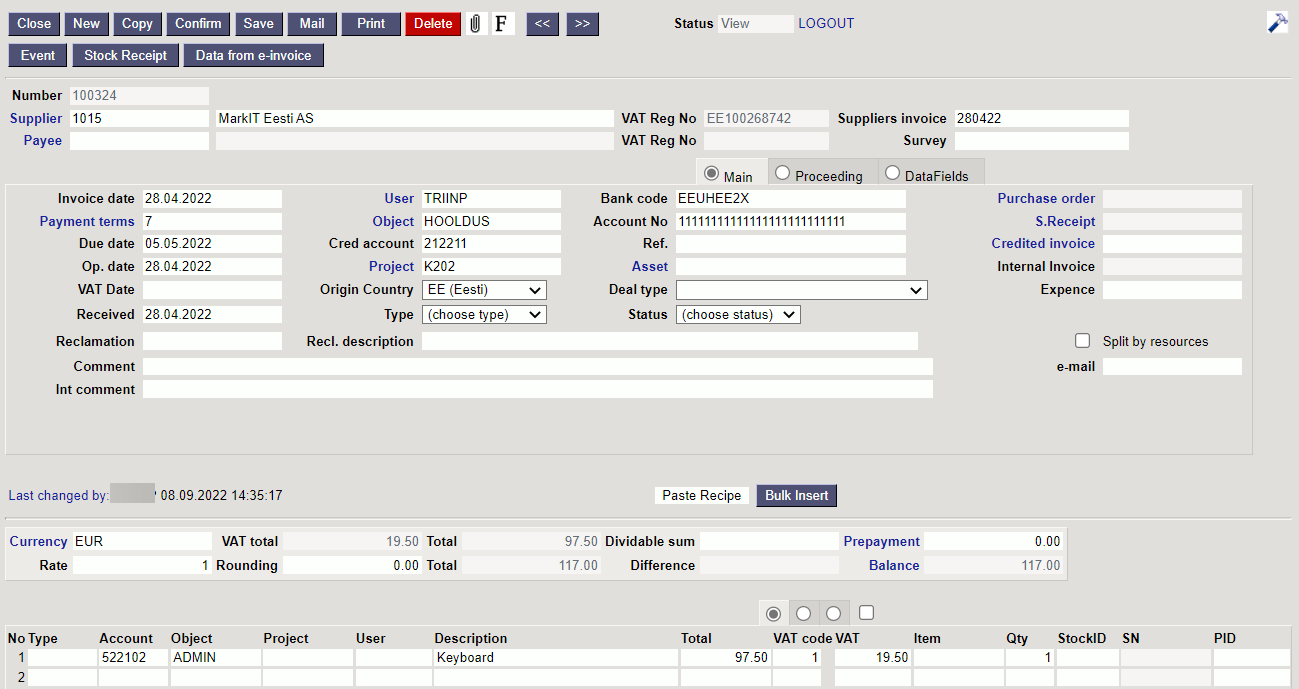
- Close - closes the document, after checking if the document has unsaved changes
- New - opens new blank document. Checks in advance if the previous document contains unsaved changes.
- Copy - makes a copy of the document. It means new document is created, where most fields are filled in as in the source document (range of copying depends on the system setting -
Document copy selection) - Confirm - confirms document if save button is pressed after confirm button. As a result, a transaction related to the purchase invoice is automatically created
- Save - saves the document
- Mail - an e-mail address must be entered first
Settings → Personal settings → User. Sends a printout of the purchase invoice by e-mail. By right-clicking you can choose between existing printouts - Print - prints a printout. After pressing Print, a document preview is displayed briefly and the printer selection window opens. By right-clicking you can choose between existing printouts.
- Delete - deletes unconfirmed document
- Paperclip - allows to link attachments to document
- Forum - you can read and write about Directo, also can start own forums within company
- Event - creates an event related to the purchase invoice. The number of related events is shown in the upper right corner of the document and can be opened from a link
- Stock Receipt - allows to create an income document directly on the purchase invoice. The generated stock receipt is automatically filled in with the data related to the supplier and the purchase invoice.
- Data from e-invoice - opens Dokumentide transpordi register from where you can select an e-invoice that partially fills in the purchase invoice fields
1.2. Confirmed purchase invoice buttons
- Credit - generates credit invoice filled in on the purchase invoice basis
- Transaction - opens a transaction related to the purchase invoice
- Payment - generates Payment to the purchase invoice
- CashOUT - generates a cash withdrawal order with the information from the purchase invoice
2. Purchase invoice fields
2.1. Header fields
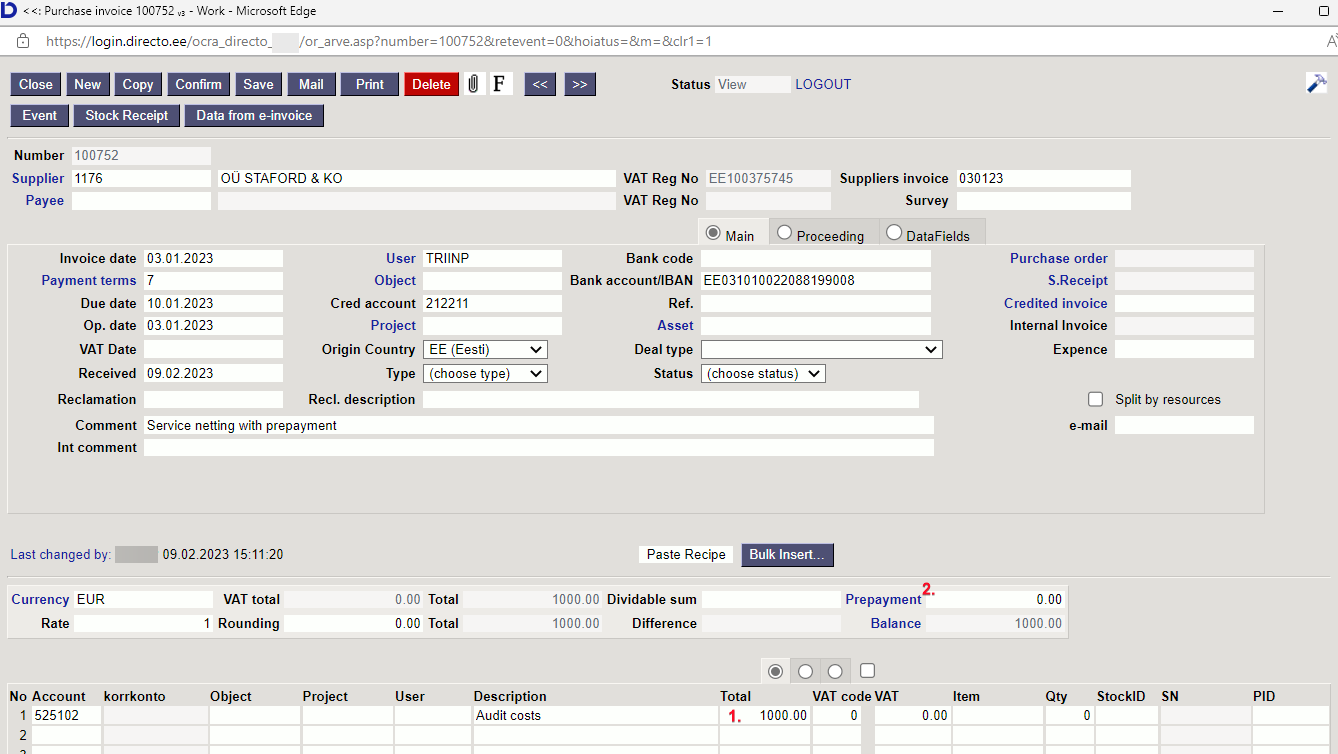
- Number - document number. When making new document range code is shown there. By double-clicking or with Ctrl+Enter the right range can be selected
- Supplier - supplier code. Can be selected from suppliers registry by double-clicking or using Ctrl+Enter
- VAT Reg No - supplier`s VAT registration number
- Suppliers invoice - supplier`s invoice number
- Payee - supplier to whom the purchase invoice is paid. Only filled in if it is different from the purchase invoice supplier.
- VAT Reg No - bill to supplier VAT registration number
- Survey - at the moment for the customers working with optics. Can be selected by double-clicking or using Ctrl+Enter.
- Invoice date - the date of the document, by right-clicking opens the calendar view
- User - user generating the document is placed here automatically. Can be overwritten or switched with double-click. Pressing on the user opens the inserted user card.
- Bank code - bank code, can be selected by double-click or with Ctrl + Enter from the bank register.
- Purchase order - the number of the purchase order document to which the purchase invoice relates
- Payment terms - Payment terms. Can be selected by double-clicking or using Ctrl+Enter
- Object - Object(s) or financial dimension(s) related to the purchase invoice. Pressing on the object opens the inserted object card.
- Bank account/IBAN - the bank account number where the purchase invoice will be paid to
- S.Receipt - the number of the stock receipt document to which the purchase invoice relates.
- Due date - payment deadline. Calculated automatically when the payment term is set

- Cred account - debt account. Locates automatically from
System settings > Supplier unpaid invoicesor from supplier card, if debt account is filled on supplier card. Can be overwritten - Ref. - reference number
- Credited invoice - if the purchase invoice is generated from another purchase invoice by using credit button, the number of the purchase invoice to be credited is displayed here
- Op. date - transaction is generated with this time after confirming the purchase invoice. The time of the invoice date is automatically set here
- Project - project code. Used if you want to link to a specific project. When a project is entered, the document is reflected in the project reports
- Asset - if the purchase invoice is related to inventory, you can add the inventory code here. If you want to see the inventory code in the Purchase invoices report, the inventory should be added to the line of the confirmed purchase invoice
- Internal Invoice - the sales invoice number, which is filled in automatically when the purchase invoice is generated during the confirmation of the Internal invoice
- VAT date - date, by right-clicking opens the calendar view
- Origin Country - is automatically placed from supplier´s card when filled
- Deal type - choice of deal types
- Expence - if the purchase invoice is related to an Expense, you can enter the expense number here. By double-clicking or with Ctrl+Enter the right expense can be selected
- Received - invoice date is automatically placed here
- Type - choice of purchase invoice types from system settings
- Status - choice of purchase invoice statuses from system settings
- Reclamation - by the amount entered here, it is possible to reduce the amount of payment created through the payment forecast
- Recl. description - free text field for reclamation
- Split by resources - divides the rows marked with the resource number
- Comment - free text field for comments
- e-mail - the default email address will be taken from here when emailing the invoice
- Int comment - free text field for internal comment
2.2. Row fields
- Type - option of expense type
- Account - can be selected by double-clicking or using Ctrl+Enter, account number is placed
- Object - object or list of objects with commas
- Project - option of the project tab
- User - option of the user tab, the code is placed
- Description - account name, can be over-written
- Total - purchase invoice net sum
- VAT code - VAT code is placed
- VAT - calculates VAT if VAT code is filled
- Item - item code is placed, can be selected by double-clicking or using Ctrl+Enter
- Qty - quantity. The quantity is placed on the financial transaction.
- StockID - stock item code
- SN - serial number - information field
- PID - purchase ID
- Customer - customer code, can be selected by double-clicking or using Ctrl+Enter
- Invoice No - can be selected by double-clicking or using Ctrl+Enter
- From resc. - resource code
- Contract - contract code
- Int comment - text field
- Start - periodization start date, by right-clicking opens the calendar view
- End - periodization end date, by right-clicking opens the calendar view
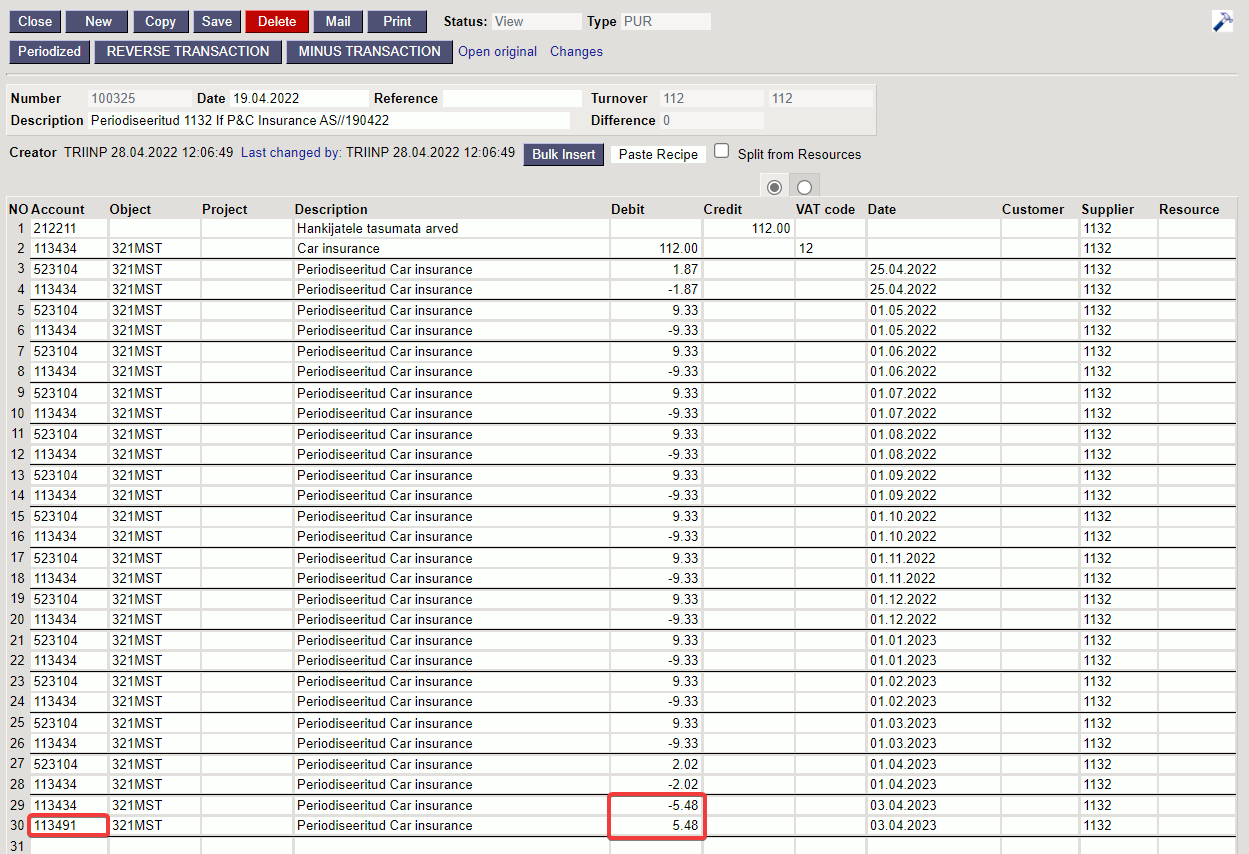
- Abort date - periodization abort start date. The field appears on a document that is confirmed and has automatic periodization applied.
- Abort amount - the amount that will be returned after the periodization abort. The field appears on a document that is confirmed and has automatic periodization applied.
- Abort account - the account to which the amount left over from periodization is transferred. It will be marked automatically when the system setting is filled, but it can be changed on the document. The field appears on a document that is confirmed and has automatic periodization applied.
- Abort object - selection from the object list. The field appears on a document that is confirmed and has automatic periodization applied.
- Abort project - selection from the project list. The field appears on a document that is confirmed and has automatic periodization applied.
- WIP - checkmark
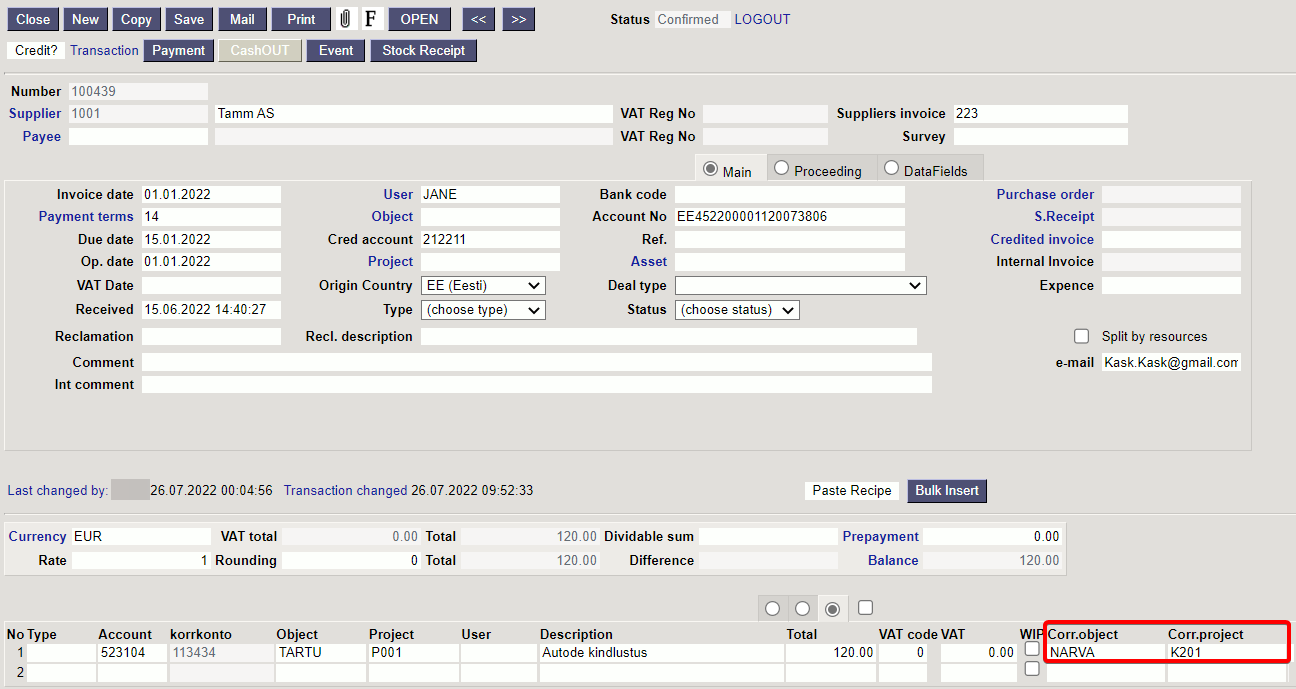
- Corr. object - the object of the amount to be periodized. Can be selected by double-clicking or using Ctrl+Enter. If it is filled in, the Core. object is placed on the transaction expense account row. Enables to use different objects in the corresponding balance account and expense account.
- Corr. project - project of the amount to be periodized. Can be selected by double-clicking or using Ctrl+Enter. If it is filled in, the Core. object is placed on the transaction expense account row. Enables to use different objects in the corresponding balance account and expense account.
- S. Receipt - receipt number
- Suppliers invoice - the invoice number is placed
- Subtotal - receipt sum
- Resource - resource code
- Expense - possible to place an expense to which the purchase invoice is related to on a document with a double click
- Asset - only on confirmed purchase invoice. New fixed asset or low value asset code created from the purchase invoice. The field fills after the card created with the NEWFA or NEWLVA buttons is saved.
- NEW FA - only on a confirmed purchase invoice, it is possible to initiate a new fixed asset card.
- NEW LVA - only on a confirmed purchase invoice, it is possible to initiate a new low value asset card.
- Asset - only on confirmed purchase invoice. Can be placed with double click, if you want to add an additional amount of fixed assets or low assets through expense.
- ADD FA - only on a confirmed purchase invoice. The button is active only if the asset code is filled in the previous field. To add an additional amount of fixed assets.
- ADD LVA - only on a confirmed purchase invoice. The button is active only if the asset code is filled in the previous field. To add an additional amount of low assets.
3. Fine-tuning
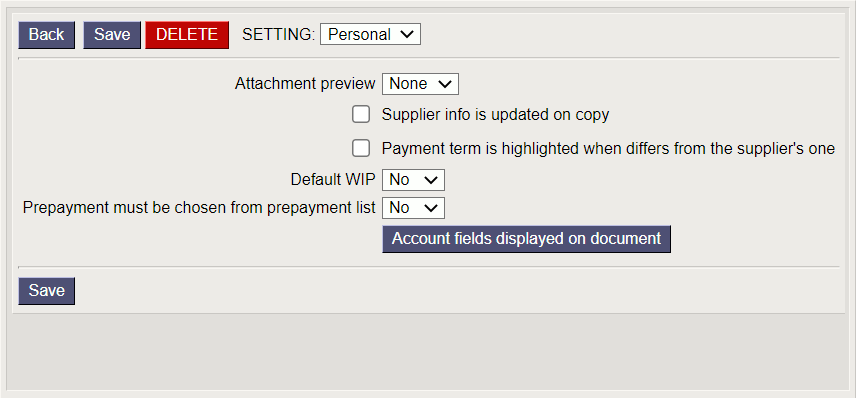
Pressing the  button on the right side of the header, opens the fine-tuning settings.
- Attachment preview - choices none, right, down
- Supplier info is updated on copy - if the supplier´s card has been changed, the copy will be filled in with the valid information from the supplier´s card (for example bank account has changed)
- Payment term is highlighted when differs from the supplier's one - if the supplier´s card has different payment term than the invoice, the payment term will be highlighted
- Default WIP - WIP is automatically marked to all filled rows
- Prepayment must be chosen from prepayment list -
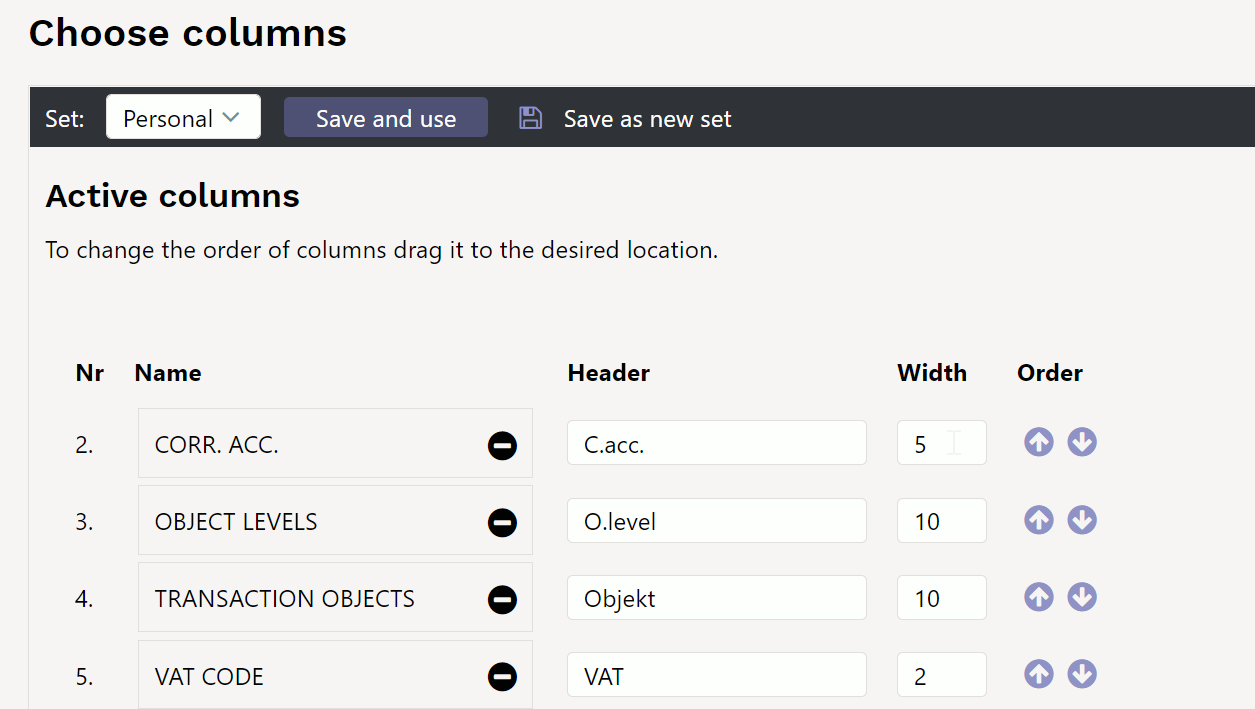
- Account fields displayed on document - different account fields can be shown on the purchase invoice rows, including datafields
You can change the column names and width by setting the account fields
4. Periodization
The periodization functionality allows you to provide the necessary parameters when entering the original document, so that a periodic entry is made immediately after the document is saved.
The periodization functionality has been applied to the Purchase Invoice and Expense to periodize expenses and to the Sales Invoice to periodize incomes. It can also be used on Transaction.
Periodization can be started automatically. Automatic periodization takes place when confirming the document, if the corresponding setting is switched on and the required fields on the document have been filled in.
Automatic periodization is applicable to Purchase Invoice , Expense and Invoice .
4.1. Periodization methodology
Periodization is based on two rules: monthly periodization and daily periodization.
Monthly periodization - period is divided into months and all the periodized parts are equal. Monthly periodization applies if applies the formula: periodization end date + 1 = periodization start date. Periodization period can be divided into full months.
These periods are for example:
Example A. 01.02.2019-31.01.2020 (31. + 1 = 1. day) and the period is divided exactly into 12 months;
Example B. 20.02.2019-19.12.2019 (19. + 1 = 20th day) and the period is divided exactly into 10 months.
⇒ (01.03. until 30.11 = 9 months) + (20.02 until 28.02.2019 = 1/3 months) + (01.12 until 19.12.2019 = 2/3 months) = 10 months.
If the periodized sum is 300 EUR, then in example A the period sum is: 300 EUR / 12 months = 25 EUR and the same sum applies to all periods.
In example B the period sum is: 300 EUR / 10 months = 30 EUR. 30 EUR applies to every month in period 01.03.-30.11.2019 (9×30 EUR). Between the periods 20.02 -28.02.2019 and 01.12-19.12.2019, which form an additional month, 30 EUR is divided so that the first period receives its share in proportion to the days remaining in that month and is based on a 30-day month ⇒ 30/30 * 20 days = 20 EUR.
The periodization balance goes to last partial month 300 - 270 - 20 = 10 EUR.
Daily periodization.- applies if the period is not divided into full months or the rule periodization end date + 1 = periodization start date does not apply.
4.2. Automatic purchase invoice periodization
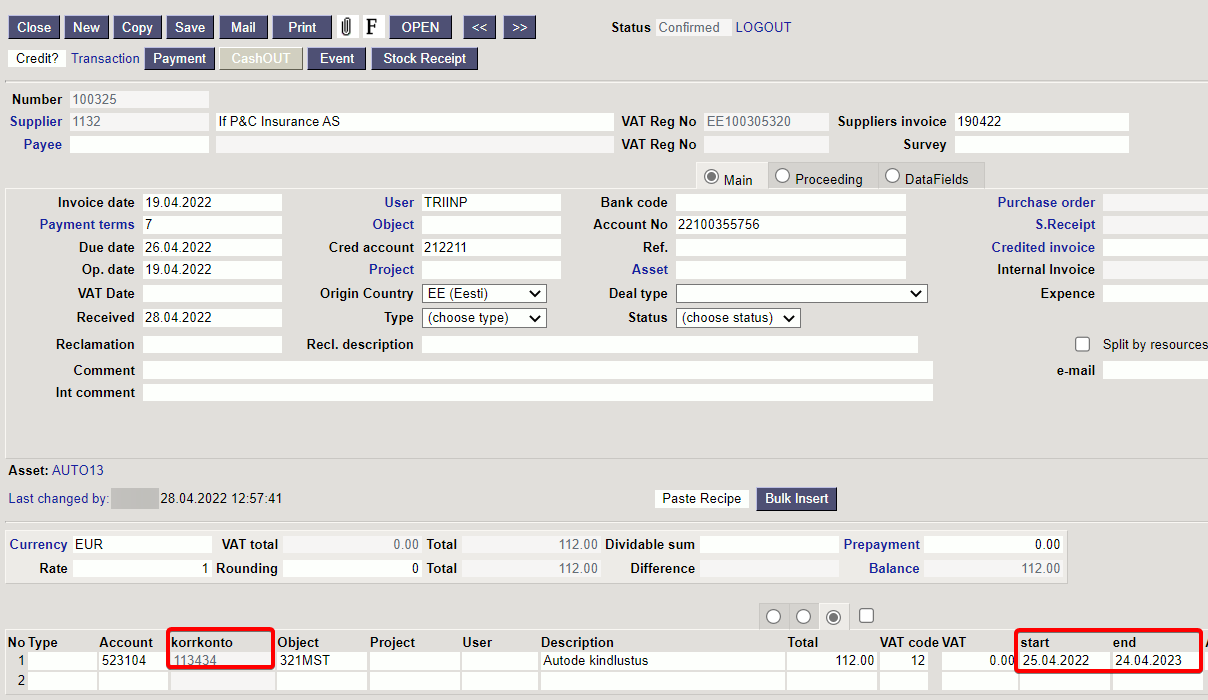
Settings > System settings > Finance settings > Automatic Periodization must be activated to periodize purchase invoice automatically. Then fill in the periodized period on purchase invoice (columns Start and End).

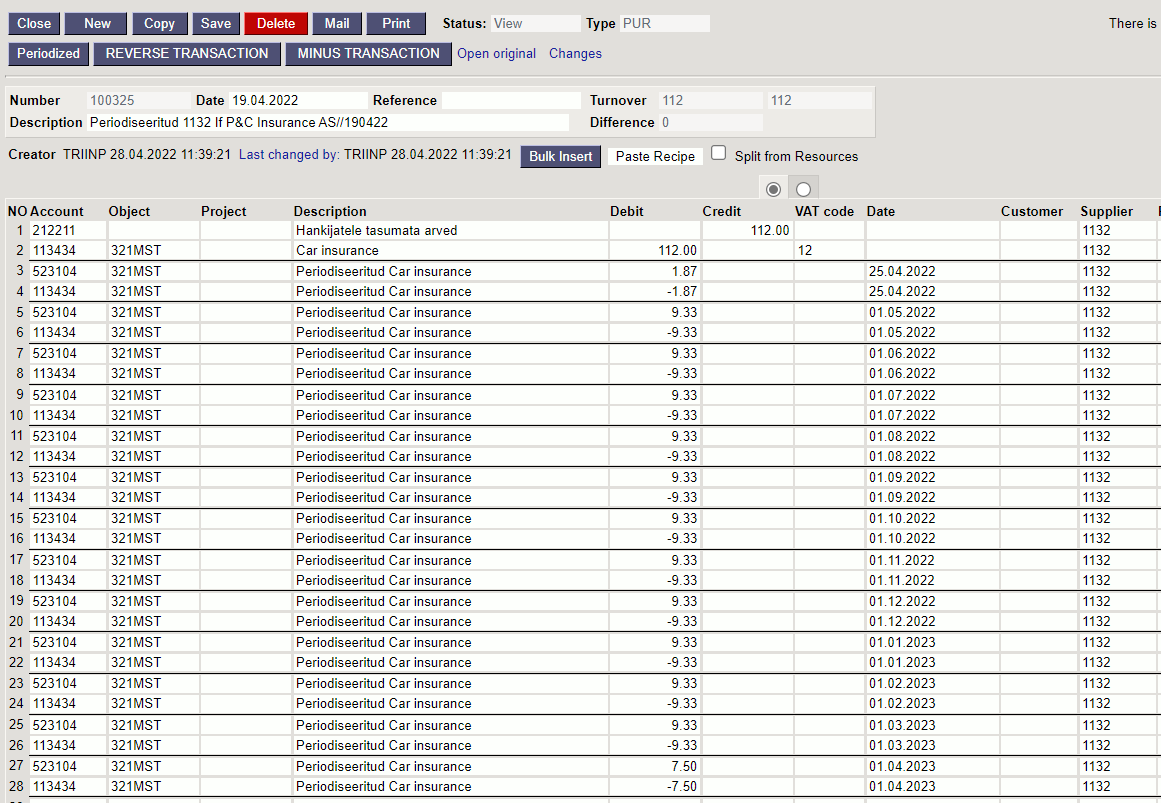
Example:
4.3. Automatic purchase invoice periodization - different objects / projects in the accounts
If it is necessary that periodization account has different objects/projects than corresponding account (future periods cost), then the corresponding account objects should be entered to the Corr. object field and projects to the Corr. project field.
4.4. Periodization abort
Periodization abort is intended to reverse a periodization transaction if the circumstances or conditions of the periodization transaction change.
For example an insurance contract, which costs were periodized, was terminated and the money is partially returned to the insurant. One option to abort the periodization is to manipulate the periodized transaction and change its end date to reflect reality (change the cost of the periods during which the transaction was cancelled to claim). But this may not be the best way and not possible if the restriction of editing the transactions of the original documents is enabled under the user's rights (this restriction is strongly recommended). An alternative and better method is to use the periodization abort functionality on the purchase invoice.
4.4.1. Settings
System setting Automatic Purchase Invoice Periodization Abort Account allows to enter an account to which the aborted amount will be transferred. A receivables account is usually used in this situation. For better control, it is recommended to create a separate asset account, for example “Aborted Periodizations”. Aborted amount will remain in this account after the periodization abort. If the amount is credited to a bank account, it is recorded in a separate transaction (D Bank; K Periodization abort). This setting is optional, offers convenience and it can also be done by entering the appropriate account during the transaction.
4.4.2. Use
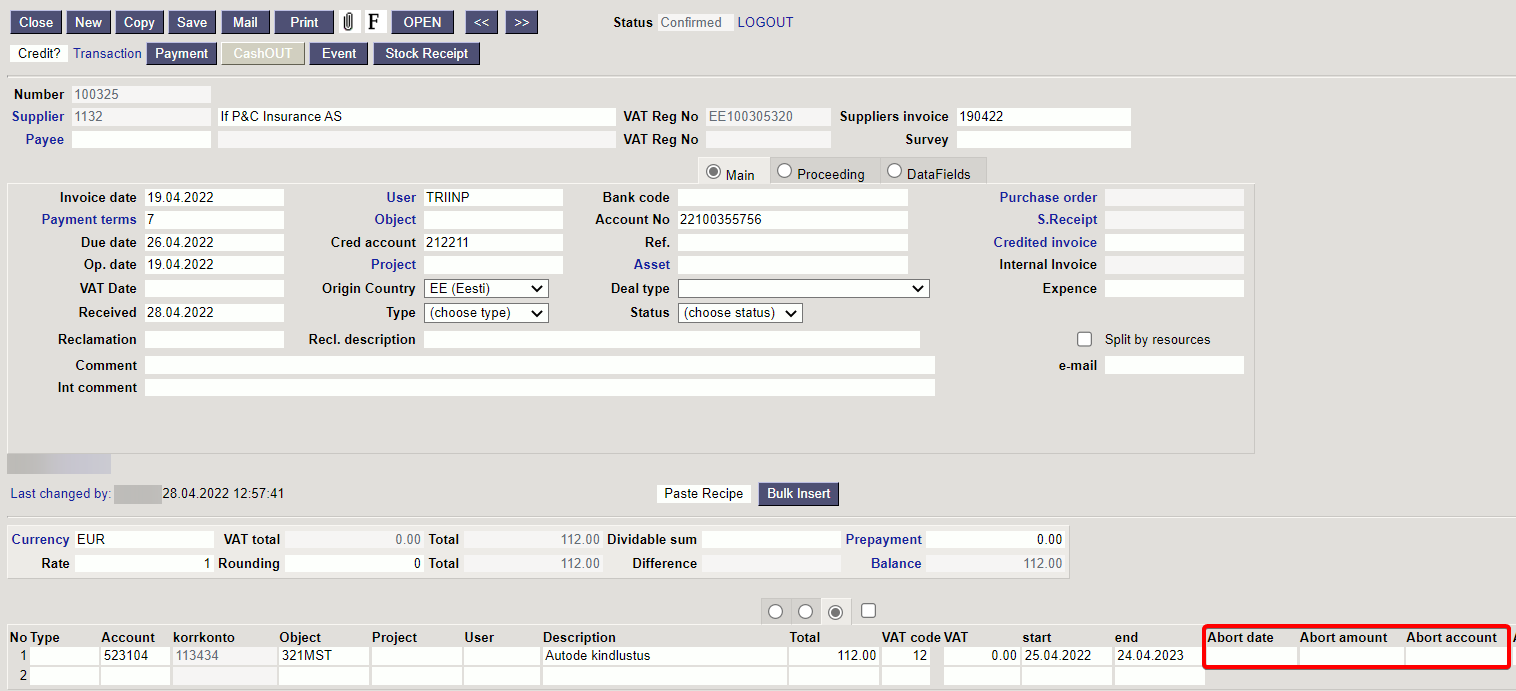
Periodization abort can be applied to a purchase invoice that uses automatic periodization and the document must be confirmed. Required fields to abort the periodization are below the third dot at the top of the lines:
Abort date- periodization abort date. This can be any date, which remains within the initial periodization period. This means it does not have to be the end of the month, etc. Periodization abort cannot be in a closed period.
Abort amount- the amount that will be refunded after the periodization abort;
Abort account- the account into where the remaining periodization amount is transferred. It will fill up automatically when the above system setup is completed. But it can be changed on the document as well.
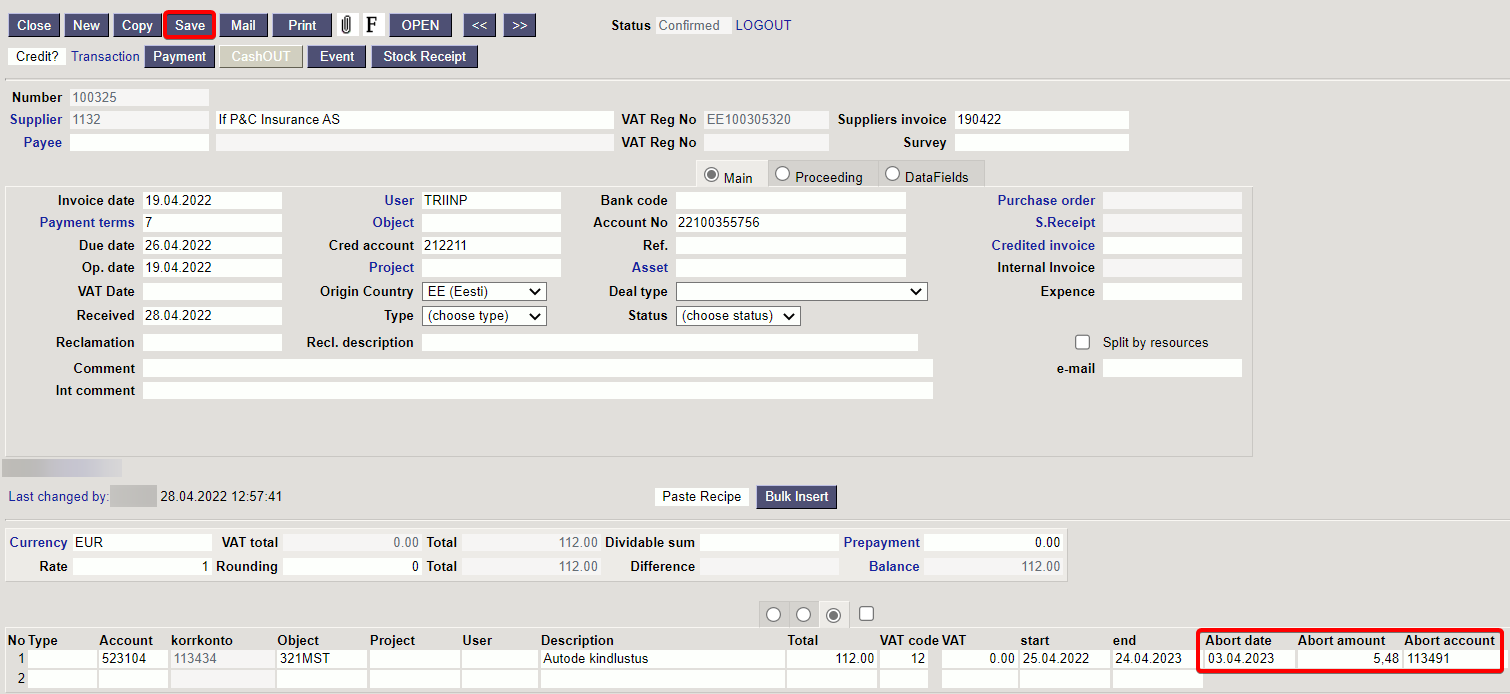
It is mandatory to fill all these fields to abort periodization. When all the fields are filled, save the document to complete the periodization abort. As a result all the periodization abort data will be saved on the document and the transaction abort part will be modified:

- Abort date cannot be in closed period
- Periodization abort requires the right to change the confirmed purchase invoice.
4.5. Changing a confirmed purchase invoice
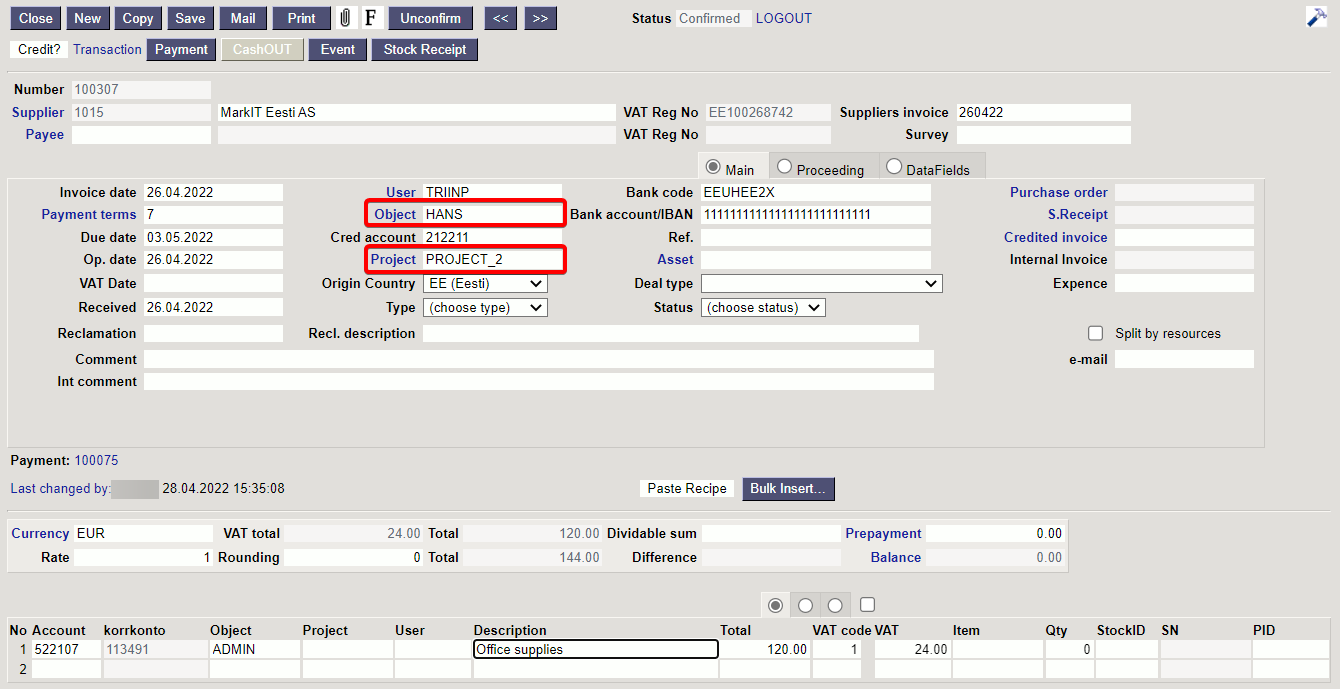
After confirming the purchase invoice it is possible to add or change the header object and project and change the financial transaction with the right of a certain user group.
Settings → Common settings → User groups → Documents → purchase invoices Confirm right settings:

Confirm - No - purchase invoice can be filled and saved, but cannot be confirmed.
Confirm - Jah - purchase invoice can also be confirmed, but changes to the header object and project are not allowed.
Confirm - Confirmed - allows to change or add an object and project to the confirmed purchase invoice header.
If the fields are filled in, press the Save button on the document to finalize the changes.
The object and project added to the header are displayed both on financial transaction supplier and expense account.

5. Use of prepayment item on purchase invoice
5.1. Create purchase prepayment item
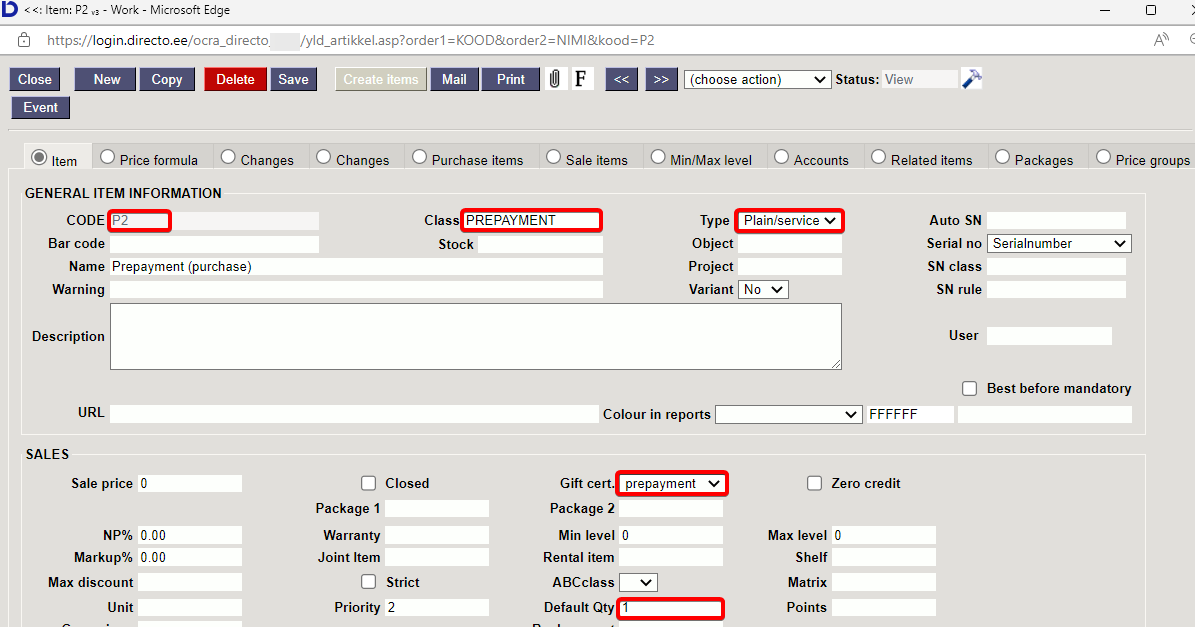
Important fields
- Class = PREPAYMENT (prepayment class)
- Type = Plain /service
- Gift cert. = Prepayment
- Default Qty. = 1
5.2. Creating a prepayment purchase invoice
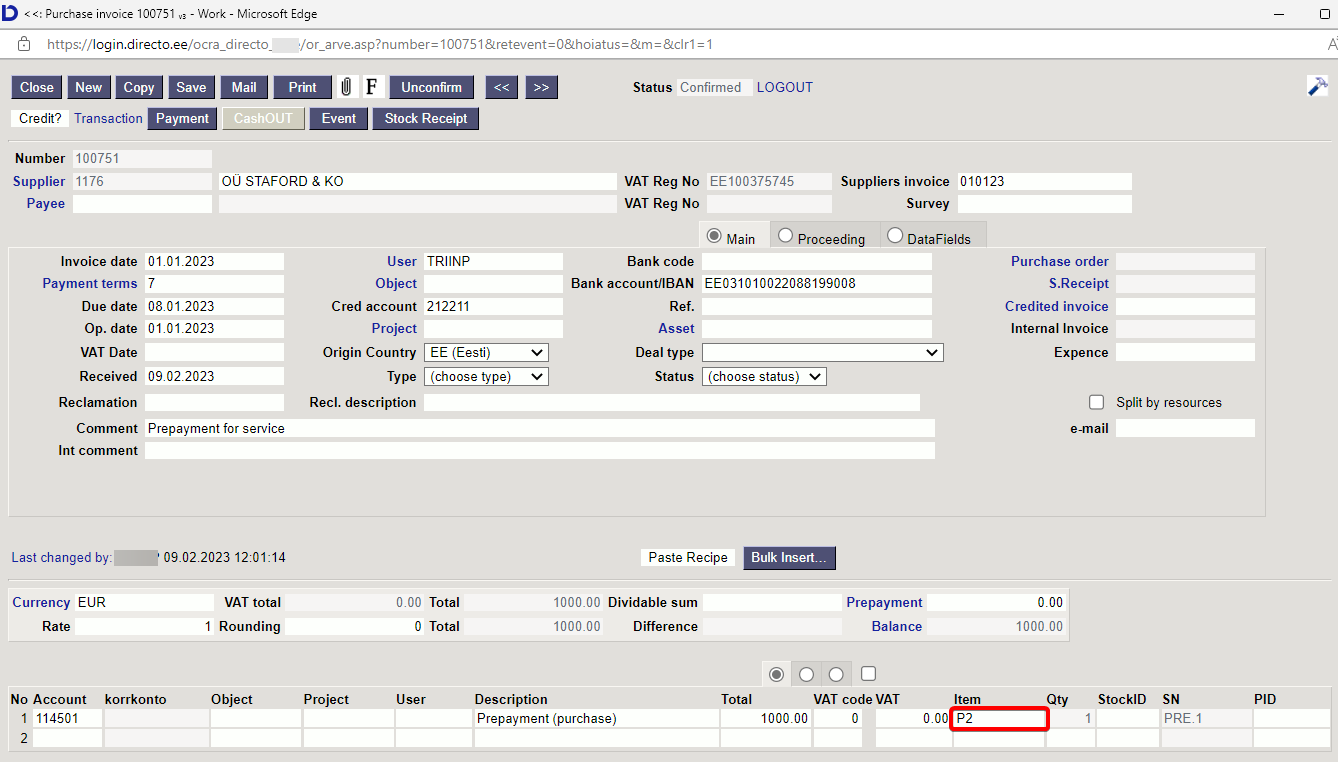
Select the appropriate purchase prepayment item in the row, when creating a purchase invoice
Purchase ledger before the purchase prepayment invoice payment
Purchase ledger after the purchase prepayment invoice payment
5.3. Using a purchase prepayment item
5.3.1. Create a purchase invoice and fill the expense
5.3.2. Choose a suitable prepayment
Click on Prepayment and select the purchase invoice that you use for prepayment and double-click on the Selected field. The selected prepayment is placed on the purchase invoice row

5.4. Why can't the purchase invoice be confirmed?
5.4.1. Confirming a prepayment on a purchase invoice gives an error if there are prepayments with pluses and minuses
When using a prepayment item on the purchase invoice, only either the prepayment item or the prepayment with a minus sum can be used to cover the cost.
On one purchase invoice must not be used one prepayment and then use the next prepayment. For this create two separate purchase invoices.
6. Examples
6.1. Using additional account fields
Account fields and additional fields can be displayed on the purchase invoice as much as necessary. It is user-based, so every user can choose different fields.
Column names and widths can be changed when setting the fields from finetuning
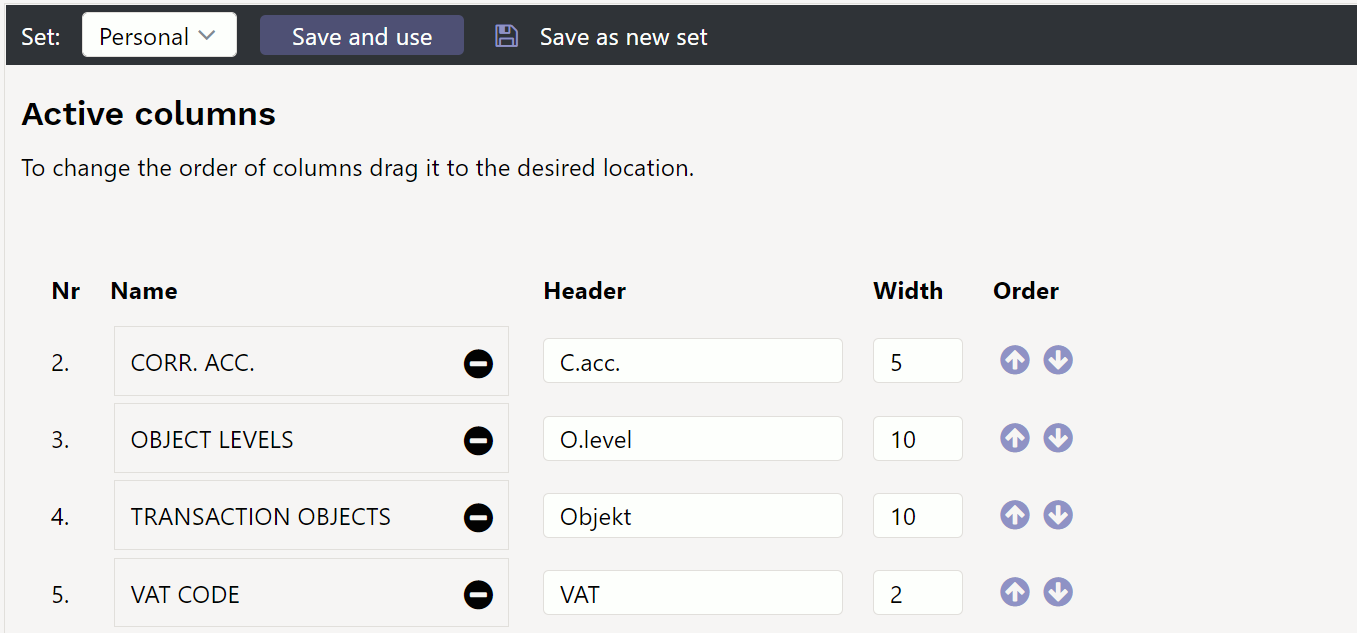
- transaction objects - the objects marked on the account as transaction objects are saved to the purchase invoice transaction line after confirming the document.
- object levels - gives a reminder of which object levels must be filled. Otherwise, the purchase invoice will not be confirmed.
- corr.acc. - if the purchase invoice needs to be periodized, it is visible whether the account required for periodization is filled on the account card. Periodizing do not occur if the corresponding account is missing from expense account.
- account datafield - reminders can be written - what to keep track of, what financial recipe to use, who to ask, etc.
- several fields at once - as many fields as needed can be selected and in any order.
6.2. Prepayment use
If you enter the sum directly in the Prepayment field, the prepayments will be linked to the purchase invoice in the order of the date after confirmation.
If there are multiple prepayments and you want to link one specific prepayment sum, then:
- press Prepayment
- prepayment list, that can be used, opens
- it is possible to enter manually or by double-clicking in the prepayment list field Selected the sum that is wanted to link to the purchase invoice.
- if there are multiple prepayments, you can choose which prepayment line to use. It is also possible to use several prepayments at once.
7. Questions
7.1. Confirming prepayment on purchase invoice gives error message
If you want to do a prepayment on purchase invoice to the supplier, prepayment is selected as payment term and E2 item on row, but error message appears on confirmation:

- To avoid error message set quantity 1 on purchase invoice prepayment item card by default.
