To jest stara wersja strony!
Spis treści

(po skompletowaniu usuń ten komentarz)
Rozliczanie wyniku finansowego
Rozliczanie wyniku finansowego służą do zamykania kont na koniec okresu finansowego, tj. resetowania sald początkowych. Można zamknąć zarówno konta rachunku zysków i strat, jak i konta bilansu. Transakcja zamknięcia jest tworzona z datą rozpoczęcia następnego okresu. Przykładowo: zamykając rok 2024 zaczynamy 01.01.2025. Transakcja zmienia saldo początkowe kont na dany dzień (okres).
Dzięki rozliczeniu wyniku finansowego możesz:
- zamknąć salda kont rachunku zysków i strat za zakończony rok obrotowy i przenieść zysk/stratę na konto zysków zatrzymanych
- zamknąć bilanse za zakończony rok obrotowy, np. salda kont VAT (patrz także przykład 6.2)
- dostosować salda początkowe kont według klienta, dostawcy lub obiektu
- transakcje środkowe nie są uwzględniane w raporcie księgi głównej
- transakcja środkowa to transakcja finansowa, która nie jest uwzględniana w kalkulacji obrotu, lecz zmienia saldo

Zamknięcie kont rachunku zysków i strat
Jeżeli wszystkie operacje roku obrotowego zostały zakończone, to aby zysk roku sprawozdawczego wyniósł 0 na początku kolejnego roku obrotowego w dniu 01.01.xx, należy zamknąć konta przychodów i wydatków w transakcji środkowej, a zysk roku sprawozdawczego poprzedniego roku obrotowego przenieść do rachunku zysków i strat poprzednich okresów.
Zamknięcie kont bilansowych (wszystkich lub wybranych)
Oprócz kont rachunku zysków i strat można zamknąć także konta bilansowe, np. konta do rozliczeń podatkowych (patrz też przykład 6.2).
Reorganizacja danych na kontach bilansowych
Aby uporządkować dane, można je przenosić pomiędzy różnymi metrykami na kontach
- obiekty
- dostawcy
- klienci
1. Middle transaction card
2. Middle transaction buttons
2.1. Header buttons
- New - opens a new, empty document. Pre-checks whether the previous document contains unsaved changes.
- Save – saves the document
- Confirm – confirms the document
- Copy - makes a copy of the document. This means that it opens a new document with most of the fields filled in as in the base document. The date is set to the date of copying. The number range is associated with the person making the copy.
- Discard - cancels the execution of the document without saving.
- Delete - allows you to delete an unconfirmed document.
- Mail - sends the printout by e-mail. If different printout formats have been configured, you have to click the Mail button with the right mouse button, which opens a drop-down menu from which you can choose different email designs. If you choose the printout form, you are first asked for your e-mail address, and only then can you choose the printout form.
- Print - prints the document. After clicking Print, a preview of the document is shown briefly and the printer selection window opens.
- Attachments - allows you to link files to the document, i.e. attach a related document.
2.2. Row buttons
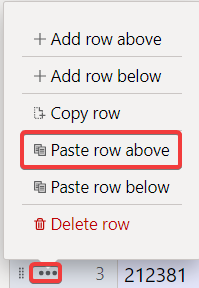
 - copies the selected rows to the clipboard (in the new design). To select rows, click on the row number. The button is inactive if no row is selected. Copied rows can be pasted under the line context menu (opens when right-clicking on the row number) with the „Paste row above” or „Paste row below” option.
New design
3. Middle transaction fields
3.1. Header fields
- Number - transaction number according to the selected financial range
- Date - time
- Object - selectable object
- Comment - a field for additional comments
- Company - specifying company selection (only on the basis of the group)
- Debit - debit turnover
- Credit - credit turnover
- Balance - the difference between debit and credit transactions
3.2. Row fields
- No. - row number
- Account - financial account
- Description - the account name (can be overwritten) and/or the comment box
- Debit - debit turnover
- Credit - credit turnover
- Object - selectable objects
- Project - selectable project
- Customer - customer code
- Supplier - supplier code
- Currency - the currency of the row
- Cur. Debit - debit currency
- Cur. Credit - credit currency
- Rate - the currency rate of the row. Placed automatically when placing the currency (if the currency and rate are available in the base). Allows you to set a „special rate” and calculates the ledger at a given rate. E.g. 1 EUR = 2 USD.
4. Instructions for closing the annual period
Finance > Documents > Middle Transactions
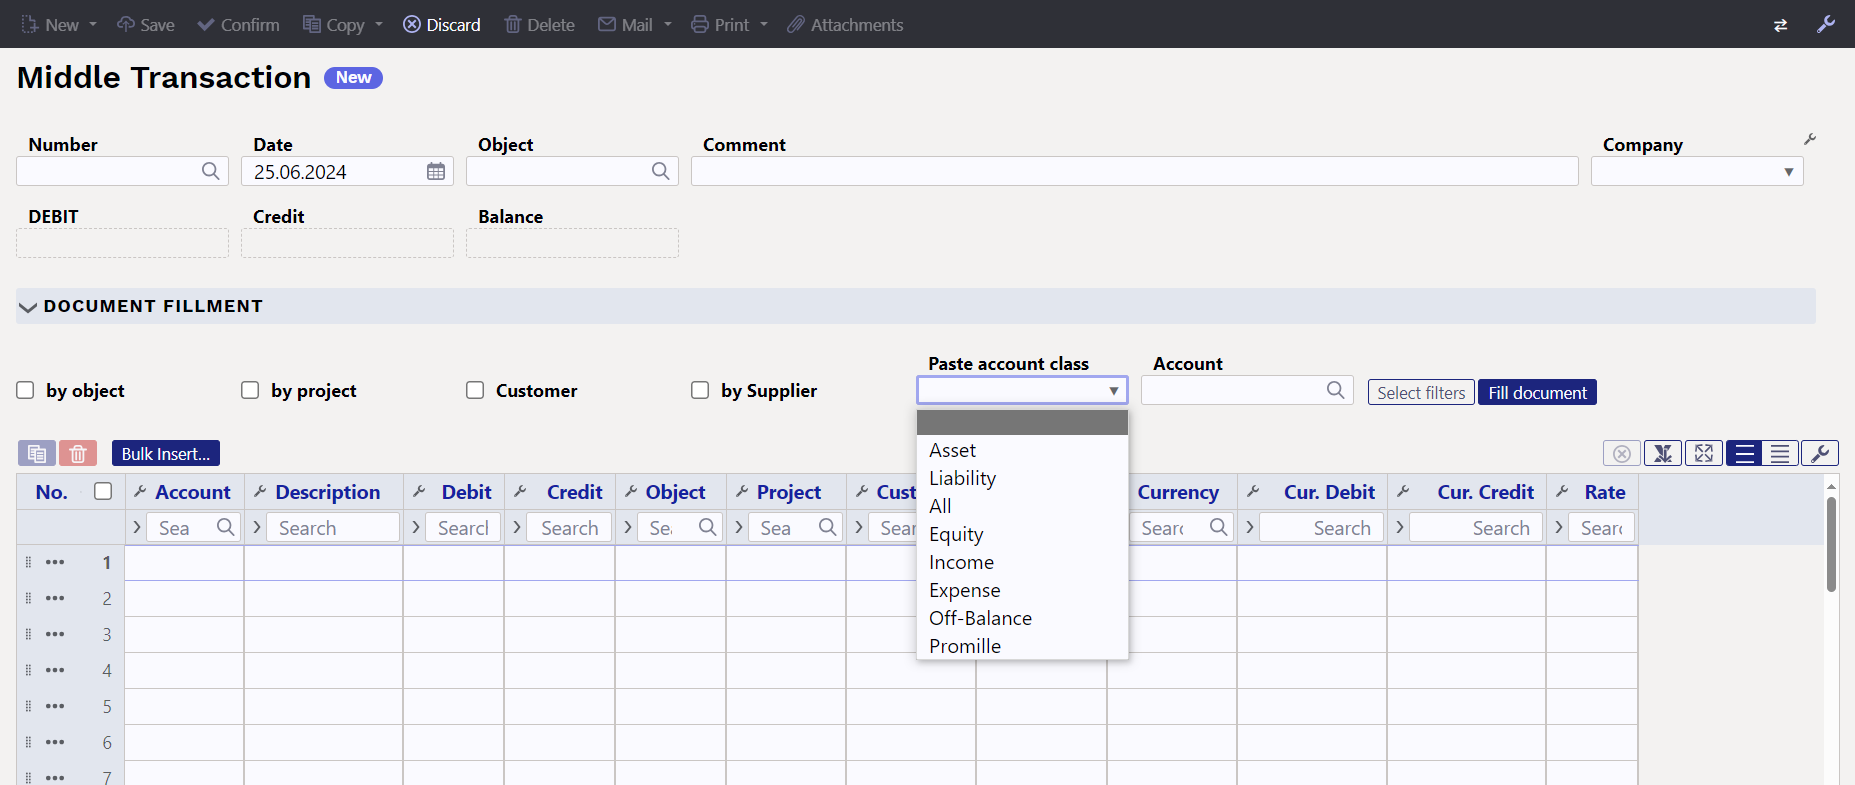
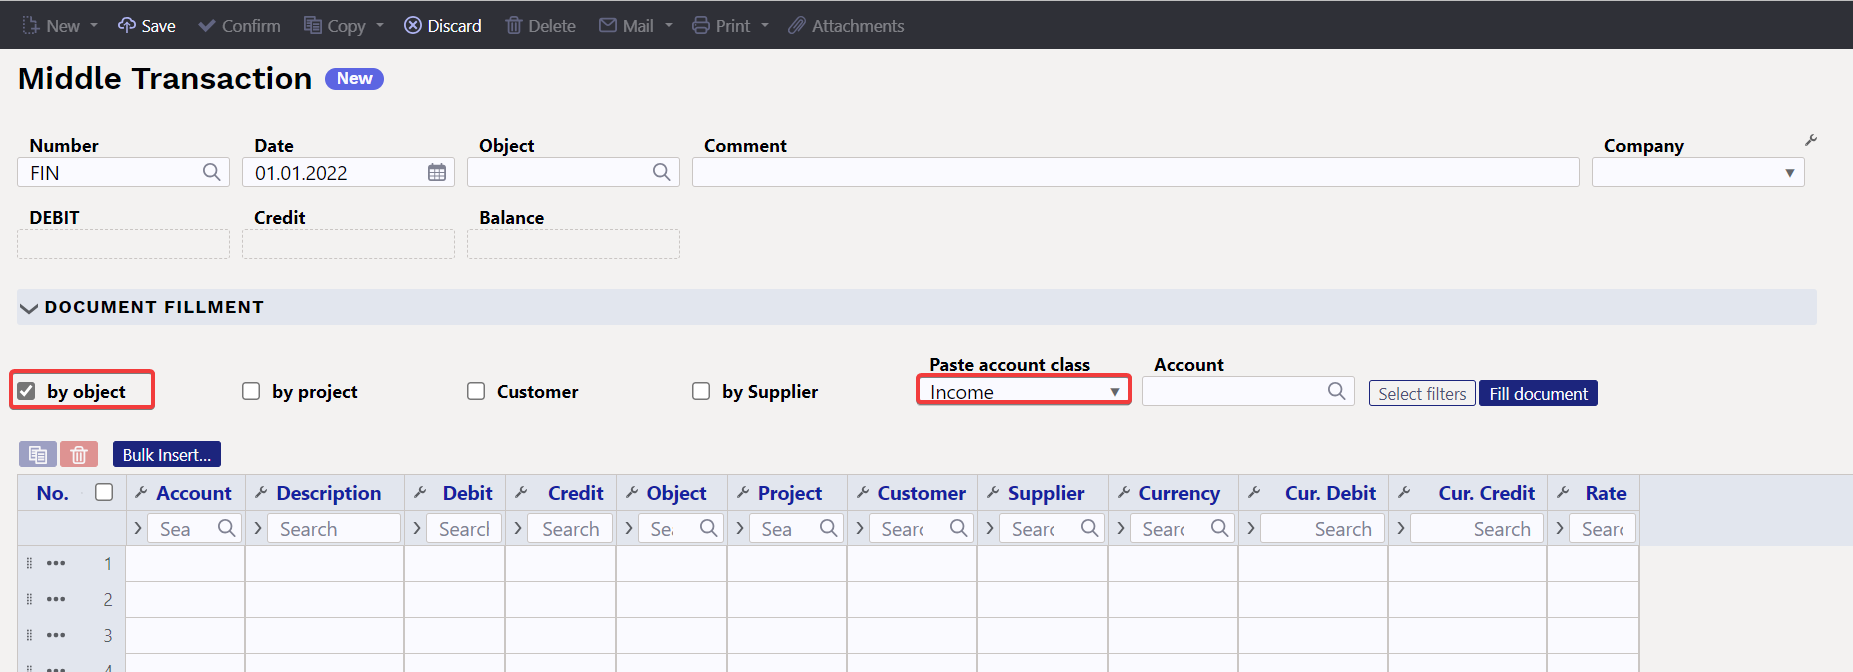
Add a new middle transaction with the  button, select a suitable range, set the time, i.e. 01.01. of the following year (date 1.1.2024 for closing the year 2023). NB! In the meantime, save the document. Then place the accounts on the transaction. To do this, first select income accounts from the selection.
The new and old design middle transaction document behave differently for placing account numbers, balances and descriptions on the transaction:
- New design - click the button „Fill document”
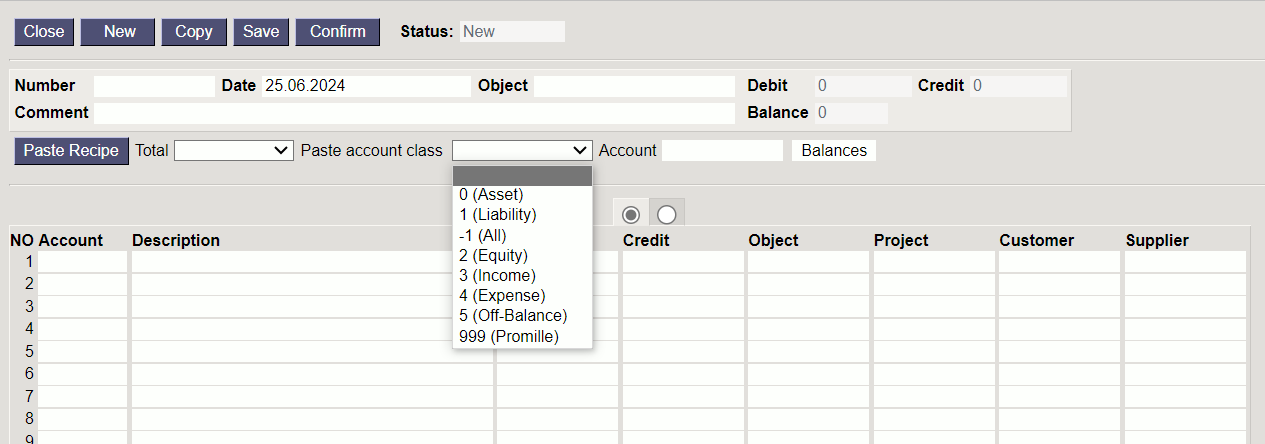
- Old design - first click on the „balances”, after which a window will appear where you can click „Fill up document”.
New design (the table does not appear, but the data is filled in immediately) 
The same procedure should also be done with expense accounts. To balance income and expense accounts, use the retained earnings account, which must be placed on the first free row of the document after entering the expense and income accounts. In the old design, double-clicking on the credit balances the transaction.
Other filters can also be used if necessary. With the Total option (old design), you can choose which account class is placed on the document using the row identifier of the transaction. You can place one specific account in the Account field, the balance of which you want to place in the document – for this, select the correct account in the Account field, and in the Paste account class field, choose either the account class of this account or all. Then Fill document. 
When balancing the middle transaction when closing the period of the previous year, manually add the account „Retained Earnings (Loss)„ (
5. Creating a middle transaction with bulk insert
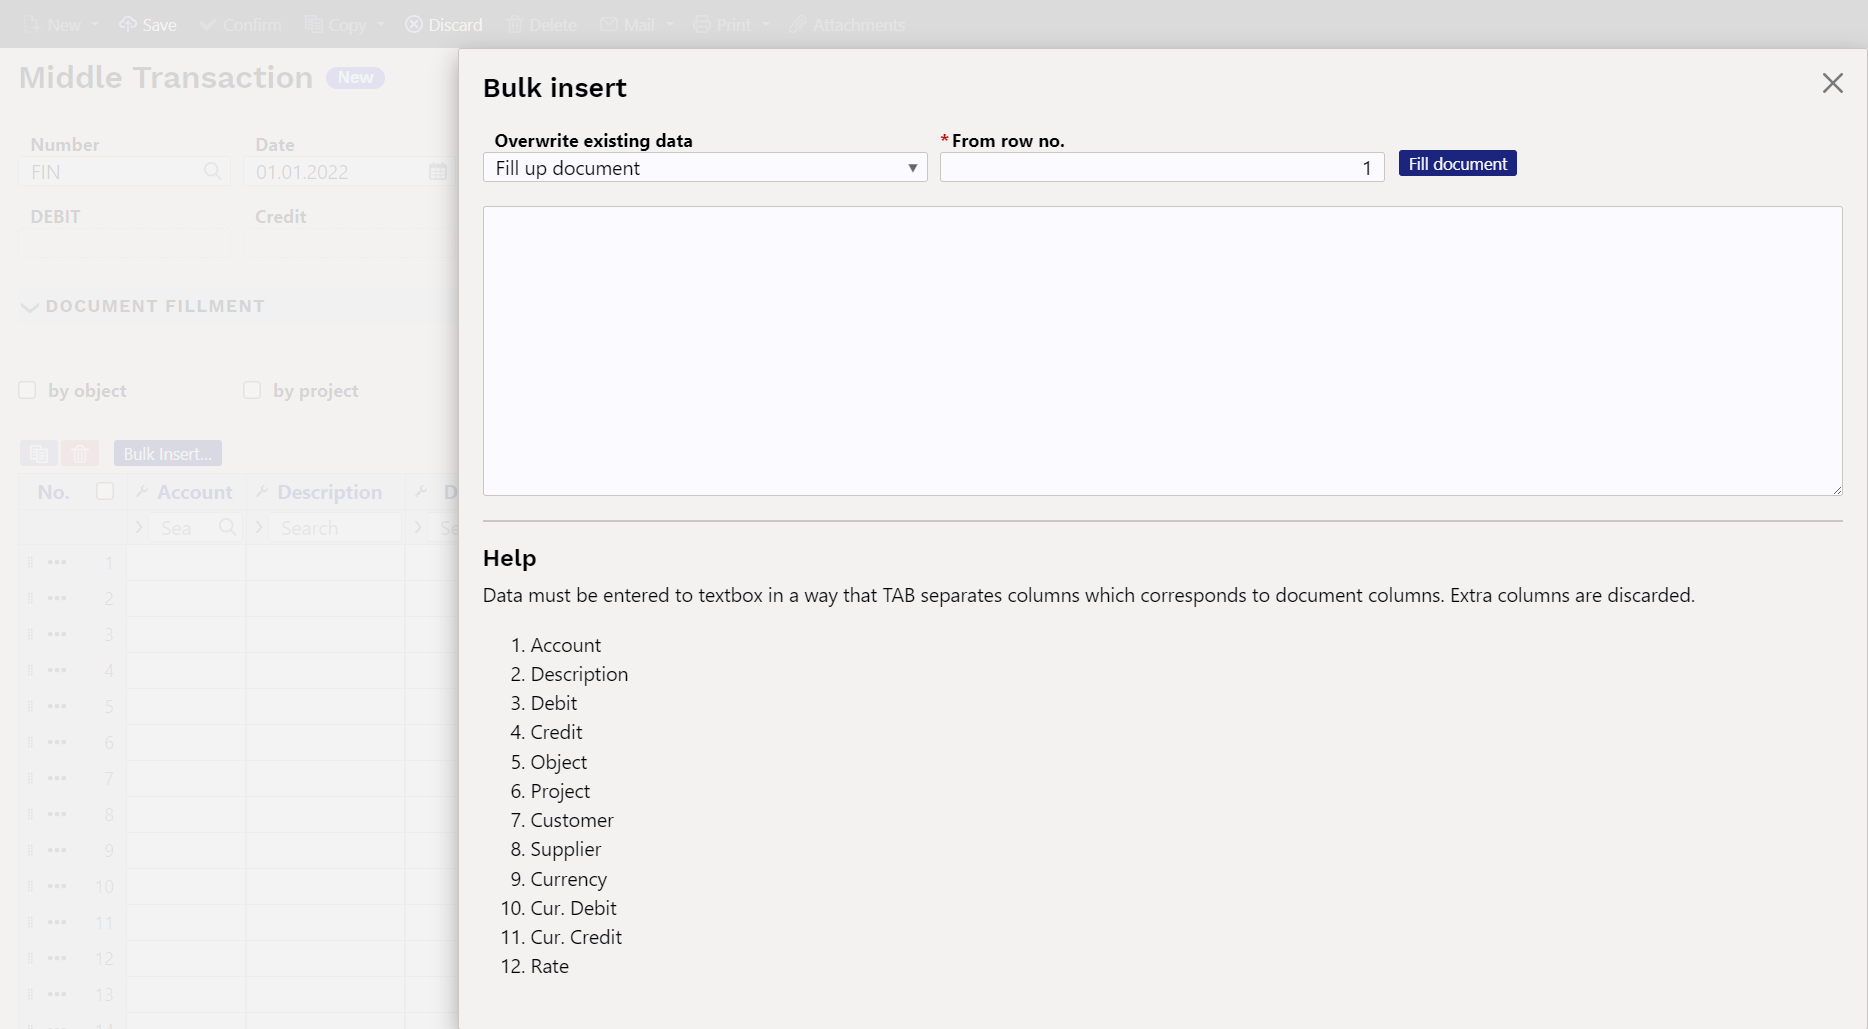
The „Bulk Insert” allows you to place rows on the document that have been previously prepared, for example, in Excel or some other format, which allows you to create a tab-limited result that can be copied to the memory buffer. Prepared row fields must be prepared in the order shown at the bottom of the bulk insert window. The prepared rows must be placed in the white textbox of the bulk insert using the copy-paste method.
Overwrite existing data - options can be used to influence how the data is placed on the document, if it is placed on the filled rows of the document.
- Fill up document - the rows added to the bulk insert textbox are placed on the document exactly as they are in the insert textbox. If placed on top of the existing rows of the document, all fields will be overwritten (if a field is left blank, the filled field will also be overwritten with the blank).
- Fill empty - only those fields that are empty on the rows of the document are filled when bulk inserting. The fields that are filled in the rows of the document are not changed.
- Replace filled - places the fields to be imported only on those document fields that are filled (no information is imported to empty document fields). If you import an empty field into a pre-filled field, it will be replaced by an empty field.
- Insert filled - places all the fields that are filled in the bulk insert table on the rows of the document (nothing is placed over the blank space).
From row no. - by default, the number of the first empty row of the document is filled here. If there is a desire to change or supplement the existing rows by bulk insert, the number of the document row from which you want to update the rows with the bulk insert must be written here.
6. Notes
- The middle transaction can also be saved as not in balance, but you have to make sure that all the middle transactions in one period are in balance, otherwise the balance will be out of place. See also example 6.2 (closing VAT accounts)
- Middle transactions can be made by several different account groups to make it easier to check.
- It must be ensured that all middle transactions for one period are in balance, otherwise the balance will be out of place.
- The middle transaction is valid immediately and does not need to be confirmed.
- If the middle transaction has been made, it is recommended to mark
Settings > System settings > Finance closed tillthe date from which transactions in an earlier period cannot be added/changed. - A middle transaction can be created without mandatory object-level completion, i.e. it is possible to create a middle transaction without objects even if the mandatory object levels are marked on the account.
7. Examples
7.1 Example - middle transaction by object
7.2 Example - posting of VAT accounts
At the end of the year, all VAT account balances are reset with a middle transaction, except for the amount that remains to be paid to the tax board for December 20.01, for which the financial transaction is made on 20.01. The amount must be left in the „VAT Paid to the Tax Office“ account. However, if at the turn of the year VAT remains to be paid in advance, then make the „Prepayments to the Tax Office – prepaid VAT“ account and transfer the prepayment to that account. See also the guide in the accountant manual with the subtitle “Posting of VAT accounts”, how to post VAT accounts monthly https://wiki.directo.ee/en/raamatupidaja_nipinurk#posting_of_vat_accounts

An example of making a middle transaction, where as of 31.12.XX there is a sum of VAT prepayment of 29 309.87.
Balance on 31.12.XX before making the middle transaction and preparation of the middle transaction: 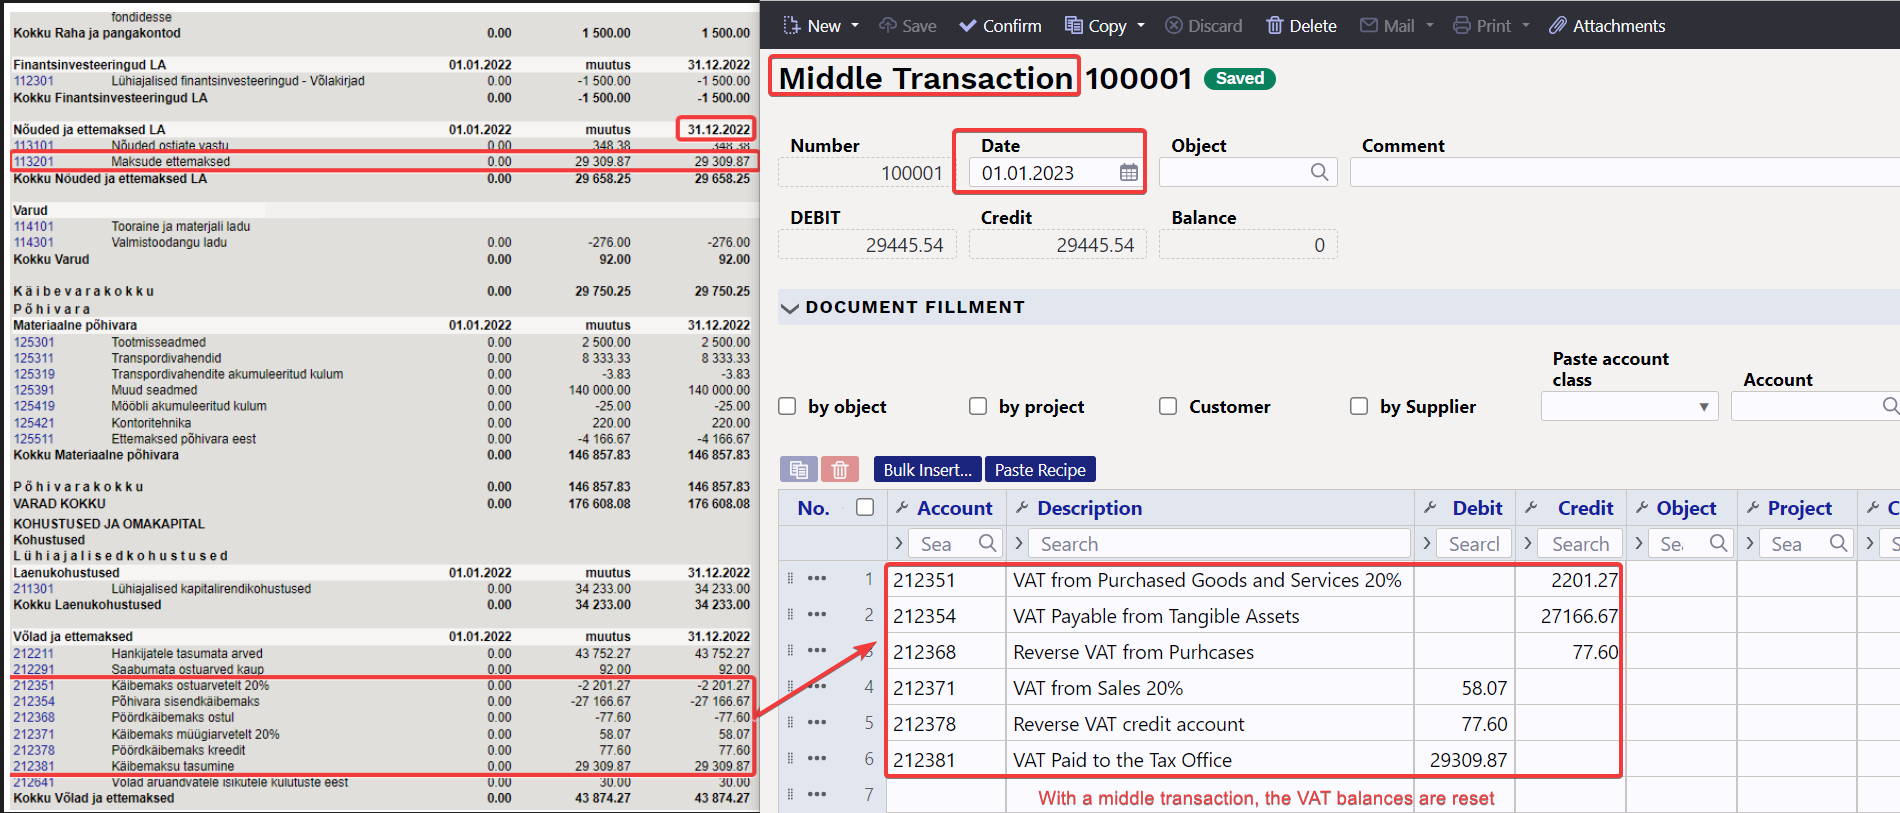
The closing balances of the nominal ledger as of 31.12.XX 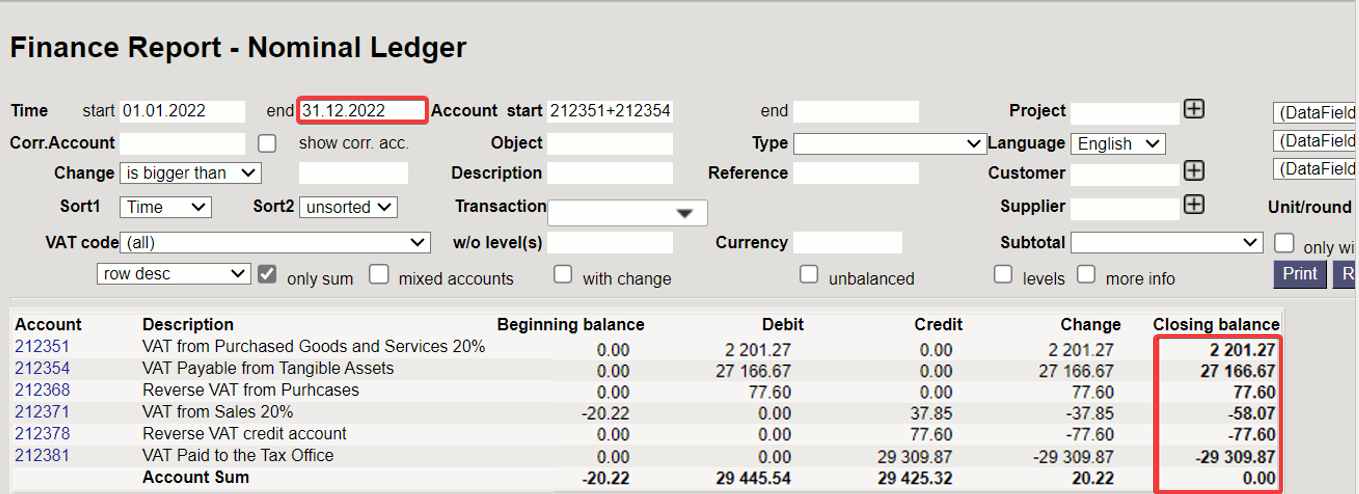
In the nominal ledger, beginning balances of the next period are reset as of 1.1.XX 


